Sunday, August 24, 2014

Security Corner: What is a Kerberos Keytab and why should you use it?

Background

Active Directory provides a Kerberos environment.  We have written extensively about Kerberos capabilities in this blog.  We also have explained that Centrify provides tight integration with Microsoft's Kerberos AD implementation by way of their MIT-Kerberos libraries and tools.  The advantage of using Centrify's tool set is that the tools are extensively tested against Microsoft's implementation.

A Kerberos key table (or "keytab") file is "is a file containing pairs of Kerberos principals and encrypted keys (these are derived from the Kerberos password)."(1).

Kerberos keytab files can help overcome two major issues:
  • The security requirement of not having plain-text passwords in scripts or helper files.
  • The increasing IT Infrastructure requirement for automation.  The proliferation elastic computing by way of private and public clouds requires that IT adds or reduces capacity on demand in a secure way.

Kerberos Keytabs 101

  • In a Kerberos environment, each system has at least one keytab table stored on disk.  The keytab table lists the service principals and provides at least one key for each of those service principals (/etc/krb5.keytab by default).  Remember that principals typically follow the "service@host/REALM" format.
  • End-users also have Kerberos files, but they are temporary (by default 10 hours), they are stored as a Kerberos cache file (by default /tmp/krb5cc_<uid of the user>), they list any user principals.
  • When working with a Centrified system, the location of the Centrify-enabled Kerberos tools is /etc/centrifydc/kerberos/bin.  
  • Quick primer on basic Kerberos tools:
    • kinit: is used to obtain a kerberos ticket-granting-ticket
    • klist: is used to list the cached tickets.
    • kdestroy: destroys kerberos tickets
  • The Centrify Kerberos tools documentation is publicly available here.
  • Keytabs are Sensitive/Confidential information: A Security Procedure needs to be established for the handling of keytabs, because whoever has the keytab can authenticate as the principal used to create it.  As a tip, this process should be viewed with the same sensitivity as the handling of private keys.

Using Kerberos Tools

Kerberos tools are great for troubleshooting purposes.
  1. Testing end-to-end AD connectivity and account availability with kinit (e.g. accunt jerry.seinfeld)
    # /usr/share/centrifydc/kerberos/bin/kinit jerry.seinfeld
    Password for jerry.seinfeld@CORP.CONTOSO.COM:

    You are prompted for the user's password.  The benefit of this test that it bypasses the NSS, PAM and authorization modules.  This means that any user in AD can be tested with kinit.
  2. Listing the contents of a keytab or cache file with klist
    1. For systems
      # /usr/share/centrifydc/kerberos/bin/klist -kt krb5.keytab
      Keytab name: FILE:krb5.keytab
      KVNO Timestamp         Principal
      ---- ----------------- ----------------------------------
      3 05/17/14 22:22:55 host/cen1@CORP.CONTOSO.COM

      Note: By default, during a system join (with adjoin) Centrify will automatically register service principals for  http ftp cifs nfs, this parameter is controlled by the adclient.krb5.service.principals directive of the centrifydc.conf file.
    2. For users (user root)
      /usr/share/centrifydc/kerberos/bin/klist
      Ticket cache: FILE:/tmp/krb5cc_0
      Default principal: jerry.seinfeld@CORP.CONTOSO.COM

      Valid starting     Expires            Service principal
      08/24/14 14:07:02  08/25/14 00:07:04  krbtgt/CORP.CONTOSO.COM@CORP.CONTOSO.COM
      renew until 08/25/14 14:07:02
      Notice that this is a Kerberos Ticket Granting Ticket (krbtgt).

Ticket-Granting-Tickets vs. Service Tickets

Depending on how the application is using the keytab, it's possible that it will request a ticket-granting ticket (TGT), or a service ticket.  Generally, a TGT is given upon a session log-in;  a service ticket is requested when a user attempts to access a service on the network.  The key here is that a principal without a servicePrincipalName (SPN) can't be used to request a service ticket.  This changes how the AD principal is created.

The example above shows how to request a TGT.  This example, shows how to test a keytab for a service ticket:
First, we check if the account has a servicePrincipalName (e.g. db2inst1)
$ adquery user -A db2inst1
dn:CN=db2inst1,CN=Service-Accounts,DC=centrifyimage,DC=vms
samAccountName:db2inst1
userPrincipalName:db2inst1@CENTRIFYIMAGE.VMS
servicePrincipalName:db2inst1/engcen5.centrifyimage.vms

Second, we attempt to get a service ticket (the keytab is db2inst1.keytab)
$ /usr/share/centrifydc/kerberos/bin/kinit -S db2inst1/engcen5.centrifyimage.vms -kt db2inst1.keytab db2inst1
[db2inst1@engcen5 ~]$ /usr/share/centrifydc/kerberos/bin/klist
Ticket cache: FILE:/tmp/krb5cc_1004
Default principal: db2inst1@CENTRIFYIMAGE.VMS

Valid starting     Expires            Service principal
11/24/14 11:24:46  11/24/14 21:24:47  db2inst1/engcen5.centrifyimage.vms@CENTRIFYIMAGE.VMS
        renew until 11/25/14 11:24:46
Notice that this is not a KRBTGT, but a service ticket.

Using Centrify Tools for Kerberos-related operations

adinfo (with the C option) can be used to review the system service principals, and encryption level. Remember that the latter is set by the domain controller functional level.
$ adinfo -C
Computer Account Diagnostics
  Joined as: cen1
  Trusted for Delegation: false
  Use DES Key Only: false
  Key Version: 6
  Service Principal Names: nfs/cen1.corp.contoso.com
                           nfs/cen1
                           ipp/cen1.corp.contoso.com
                           ipp/cen1
                           http/cen1.corp.contoso.com
                           http/cen1
                           host/cen1.corp.contoso.com
                           host/cen1
                           ftp/cen1.corp.contoso.com
                           ftp/cen1
                           cifs/cen1.corp.contoso.com
                           cifs/cen1
                           afpserver/cen1.corp.contoso.com
                           afpserver/cen1

Supported Encryption Type(s): RC4-HMAC
                              AES128-CTS-HMAC-SHA1-96
                              AES256-CTS-HMAC-SHA1-96

Operating System Version: 6.1:6.5 (Final)

Adkeytab

adkeytab, is arguably one the most powerful command line tools provided by Centrify.  When used in tandem with scripts and the Kerberos tools it can help to increase security and provide flexibility in automation scenarios.  It has the ability to provision, deprovision and modify server and user principals.  Aside from adedit, adkeytab contains the largest command reference.

adkeytab  -  create  and manage Kerberos key tables (*.keytab files)and coordinate changes with the  Kerberos  key  distribution center(KDC) provided by Active Directory.

I will try to highlight some benefits of using adkeytab:
  • It can be used to create or adopt AD principals:  adkeytab can create the user in AD for you, or in a separation of duties scenario, the UNIX/Linux admin can adopt the account provided he has the appropriate rights to modify the AD account.
  • It randomizes the AD account's password:  The major issue with service accounts it that they are considered a shared account since at least one person (the creator or the user) knows the password.  With adkeytab it's possible to randomize the password of the AD account, effectively minimizing the need for aggressive password rotation.
  • Can be fully automated:  adkeytab can be used with your scripts to perform operations.  This helps with elastic or private clouds.
  • It's Kerberized!  what that means is that you can use a keytab to use adkeytab - this is great for automation.
  • Syntax can be tricky - there are so many options that it can be overwhelming for beginners; my tips are to use the long for options (e.g. --adopt) and verbose output.
  • Fixes stale AD computer accounts:  It can be used to reset the machine computer account.  Just elevate to use the adkeytab command with the -C (--change-password).  The output below uses the local system's computer account (--machine) in AD to reset the computer's password in AD.
$ dzdo adkeytab --change-password --machine -V
Attempting bind to centrifyimage.vms site:Demo-Site server:dc.centrifyimage.vms: ccache:FILE:/etc/krb5.ccache
Bind successful to server dc.centrifyimage.vms
Searching for AD Object: filter = (samAccountName=engcen5$), root = DC=centrifyimage,DC=vms
AD Object found: CN=engcen5,OU=UNIX-Servers,OU=Unix,DC=centrifyimage,DC=vms
Key Version = 21
Changing account 'engcen5' password with machine credentials.
Searching for AD Object: filter = (samAccountName=engcen5$), root = DC=centrifyimage,DC=vms
AD Object found: CN=engcen5,OU=UNIX-Servers,OU=Unix,DC=centrifyimage,DC=vms
Key Version = 22
Success: Change Password: Default Key Tab

The posts below, cover scenarios that use Kerberos key table files:

(1) Source: Indiana University IT, https://kb.iu.edu/d/aumh

Monday, July 7, 2014

Labs: Securing Multi-protocol File Access (NFS/CIFS) on NAS (NetApp) Using Centrify and Windows Security Groups

Background

In the previous post, we discussed how to overcome identity limitations in NAS sharing scenarios.  In heterogeneous environments the main issue is about Identity - the filer is unable to consistently translate the Windows identity to a UNIX identity.  With Centrify Zones and the LDAP Proxy we solved the issue providing a unified identity consistently across Windows, Unix, Linux and Macs.

In Summary, here's what we accomplished:


The LDAP Proxy present's user information for the filer with consistency.  The UNIX information corresponds to what the AD user has in the Centrify Zone.

Now, we can let the NetApp filer do it's magic.  Let's look at a very simple example:

Testing Mixed Share Permissions

Set up the NetApp share
  1. Create a new qtree
    qtree create /vol/vol0/mixed
  2. Change the security model as mixed
    qtree security mixed
  3. Export the newly created qtree
    exportfs -p rw /vol/vol0/mixed
Create a New AD Security Group for the Mixed Share Access
  1. Open ADUC browse to an OU for groups
  2. Select New > Group
  3. Give it a name  (e.g. "Mixed-Share-Access")
  4. Add a test user to the newly created share.
Publish the share in Windows
    1. Open Computer Managemetnt
    2. Connect to your NetApp filer
    3. Navigate to System Tools > Shared folders
    4. Follow the wizard to create your share
    5. In the Share Permissions, remove Everyone and add your previously-created AD Group

Now you have:
  • A CIFS share that is a shared folder protected by a Security Group in AD.  Access is governed by group membership and the permissions on the share.  NTFS permissions will be assigned at file/folder creation based on the user's identity.
  • An NFS share that can be mounted from any Unix, Linux or Mac system;  UNIX file permissions will be assigned at folder/file creation based on the user's identity.  We'll leverage the NETGROUPS option with Centrify-exposed options to accomplish this.
Let's see this in action


Improvements

As outlined in the latter part of the video, there's definitely improvements that can be implemented:
  • On the NetApp side, Kerberos can be implemented for additional security.  Remember that Centrify already provides "hands-off" Kerberos environment optimized for Microsoft's Kerberos.
  • The AD Group used to control access can be UNIX-enabled, this opens the possibility of leveraging the group's UNIX identity as a group owner on the UNIX side.

Key benefits

  • Process consolidation - now a single AD group can be leveraged to control access.
  • Better Security - there's a better grasp on who has access to what.

Saturday, July 5, 2014

Business Problems: Conquering the NAS multiprotocol (CIFS/NFS) file sharing in a mixed (Unix, Linux, Windows, Mac) environment using Centrify

Background

Network Attached Storage (NAS) is a key part of any enterprise today; they provide flexibility and an abstraction layer from an infrastructure perspective.  In the heterogeneous enterprise, the easy part is the infrastructure piece;  the hard part has to do with the diversity of platforms and the multiple file-sharing protocols in use.  This post and a series of labs will illustrate how leveraging Active Directory, Centrify Zones, the Centrify agent for UNIX, Linux & Mac and the Centrify LDAP Proxy we can ensure consistency with multi-protocol CIFS/NFS shares and enhance operational efficiency.

In previous posts, we have addressed how to to solve the consistency issue individually:


This posts uses a NetApp filer as an example(*).  The concepts outlined here can be used on any NAS device that supports LDAP.  We will assume that you understand that the fundamental problem is how to solve the issue of identity across multiple platforms and how we accomplish that with the Centrify Agent and Active Directory (I highly recommend that you read the previous links).

The Issues (or variations of it)

  • We have a NAS device, we integrated it with AD and it works great as long as the user is performing file operations on Windows.  However, we have to keep separate NFS shares.  We also have to manage permissions in multiple groups (Windows or UNIX) and that takes a lot of effort.
    Note, in my example with NetApp, the appliance does a great job at discovering LDAP servers:

    netapp1> Sat Jul  5 11:26:52 EST [netapp1:auth.ldap.trace.LDAPConnection.statusMsg:info]: AUTH: TraceLDAPServer- AD LDAP server address discovery for CORP.CONTOSO.COM complete. 2 unique addresses found.

    However, although it can resolve the AD portion, it is plain wrong about the Unix UID:
  • We have a multi-protocol share (CIFS/NFS), everything is great on Windows, when the user wants to access their files over NFS he has to call to have the file/folder ownership taken care of
  • We are tired of having to resolve file ownership issues.  Our organization is globally very diverse and each time we have a new visitor we spend significant amount of time helping them get access.
  • We have a combination of Unix, Linux, Mac and Windows users and although we had it down in individual servers, when we moved to filers now we have all these new issues.
  • I have a filer in my environment and we have Centrify as well, I know it can help but I don't now where to start.

Example of one of the issues

Let's look at an example.  In my environment with a domain-joined Netapp the appliance does a great job at discovering LDAP servers (this happened once I searched for one of my users):

netapp1> Sat Jul  5 11:26:52 EST [netapp1:auth.ldap.trace.LDAPConnection.statusMsg:info]: AUTH: TraceLDAPServer- AD LDAP server address discovery for CORP.CONTOSO.COM complete. 2 unique addresses found.

netapp1> wcc -s george.constanza
(NT - UNIX) account name(s):  (CORP\george.constanza - pcuser)
        ***************
        UNIX uid = 65534

        NT membership
                CORP\george.constanza
                CORP\UNIX-Model-Samba Users
                CORP\UNIX-Model-All Users
                CORP\UNIX-Model-dbaadmin
                CORP\Domain Users
                CORP\UNIX-Model-Sysadmins
                CORP\UNIX-Model-webadmin
                CORP\UNIX-Model-All UNIX Groups
                BUILTIN\Users
        User is also a member of Everyone, Network Users,
        Authenticated Users
        ***************

This is great from a Windows perspective, however, look at the Unix UID (65534), when you look at the options, this means that the user is being assigned a "nobody" user from a UNIX perspective.  We can further confirm this with this command:

netapp1> wcc -u george.constanza
no passwd entry for george.constanza

The way I have my system configured, although I can derive the user's identity leveraging the DCs, I can't see the user's Unix identity.  It is stored in the zone. See the output from a centrified system:

george@ubu1:/etc/centrifydc/openldap$ adquery user george.constanza -A
unixname:george
uid:1149240406
gid:1149240406
gecos:George Constanza
home:/home/george
shell:/bin/bash
auditLevel:AuditIfPossible
isAlwaysPermitLogin:false
dn:CN=George Constanza,OU=Staff,DC=corp,DC=contoso,DC=com
samAccountName:george.constanza
displayName:George Constanza
sid:S-1-5-21-2180375406-786980114-1643973036-1110
userPrincipalName:george.constanza@corp.contoso.com
canonicalName:corp.contoso.com/Staff/George Constanza
passwordHash:x
accountExpires:Never
passwordExpires:Wed Aug 13 11:28:48 2014
passwordWillExpire:39
nextPasswordChange:Thu Jul  3 11:28:48 2014
lastPasswordChange:Wed Jul  2 11:28:48 2014
accountLocked:false
accountDisabled:false
zoneEnabled:true
unixGroups:dbaadmin,george,webadmin
memberOf:corp.contoso.com/UNIX/Provisioning/UNIX-Model-All UNIX Groups,corp.contoso.com/UNIX/Provisioning/UNIX-Model-All Users,corp.contoso.com/UNIX/RBAC/UNIX-Model-Samba Users,corp.contoso.com/UNIX/RBAC/UNIX-Model-Sysadmins,corp.contoso.com/UNIX/UNIX Groups/UNIX-Model-dbaadmin,corp.contoso.com/UNIX/UNIX Groups/UNIX-Model-webadmin,corp.contoso.com/Users/Domain Users

Our goal is to make sure that our filer (or application) gets the correct Identity information for the purposes of proper file/folder ownership, access and permissions.


Who's affected

As you can see, the variety of problems outlines have multiple constituents:
  • Security needs to make sure that users have access to what they need and to comply with policies
  • IT (business) need to make sure that users can do their jobs
  • IT (operations) wants to be efficient and make sure that an army of people is not needed
  • The End User just wants to get their job done
As with all Business Problems, we'll use the Plan, Do, Check, Adjust methodology.

Planning

As discussed in previous posts, the key to this issue is Identity.  In this case, the NAS appliance needs to know not only the user's AD information, but the extended attributes (RFC2307) like unixname, UID, GID, Home, GECOS, Shell, etc., and unlike other approaches, Centrify stores this information in the zone.  This makes the solution more flexible because an AD principal can have multiple Unix identities.

Note:  If you've read this blog, you know that I've been very vocal about overrides (what enables multiple identities and roles).  Every process needs to have constraints; constraints make solutions simpler.  Having a normalized UNIX namespace is the goal and destination of any enterprise, even if Centrify allows you to put off this goal.  

Identity and Access Planning
  1. Do the best you can to have a normalized namespace.  Leverage Centrify's ability to assign users a unique UID by generating it from the AD SID (using Centrify or Apple's Scheme).
  2. Perform a migration if necessary (this post talks about strategies and Centrify tools for that purpose)
  3. Leverage the power of hierarchical zones:  provision all identities at the top-most zone.  This will ensure that all pertinent systems will know the user's identities.
  4. Continue to enforce the least-access principle:  Use the "listed" role to make users known to the systems (e.g. the LDAP proxies) and ensure that they can't sign-in to the systems.
Planning your LDAP Proxies

The Centrify LDAP proxy leverages the Centrify client (adclient) to present AD information to clientless devices or programs.  The benefits of leveraging the proxy are:
  • It flattens AD for the application:  depending on the enterprise, AD can be complex.  There may be multiple forests, child domains, one-way, two-way trusts, etc.
  • It leverages the agent's built-in capabilities:  optimal DC selection, site-awareness and offline cache.
Plan for high-availability:  the NAS (or application) is going to require redundancy, plan to deploy and configure multiple proxies.
Plan for confidentiality:  make sure that only authenticated connections over secure transports (TLS, SSL, etc) in case your appliance or application does not do it natively.
Plan for high-performance:  As always, have NSCD on the Centrified system, and plan for co-location near the appliance, application and be close to Global Catalog servers in complex environments.

Plan for your file-sharing use case

This section varies based on what you want to accomplish.  Planning for home directories is not the same as planning for a workgroup share.  

Implement (Do)

  1. Unix-enable all your relevant users (you don't need to Unix-enable users that won't ever access via NFS).  You can do this manually, with ZPA or with your own IdM solution.   
  2. Assign roles as required:  keep the least-access principle intact by leveraging the "listed" role.
  3. Install the LDAP Proxy(es):
    1. Copy the Centrify LDAP proxy binaries to the platfrom.
      e.g. for Ubuntu on 2014:  centrifydc-ldapproxy-5.1.3-deb5-x86_64.deb
    2. Log in and install the package
      e.g. dpkg - i centrifydc-ldapproxy-5.1.3-deb5-x86_64.deb
      The LDAP proxy binary is on /usr/share/centrifydc/libexec
      The config files and schemas are in /etc/centrifydc/openldap
      The LDAP utilities (like ldapsearch)  are on /usr/share/centrifydc/bin
    3. Modify the RFC 2307 map
      1. Edit the /etc/centrifydc/openldap/rfc2307.map file
      2. Add the following line (for NetApp compatibility):
        # Added for NetApp
        posixAccount.userPassword: _userPassword
    4. For testing only, start slapd manually:
      dzdo /usr/share/centrifydc/libexec/slapd -f /etc/centrifydc/openldap/ldapproxy.slapd.conf -h ldap://ubu1.corp.contoso.com
    5. Check that the proxy is running
      $ ps -ef | grep slapd
      root     23192     1  0 Jul04 ?        00:00:00 ./slapd -f /etc/centrifydc/openldap/ldapproxy.slapd.conf -h ldap://ubu1.corp.contoso.com
    6. Verify that the proxy is responding to queries (e.g. check the Administrator account)
      $ /usr/share/centrifydc/bin/ldapsearch -h ubu1.corp.contoso.com-x -b "dc=corp,dc=contoso,dc=com" "(cn=Administrator)"
      # extended LDIF
      #
      # LDAPv3
      # base <dc=corp,dc=contoso,dc=com> with scope sub
      # filter: (cn=Administrator)
      # requesting: ALL
      # with pagedResults control: size=100
      #
      # Administrator, Users, corp.contoso.comdn: cn=Administrator,cn=Users,dc=corp,dc=contoso,dc=comaccountExpires: 0
      (output truncated***)
  4. Configure your NAS appliance (e.g. on NetApp Ontap v 8.1.2)
    1. Housekeeping:  Make sure that the name of the appliance is resolvable (add an A record for it) and that all Centrified systems, Windows Systems can resolve it.  The NetApp system should resolve all systems as well.  E.g.
      netapp1> ping ubu1
      ubu1.corp.contoso.com is alive
      netapp1> options dns
      dns.cache.enable             on
      dns.domainname               corp.contoso.com
      dns.enable                   on
      dns.update.enable            off
      dns.update.ttl               24h
    2. Housekeeping:  Make sure that CIFS and NFS are licensed, enabled and the NetApp filer is joined to the domain.  (use the license command, the cifs setup command )
    3. Verify that there's a computer object for the netapp device and that you can (as a Domain Admin) connect to it via Computer Management.  E.g. using ldapsearch:
      george@ubu1:/etc/centrifydc/openldap$ /usr/share/centrifydc/bin/ldapsearch -h
      ubu1.corp.contoso.com -x -b "dc=corp,dc=contoso,dc=com" "(cn=NETAPP1)"
      <truncated>
      # NETAPP1, Appliances, corp.contoso.com
      dn: cn=NETAPP1,ou=Appliances,dc=corp,dc=contoso,dc=com
      <truncated>
    4. Optional:  Make sure that Domain Administrators are not mapped to root the NetApp filer:
      netapp1> options wafl.nt_admin_priv_map_to_root off
    5. Configure NetApp to use the LDAP Proxy (Example corp.contoso.com;  ubu1)
      1. Set up the LDAP base container
        netapp1> options ldap.base dc=corp,dc=contoso,dc=com
      2. Set up the LDAP server(s) to be used by the NetApp appliance
        netapp1> options ldap.servers ubu1.corp.contoso.com
      3. Set up the name of the Active Directory Domain
        netapp1> options ldap.ADdomain corp.contoso.com
      4. Map the userPassword attribute to avoid null results
        netapp1> options ldap.nssmap.attribute.userPassword cn
      5. Enable LDAP
        netapp1> options ldap.enable on
      6. Modify the /etc/nsswitch.conf to make LDAP the first source for user, group and shadow entries.
        netapp1> wrfile /etc/nsswitch.conf
        hosts:  files  dns
        passwd:  ldap files
        group: ldap files
        netgroup:  files nis
        shadow:  files nis
      7. Verify the results
        1. Query and note the UID from Windows
          wcc -s jerry.seinfeld 
        2. Query and note the UID from UNIX
          wcc -u jerry.seinfeld
        3. Advanced query using NSS
          priv set diag
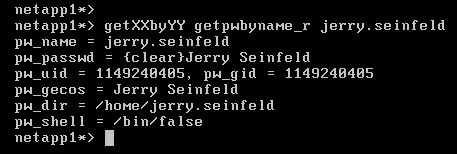
          getXXbyYY getpwbyname_r jerry.seinfeld


          Compare the results with the zone information.  At this point it should match the UNIX identity on Access Manager


Check the Results

To verify the results, use a multi-protocol (CIFS/NFS) share and make sure that the identity information is consistent.

  1. From a Windows system in the target domain, map or browse to the share via CIFS.  Create a file.
  2. From a Unix/Linux or Mac system, mount the share as an NFS mount and issue the ls -la and ls -lan.  Compare the results from before.

Adjustments to the Implementation

Adjustments are based on your existing environment, however, based on ours here are some key modifications:

  • There's only one LDAP proxy, we need several for high-availability
  • The LDAP Proxy is accepting anonymous connections, we need to make sure that only authenticated connections are accepted.
  • Ideally we would use Secure LDAP or implement TLS or IPSec for additional confidentiality controls.
  • Operations needs to monitor the health and status of the LDAP Proxies

Lab Videos


What you'll need to follow along:
  • Active Directory
  • Centrify Standard Edition
    • A Centrify zone
    • Client for Unix, Linux or Mac
    • Centrify's LDAP Proxy
  • A Multi-protocol filer (we'll use NetApp's  ONTAP Simulator)
Installing, Configuring and Testing the Centrify LDAP Proxy


Configuring the NetApp appliance to use the Centrify LDAP Proxy


Verifying the NetApp CIFS/NFS share provides consistent identities

Friday, July 4, 2014

Mac OS X Extras: Computer Certificate Auto-enrollment

Background

Digital Certificates have an important place in a properly managed enterprise.  From an infrastructure perspective, they can enhance authentication and provide encryption for Ethernet and Wifi Networks.
Centrify for Mac OS X has built-in capabilities to enable 802.1x authentication leveraging Group Policy but it does require that the computer has a digital certificate.

PKI Disclaimer:  As in all PKI-related posts and videos, I make the caveat that Public Key Infrastructure is no joke.  There are policy, people, process, security and technology implications to your enterprise, so all PKI deployments need to provide a high-level of assurance.  You may have landed here due to a google search or reference, feel free to use these posts for testing purposes, but again, when it comes to PKI, any production deployment should conform to best practices.

Centrify uses GPOs to configure computer or user-based 802.1x settings on the Mac OS X platform

Configuring Computer AutoEnrollment for Mac OS X

The Centrify adclient is capable of leveraging Windows certificate auto enrollment with the Microsoft CA. The basic steps are:

On the AD side (with a Domain or Cert Admin)
  1. Configure the certificate template based on your needs (using the Certificate Templates MMC)
    • Subject  (typically common name based on the User Principal Name)
    • Security (set it to an AD group containing your Mac Systems and check to Enroll and AutoEnroll)
    • Extensions (add what you need)
      If using it for 802.1x - usage should be Client and Server Authentication.
  2. Configure your CA to issue Certificates based on that template (using the Certificate Authority MMC)
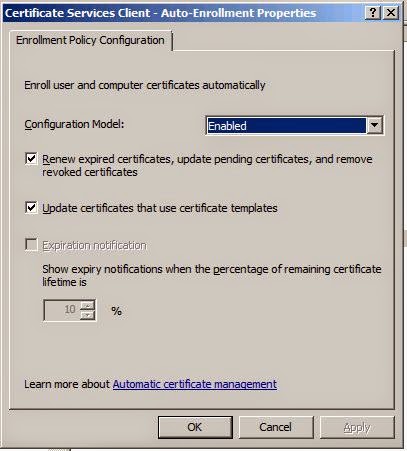
  3. Modify your GPO to enable the PKI policies for auto-enrollment
    Enabling the Computer Configuration > Windows Settings > Security Settings > Public Key Policies > "Certificate Services Client - Auto-Enrollment Settings" GPO

On the Mac (domain-joined)
  1. Flush the cache with adflush (or wait the cache flush interval)  [sudo adflush]
  2. Refresh the group policies (with adgpupdate) or wait for the GP refresh interval
  3. Verify the Certificates on the Keychain Access app.

Video Lab

Monday, June 30, 2014

Troubleshooting: How to Spot Configuration Issues

Configuration issues can be hard to find.  The issue could be as simple as a missing item, as challenging as an issue introduced during the troubleshooting process or as complex as a configuration item that was set up and conflicts with the current objective.

Spotting Identity Issues with Identities and Role Definitions and Assignments


The most common identity configuration issues have to do with:
About Identity Overrides
Identity overrides can be used to assign an AD user more than one Unix Identity.  Overrides can happen at the Zone, Child Zone or Computer Levels.  Although identity overrides showcase the flexibility of the Centrify approach to UNIX identity management, they are generally a very bad idea.  Overrides promote identity fragmentation within the solution and in specific use cases (like filers) can be a challenge.  Ultimately Identity overrides promote what's known as a Centralized mess.  Administration of identities is centralized in AD but the UNIX namespace is not rationalized.

Nonetheless, overrides can be good for: migrations while rationalizing a namespace, legacy systems, mergers and acquisitions between different UNIX environments and even one-offs.

Classic zones traditionally had used the nss.passwd.override parameter, this troubleshooting purposely ignores this parameter since classic zones are not covered in this blog.

Determining Identity Overrides
The agent will use the PAMGetUnixName call to determine the user's UNIX login name, the key items to remember here are:

a) Is this change effective?
b) Is this a system local override (bad idea)?  If it is, has the centrifydc daemon been restarted?

The best way to make sure that system local overrides are effective is to restart the agent.  This is the only identity-related time that the agent has to be stopped and started.  The behavior varies in the latest versions of the agent, but I'd do a restart to be sure.

Spotting Authorization Issues


For RBAC to work, roles have to be effective, properly created, properly assigned and properly scoped.
The most common authorization issues have to do with:
  • Misconfigured Role
  • None or missing rights in Role
  • Improperly defined roles (another topic)
  • Unassigned Roles
  • Poor or Wrong scoping
Role configuration issues

1. Role is time-bound: this happens when the role has a time restriction and the user complains that they can't log in at certain times.

2. Role is not configured properly (System Rights):   this is very common. A role is created and properly assigned, but the role creator forgets to set the attributes for the role.  This pic illustrates the main issues:

3. Audit is being enforced (required):  the end user can log in to systems with standard edition, but not enterprise edition.

4. Roles that do not contain any rights:  this is very common.  A role is properly set up and properly assigned, but the creator forgets to add the proper PAM login or commands.  From UNIX, you can run an elevated dzinfo on the target user that is having the issue with the role.

$ dzdo dzinfo yash
...
  PAM Application  Avail Source Roles
  ---------------  ----- --------------------


Privileged commands:
  Name             Avail Command               Source Roles
  ---------------  ----- --------------------  --------------------
  (yash has no privileged command rights)

This excerpt of dzinfo indicates an empty role (no PAM or privileged commands); a role needs at least a PAM right to allow the asignee of the role to log in.  You can also verify this on Access Manager by clicking on the role in the left pane and looking at the detail in the right pane.

5. Unassigned Roles

The RBAC cadence in Access Manager is as follows:
  1. Create the PAM rights and Commands
  2. Create and configure the role
  3. Assign the rights to the role
  4. Assign the role to an AD principal (preferably a group) at the correct scope  (zone, child zone, computer role or computer (override))
  5. Populate the group and make sure the user's have UNIX identities in the zone.
Unfortunately a lot of end users think that by performing steps 1 to 3, the role is already assigned and to make matters worse, the design may make matters harder or easier to troubleshoot.  My recommendation is:
  • Identities are assigned at the highest levels with overrides used as a last resort.
  • Role assignments are performed at the computer role or child zone (with high-level roles assigned for a very small set of trusted administrators)
  • Very rarely use system overrides.
The tools available to perform high-level troubleshooting are:

a) The user's effective rights utility of Access Manager:
Do not attempt to troubleshoot at the system level if things don't look correctly here (it may be a time issue). 

b) The dzinfo command
c) The Centrify Report Center

6.  Role assigned, but expired

With Centrify, UNIX (or Windows) roles can be assigned during a specific window of time (break/fix, change control, etc).  An expired role can stop the user from logging in or performing admin duties.


Bottom-line, understanding why you're doing what you're doing is crucial, along with a configuration that makes sense.

Tuesday, June 24, 2014

Utilities: addebug

Background

The addebug command is used to use the log feature of the Centrify client for UNIX, Linux and Mac OS X.  Logs written to /var/log/centrifydc.log, however in HP-UX the location is /var/admin/syslog.  Only turn on debugging if you're troubleshooting a problem and you'll have to elevate (with sudo or dzdo) to use addebug and review the log.

Location

The utility is located in the /usr/share/centrifydc/bin folder.

Basic Usage
  • Use /usr/share/centrifydc/bin/addebug on to start debugging
  • Use /usr/share/centrifydc/bin/addebug off to stop debugging 
  • Use /usr/share/centrifydc/bin/addebug clear to clear the logs
For more information, read the manual page for addebug  (man addebug).

What to look for

Modules
Centrify  implements directory lookups with Name Server Switch (NSS) and Pluggable Authentication Modules (PAM) for authentication, this means that you need to become familiar with some of  these calls:
  • NSS calls:  These are name server switch function calls.  For example (oversimplifying) an application may use a call to determine the user's UID from the login name.  These calls start with "NSS".
  • PAM calls:  These function calls implement the account, authentication, session and password modules that are implemented with the solution. These calls start with "pam_"
File Descriptors
FDs identity the transactions, they make it easy for the log reader to follow the same transaction.  They are labeled with "fd:nn"  (nn is the descriptor number).  

Keywords, Phrases and Functions
During the troubleshooting process, you'll become familiar with several keywords that will help you determine what happened during the transaction.  For example, here are a few:
  • pam_sm_authenticate:  search for this call to determine the beginning of PAM authentications.
  • "User is ours" / "User is not ours":  This phrase appears in a file descriptor when the function PAMUserIsOurResponsibility determines that the user is indeed an AD user that needs to be processed or not.

Monday, June 23, 2014

Troubleshooting: Ruling-out issues with the user's AD Account

Verifying that the user's AD account is OK

To verify that the user's account is OK you'll need access to any of these tools:

  • Active Directory Users and Computers
  • Centrify Access Manager
  • The Unix/Linux command line of a Centrified system

You MUST know how provisioning happens in your organization.  Otherwise you're trying to troubleshoot something that you DON'T understand.  How smart is that?

What you're looking for to rule out issues with the AD account

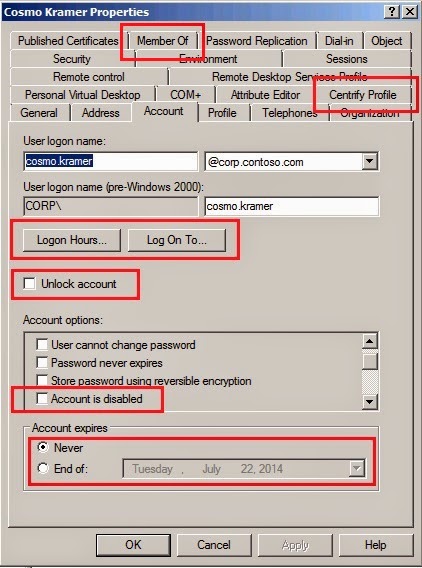
The user account has to be enabled, not locked, not expired, if it has restrictions (logon hours/logon to) those must make sense, they need a Unix Identity (login, uid, gid, etc.) and to belong to the right group if you are granting roles based on group membership.

From Windows with Active Directory Users and Computers

The account tab of the AD user contains most of the relevant info.


The Centirfy Profile tab can expose the user's UNIX identities.

Finally, the "member of" tab can expose the groups the user belongs to.  If any of the groups is used for the purposes of role-based access.  I know to look in here because I understand the process.


From Windows using Centrify Access Manager 

Determining if the user has an identity

Under the Zone/Unix Data/Users node, you can see a list of users.  Double-click the user to see the identity. If the user is not on the list, you may be facing time issues or provisioning issues.

Determining if the user has a role
The "Show Effective UNIX rights" utility is the best tool to determine who has access to which system and at which level.  Just right lick the zone or system and select the function.


From Unix/Linux using CLI tools
You can use the adquery user <user> with the -A switch.  Depending on how it is run, it may produce different results.  If elevated (with dzdo in this case) provides all the information required about the account.
This output tells me that the user has a Unix Identity (because unixname, uid, gid, etc are present), the account is neither expired nor locked, and judging from the output of dzinfo, the user does have a role that allows him to log in and even some privileged commands.

Compare with this output. Here I deprovisioned the user, note the output of a simple adquery user <user> that states that the user is not a zone user.  In this case the user is missing the UNIX identity, so we used the AD user logon name to get the information about the user with the -A switch.
This looks like a good AD account that does not have a Unix Identity. 

Let's put all this together in this video:


Using Switch User (su) or Kerberos tools
If you have a privileged account, switch user (su) can be used to isolate a particular application (like SSH) from a troubleshooting situation.  Assuming the user does have an identity and a role, but can't log in via SSH, you can try to elevate.

george@cen1 ~]$ dzdo su cosmo
AD Password:
Created home directory
[cosmo@cen1 george]$ id
uid=1149240408(cosmo) gid=1149240408(cosmo) groups=1149240408(cosmo),10024(webadmin) context=unconfined_u:unconfined_r:unconfined_t:s0-s0:c0.c1023
[cosmo@cen1 george]$

In this sequence, George elevated with Centrify sudo to switch to Kramer. If Kramer is having issues with SSH login, this eliminates his Centrify identity and role from the troubleshooting table.

If you want to take things further and eliminate both the logon application (that may use PAM) and NSS and test the AD account directly, you can use kinit and klist from  /usr/share/centrifydc/kerberos/bin.

[george@cen1 ~]$ /usr/share/centrifydc/kerberos/bin/kinit cosmo.kramer
Password for cosmo.kramer@CORP.CONTOSO.COM:
[george@cen1 ~]$ /usr/share/centrifydc/kerberos/bin/klist
Ticket cache: FILE:/tmp/krb5cc_cdc1149240406_EINhqm
Default principal: cosmo.kramer@CORP.CONTOSO.COM

Valid starting     Expires            Service principal
06/22/14 14:11:36  06/23/14 00:11:40  krbtgt/CORP.CONTOSO.COM@CORP.CONTOSO.COM
        renew until 06/23/14 14:11:36

I would argue that using kinit/klist are the fastest way to determine if any AD account (if the credentials are known) is working correctly. It also ensures that the communication path between the Centrify agent and AD is working as expected. Notice that I did not use the user's unix name (cosmo) but their AD account (cosmo.kramer).

In the next posting, we'll continue our troubleshooting and will look at what happens in the logs.