Showing posts with label Public Key Infrastructure. Show all posts

Monday, September 12, 2016

Enabling Centrify Identity Service and Privilege Service for Smart Card Authentication

Background
Many governmental and commercial organizations have implemented smart cards as their preferred method for Multi-factor Authentication.  This post explains how to configure Centrify Identity Service (CIS) or Centrify Privilege Service (CPS) to provide authentication using Smart Cards.  This article provides the configuration steps to enable Smartcard (certificate)-based authentication for CIS or CPS.

How it works
Generally, cryptographic credentials (user certificates) are stored in the smart card (PIV or CAC card) and the system has a dedicated reader.   Upon successful authentication (credentials verified and PIN submitted) the operating system or application will use a standard protocol (like Kerberos) or a one-time-code to grant access to the system or application.

For example, Centrify Server Suite allows the user of Kerberos for SSO to applications like Secure Shell (SSH).  Our DirectAuthorize can enforce if the user is allowed to log in with a password or with Kerberos/GSSAPI only.

In the case of Identity Service and Privilege Service, we use a Centrify capability called Zero Sign-on (SZO).  SZO provides a one-time token to use for authentication if the Authentication Profile that applies to the user is configured for Certificate-based Authentication.  All the user needs to do is navigate to the CIS/CPS site, select the smart card certificate and PIN.
pki-cis-cps.png
This setup provides strong authentication to access Apps or for Privileged Identity Management scenarios.

What you'll need:
  1. An instance of Centrify Identity Service App+ or Privilege Service  (CPS can be SaaS or On-Prem)
  2. Public Key Infrastructure Infrastructure  (Enterprise CA, Revocation Infrastructure, well-configured PKI clients) and understanding of how the subject name is being provisioned.
  3. A copy of the Certificate Chain (or Root CA) for your PKI infrastructure.
  4. A SmartCard or Yubikey configured for authentication into your environment.
    This post contains instructions to set up a lab. See "Lab - Base Setup"
Strong Disclaimer:  This is a PKI-related topic.  You should always be workign with your PKI SME with anything related to certificates, trust chains, revocations, etc.

Configuration Overview
The configuration depends on the deployment option of the service.
  1. Configuring the Root CA in Identity Service App+ or Privilege Service
  2. Configuring a Policy that allows for Integrated Windows Authentication
  3. Testing the configuration
  4. Appendix:  Configure Privilege Service On-Premises CNAME and Zero Sign-on SSL Certificate
Configuring the Root CA in Identity Service App+ or Privilege Service (SaaS)
  1. Sign-in to Cloud Manager
  2. Go to Settings > Authentication > Certificate Authorities
    Note:  If you can't see the Certificate Authorities option, you're not running the App+ edition or in the case of Privilege Service on-premises, you have to perform the activation steps (see below).
  3. Press Add and complete the follwing information:
    add-ca.png
    Name:  descriptive name of the CA
    Extract login name from:  The options are
    a) Principal Name from Subject Alternate Name
    b) E-mail address field from Subject Alternate Name
    c) Username from Subject
  4. Click Browse and select the location of the root ca certificate.
  5. If you are confident that you have a highly-distributed (Internal & Internet facing) Certificate revocation infrastructure, check the "Enable Client Certificate Revocation Check" if you are not sure un-check the box for now.
    Note:  If you don't know what PKI certificate revocation is, it's time to find your in-house PKI expert and get him or her involved.  This is a serious topic.
  6. Press Save
Configuring a Policy that allows for Integrated Windows Authentication
  1. Sign-in to Cloud Manager
  2. Go to Policies > [Select your Test Policy] > Expand User Security Policies > Login Authentication
  3. Set the "Enable authentication policy controls" setting to Yes, if not selected.
  4. Scroll down to "Other Settings" and make sure that the "Allow IWA connections..." is checked.  Then note the following:
    Note: Certificate-based authentication bypasses the login authentication rules set up for that profile.  The key settings are:
    cert-options.png
    The first setting "Use certificates for authentication..." is the main switch.  If you un-check this box, the users in scope for this policy won't be able to use smart cards for authentication.  This bypasses any controls set under "Login Authentication" in the preceding section.
    The second setting  "Set identity cookie..."  controls whether the cookie is set for the browser.   I would not set this flag if you expect users to access via non-managed systems.
    The third setting "Accept connections using certificate..." defines whether if users logging in with smart cards or certs are treated as "strongly-authenticated"

    Make your selections based on your desired security posture.
  5. Press Save.

Testing your configuration
  1.  Navigate to your Identity Service or Privilege Service URL
  2. Depending if your browser is configured correctly, you'll see any of the following pop-ups will come up:
    cert-challenge.png
  3. After selecting the Certificate on the Smart Card, you'll be prompted for the PIN:
    pin-cert.png
  4. Once you type-in the PIN, you'll be redirected to the appropriate portal (User | Cloud Manager | Privilege Manager).

Quick Setup Video


Appendix 1:  Enabling Certificate Authorities for Centrify Privilege Service (On-Premises)
Background:  Centrify Privilege Service can be deployed on premises on a Windows Server 2012 R2 system.  You need a CNAME record for the Zero Sign-On website and a x.509 certificate with that DNS name.

Pre-requisite tasks:
a) Set-up a DNS CNAME record to with the name hostname[zso].domain.name pointing to the hostname.domain.name.  E.g. if your system name is app1.corp.contoso.com, create a CNAME record to app1zso.corp.contoso.com and point it to the original host name.
b) You need an SSL Certificate with the DNSname for the SZO special host.

  1. Log in to the server hosting Centrify Privilege Service
  2. Open an Administrative PowerShell and navigate to %Programfiles%\Centrify\Centrify Identity Platform\Scripts
  3. Run the setup_certauth.ps1 script.   The program will ask if the pre-requisites have been met.
    setup_certhauth.png
  4. Confirm and you'll be prompted to provide the x.509 (SSL) cert for the SZO site.
  5. Once completed, you can return to Cloud Manager and perform the steps outlined above in the:  "Configuring the Root CA in Identity Service App+ or Privilege Service (SaaS)" section.

Other Resources and Related Topics
Documentation:  https://stage-docs.centrify.com/en/centrify/adminref/index.html?version=141#page/cloudhelp%2FCloud_Policy.13.html
Centrify's support for Derived Credentials: 
- Blog: https://www.centrify.com/products/identity-service/emm/derived-credentials/

- Docs:  https://docs.centrify.com/en/centrify/adminref/index.html?version=141#page/cloudhelp%2FderivedCreds.html

This article was originally written as a Centrify Tech Blog.

Friday, February 13, 2015

Mac OS X Extras: Using Centrify and your Windows Infrastructure to provide 802.1x EAP-TLS to Mac OS X Systems

Background

Secure access to Wifi or Ethernet networks is a goal of any security conscious IT infrastructure team, however diversity of platforms makes this goal very hard to achieve, especially when organizations are looking to standardize but have diverse client platforms.

In a Windows world, capabilities such as Active Directory Certificate Services, Group Policies, the Network Policy Service and Windows clients make this goal relatively simple.  The popularity of Mac Workstations has forced many organizations to face this challenge.

The good news is that Centrify has worked very hard to make sure that IT Infrastructure folks can leverage their existing Windows infrastructure to solve this challenge on the macs.
The challenge for any technical lead is that the expertise required just to meet the prerequisites is going to be scattered all over the organization; this means that it's time to flex the ability to coordinate and get people to work together.  Hopefully this post provides a lot of clarity.

How easy is it to implement?

It is as easy as enabling one of the Centrify-provided GPOs for Mac OS X.  Specifically the "Computer Configuration > Policies > Centrify Settings > Mac OS X Settings > 802.1x Settings" and you can pick your flavor:
  • Enable Machine Ethernet Profile
  • Enable Machine Wi-Fi Profile
  • Enable User Ethernet Profile
  • Enable User Wi-Fi Profile
However, this entry would not be useful if I just show you that you can enable the GPO, perform a policy refresh and just like magic: network access.

What I've noticed from prospects or customers that are looking to test these capabilities is that they don't understand all the moving pieces that need to be in place in order for this to work. 

In this post we'll use a checklist to make sure that you understand what needs to be in place to be successful.  

Note:  If you already have 802.1x EAP-TLS running with your Windows infrastructure today, you are very well-positioned for success.

Pre-Requisites

Building Blocks

Active Directory and Windows Services:  There are several ways to accomplish this goal, but in this particular instance, because our goal is to consolidate processes, knowledge and infrastructure, we are leveraging Windows capabilities like Active Directory, AD Certificate Services and the Network Policy Service.  AD Groups will be key to provide access controls;  OUs will determine the scope of GPOs to be used.

Public Key Infrastructure:  PKI is needed to provide the encryption, non-repudiation and authentication between the back-end infrastructure (Active Directory) and the client (Ethernet or Wifi).  The key here is the certificate life-cycle management, this is where Windows PKI uses Group Policy.
PKI Disclaimer:  PKI is not joke.  Any proper implementation needs to provide the assurances that PKI is aligned with your security policy.  If your organization does not have a policy for PKI (general assurances, handling of private keys, policies, templates,  Root and SubCAs) consult an expert.

A Policy/Configuration Management Engine:  Group Policy provides the rules and the enforcement for configuration items and even provides certificate auto-enrollment - a way to manage the certificate lifecycle (issuance, renewal, revocation, etc); in addition, GPOs will be the way that Centrify will provide the Apple profile information.

Network Policy Service: The NPS service on Windows provides the services like Remote Authentication Dial-in User Service (RADIUS) and the policy rules to enable 802.1x.  The NPS Service interacts with Active Directory to leverage groups and attributes.

802.1x-Capable Network Devices:  Any modern switch or access point supports 802.1x EAP and RADIUS.

Centrify Agent for Mac OS X:  This use case showcases the power of the Centrify agent.  Not only it leverages its ability to integrate with AD, but to use advanced services and perform this cohesively within the MacOS platform.  Key capabilities:  Certificate Auto-Enrollment, System Profiles, GPO Engine.

The Lab

  • For AD and PKI:  Modified Microsoft Test Lab Guide:  Provides the corp.contoso.com domain with a running Microsoft CA.  The RootCA (corp-DC1-CA) certificates are deployed using GPOs.
    Translation:  A common Certificate Authorithy with the proper Certificate Revocation publication methods needs to be provisioned. I did not set APP1 as a SubCA.
  • For RADIUS and Policies:  I'm piggybacking on my APP2 Windows 2012 server
  • Network Devices:  I'm using Cisco small business (300 series) switch and a TPLink (TL-WA90x) Wireless Access Point.
  • Mac Client:  Old Macbook running 10.7 and Centrify 5.2.1

Basic Checklist
OS X System is Centrified
Centrify agent is connected  (run adinfo -m)

PKI Checklist
All Systems have a Root CA in their trust chain?
The Network Policy Server has a computer certificate?
A proper 802.1x certificate template was set up for Mac Systems?
The Mac Auto-Enrollment GPO has been properly deployed?
Was the computer Certificate on the Mac based on the proper template?

You may need to look in the CA's Issued Certificates.
With PKI it's all about consistency.  All systems trust the Enterprise CA; All Certs are Issued by the CA or SubCAs and Programs (like NPS) are using the same trust chain.


NPS/Network Device Checklist
RADIUS clients have been set up properly on the NPS Server
RADIUS servers are properly configured on the network devices
Is there connectivity between RADIUS clients and servers?

Connection Request Policies are set up appropriately (Conditions/Settings)
Network Policies are set up to Allow access based on Conditions
Clients Meet the Conditions
Any conditions added (like AD group membership) must be met in order to have successful connections.
For example, if you're using a condition in which your Mac has to belong to a group called "Mac Workstations 802.1x" you can use the 'adquery user -A computername$ | grep MemberOf'  command to enumerate the AD groups that the computer belongs to

$ adquery user rpmacbook$ -A | grep memberOf
memberOf:corp.contoso.com/Mac/Corporate/Mac Workstations 802.1x,corp.contoso.com/Users/Domain Computers

802.1x Mac Group Policy
Is the Mac System Wifi-capable?
Wifi SSID is correct?
Template Name is correct?
The template Display Name may be different than the template Name
Has the policy been refreshed?  (adgpupdate - remember replication!)
System Preferences > System > Profiles contains payload?

Connected?


Video Playlist

Sunday, September 21, 2014

Utilities: adcert - a UNIX/Linux/Mac Microsoft CA PKI client

Background

Public Key Infrastructure (PKI) is the key building block for many IT capabilities and has been around for a long time.  It is poorly understood.  Let's start by defining some key terms:

PKI - Public key infrastructure (or standard x.509) defines the infrastructure, policies and usage of digital certificates.

Digital Certificate - a digital file pair that allows us to implement capabilities like
  • confidentiality - making sure data stays secret (at rest and in transit) 
  • integrity - making sure a message has not been tampered with in transit
  • non-repudiation - making sure that a party is who they say they are

Certification Authority:  A trusted computer that governs the policies, issuance, revocation and workflow of digital certificate operations.  There are Root CAs, Intermediate CAs, and Registration Authorities.  These roles (although NOT recommended) can be satisfied by a single system.

Certificate Policies:  Define how a certificates is going to be used, issued, revoked, etc.
Certificate Revocation:  When a certificate is revoked (e.g.  user is disabled, or the computer role changes, certificate expires or is replaced), the revocation protocol is used.  The legacy protocol is certificate revocation lists (CRLs), this has been replaced by the Online Certificate Status Protocol (OSCP).

PKI is all about the Trust Model and the standard as of how certificates are going to be handled.  My advice is that standing a CA in an enterprise is a process that should not be taken lightly.  The technology is the easy part.

For a great blog on PKI from the Microsoft PKI experts, go here:  http://www.css-security.com/category/public-key-infrastructure/

Challenge:  Managing the Lifecycle

Once a PKI infrastructure is established, in a Windows environment the lifecycle of issuing, revoking, renewing and provisioning certificates is very simple:  It can be done via self-service or with workflow, but we'll focus on the automatic method - using Group Policies.

It's all about simplicity:  The group policy client will check if either the user or computer needs a certificate, the PKI client will do the rest.  If a computer belongs to an OU that has a GPO for PKI certificates, there's a usable certificate template and the right permissions are in place, the certificate will be issued and provisioned to the computer.  Depending the policy, a few weeks before the certificate is revoked, the certificate will be renewed.

We already outlined these steps with the Mac platform.

adcert:  Centrify's hidden gem

For any PKI expert, adcert is a gem.  Why?  The variability of UNIX and Linux platforms and the evolution of them have not produced several basic standards as of how certain things are going to be done.  Since Centrify focuses in maximizing the investment in Active Directory with the Centrify Suite the answer is simple:  Use the Microsoft CA.

adcert is an Active Directory PKI client that works on Unix, Linux and Macs.  It also can be combined with Group Policies so the lifecycle can be managed the same way as in Windows.

adcert must be run as root and it exists in /usr/share/centrifydc/sbin.  Certificates (CRLs,  are placed in the /var/centrify/net/certs folder.
Some key switches:

-e  enroll certificates for this computer
-u <user>  - retrieve the certificates for the user.  In UNIX/Linux user GPOs are not enabled by default.
-m retrieve certificates for the computer. There has to be a usable certificate.

Example - to enroll the computer-based certificates for a computer:

$ dzdo /usr/share/centrifydc/sbin/adcert -e -m -V
Certificate AutoEnrollment for suse1$@CORP.CONTOSO.COM in domain CORP.CONTOSO.COM
Retrieved 17 templates with client or server authentication
Check template Administrator
Check template Centrify-Autoenroll
Check template Centrify-Autoenroll-Macs
    autoenrollment is allowed
Check template ClientAuth
Check template DomainController
Check template DomainControllerAuthentication
Check template KerberosAuthentication
Check template MacAutoenroll
    autoenrollment is allowed
Check template Machine
Check template OfflineRouter
Check template RASAndIASServer
Check template SmartcardLogon
Check template SmartcardUser
Check template User
Check template UserSignature
Check template WebServer
Check template Workstation
2 templates found with autoenrollment set
Checking certificate template Centrify-Autoenroll-Macs ...
    certificate and private key exist on computer
    revision (100) matches value in template
    expiration is Mon Sep 21 13:00:58 2015 GMT
    certificate public key matches private key
    No OCSP url in AIA section of certificate.
    ocsp operation not performed
    certificate is valid
Checking certificate template MacAutoenroll ...
No issuing CA found for template MacAutoenroll.
No CA's found for all templates requiring new/updated certificates: [MacAutoenroll].
1/1 templates requiring a new certificate could not have one issued.

The only usable template is the one I set up for Mac Autoenrollment in a previous lab.  The contents of the /var/centrify/net/certs shows:

$ ls -l
total 12
-r--r--r-- 1 root root 2069 2014-09-21 09:10 auto_Centrify-Autoenroll-Macs.cert
-r--r--r-- 1 root root 3357 2014-09-21 09:10 auto_Centrify-Autoenroll-Macs.chain
-r-------- 1 root root 1671 2014-09-21 09:10 auto_Centrify-Autoenroll-Macs.key
dzdo cat auto_Centrify-Autoenroll-Macs.cert
-----BEGIN CERTIFICATE-----
MIIFyjCCBLKgAwIBAgIKIiSOLwAAAAAAHDANBgkqhkiG9w0BAQUFADBaMRMwEQYK
CZImiZPyLGQBGRYDY29tMRcwFQYKCZImiZPyLGQBGRYHY29udG9zbzEUMBIGCgmS
JomT8ixkARkWBGNvcnAxFDASBgNVBAMTC2NvcnAtREMxLUNBMB4XDTE0MDkyMTEz
MDA1OFoXDTE1MDkyMTEzMDA1OFowITEfMB0GA1UEAxMWc3VzZTEuY29ycC5jb250
b3NvLmNvbTCCASIwDQYJKoZIhvcNAQEBBQADggEPADCCAQoCggEBANCZDHWJaHKR

Understanding the benefits

The key here is process consolidation and cost savings, especially for internal certs.  The Microsoft root CA is trusted by all domain-joined computers, this means that Unix, Linux and Mac computers can easily participate in getting their own SSL, 802.1x, Code Signing and other types of certs;  all with a single infrastructure and consolidated process.  That is power.

Video - Using adcert (5:18)


Friday, July 4, 2014

Mac OS X Extras: Computer Certificate Auto-enrollment

Background

Digital Certificates have an important place in a properly managed enterprise.  From an infrastructure perspective, they can enhance authentication and provide encryption for Ethernet and Wifi Networks.
Centrify for Mac OS X has built-in capabilities to enable 802.1x authentication leveraging Group Policy but it does require that the computer has a digital certificate.

PKI Disclaimer:  As in all PKI-related posts and videos, I make the caveat that Public Key Infrastructure is no joke.  There are policy, people, process, security and technology implications to your enterprise, so all PKI deployments need to provide a high-level of assurance.  You may have landed here due to a google search or reference, feel free to use these posts for testing purposes, but again, when it comes to PKI, any production deployment should conform to best practices.

Centrify uses GPOs to configure computer or user-based 802.1x settings on the Mac OS X platform

Configuring Computer AutoEnrollment for Mac OS X

The Centrify adclient is capable of leveraging Windows certificate auto enrollment with the Microsoft CA. The basic steps are:

On the AD side (with a Domain or Cert Admin)
  1. Configure the certificate template based on your needs (using the Certificate Templates MMC)
    • Subject  (typically common name based on the User Principal Name)
    • Security (set it to an AD group containing your Mac Systems and check to Enroll and AutoEnroll)
    • Extensions (add what you need)
      If using it for 802.1x - usage should be Client and Server Authentication.
  2. Configure your CA to issue Certificates based on that template (using the Certificate Authority MMC)
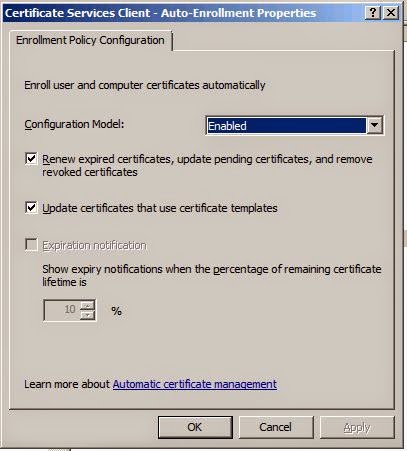
  3. Modify your GPO to enable the PKI policies for auto-enrollment
    Enabling the Computer Configuration > Windows Settings > Security Settings > Public Key Policies > "Certificate Services Client - Auto-Enrollment Settings" GPO

On the Mac (domain-joined)
  1. Flush the cache with adflush (or wait the cache flush interval)  [sudo adflush]
  2. Refresh the group policies (with adgpupdate) or wait for the GP refresh interval
  3. Verify the Certificates on the Keychain Access app.

Video Lab