Showing posts sorted by relevance for query unix-enable. Sort by date Show all posts

Saturday, July 5, 2014

Business Problems: Conquering the NAS multiprotocol (CIFS/NFS) file sharing in a mixed (Unix, Linux, Windows, Mac) environment using Centrify

Background

Network Attached Storage (NAS) is a key part of any enterprise today; they provide flexibility and an abstraction layer from an infrastructure perspective.  In the heterogeneous enterprise, the easy part is the infrastructure piece;  the hard part has to do with the diversity of platforms and the multiple file-sharing protocols in use.  This post and a series of labs will illustrate how leveraging Active Directory, Centrify Zones, the Centrify agent for UNIX, Linux & Mac and the Centrify LDAP Proxy we can ensure consistency with multi-protocol CIFS/NFS shares and enhance operational efficiency.

In previous posts, we have addressed how to to solve the consistency issue individually:


This posts uses a NetApp filer as an example(*).  The concepts outlined here can be used on any NAS device that supports LDAP.  We will assume that you understand that the fundamental problem is how to solve the issue of identity across multiple platforms and how we accomplish that with the Centrify Agent and Active Directory (I highly recommend that you read the previous links).

The Issues (or variations of it)

  • We have a NAS device, we integrated it with AD and it works great as long as the user is performing file operations on Windows.  However, we have to keep separate NFS shares.  We also have to manage permissions in multiple groups (Windows or UNIX) and that takes a lot of effort.
    Note, in my example with NetApp, the appliance does a great job at discovering LDAP servers:

    netapp1> Sat Jul  5 11:26:52 EST [netapp1:auth.ldap.trace.LDAPConnection.statusMsg:info]: AUTH: TraceLDAPServer- AD LDAP server address discovery for CORP.CONTOSO.COM complete. 2 unique addresses found.

    However, although it can resolve the AD portion, it is plain wrong about the Unix UID:
  • We have a multi-protocol share (CIFS/NFS), everything is great on Windows, when the user wants to access their files over NFS he has to call to have the file/folder ownership taken care of
  • We are tired of having to resolve file ownership issues.  Our organization is globally very diverse and each time we have a new visitor we spend significant amount of time helping them get access.
  • We have a combination of Unix, Linux, Mac and Windows users and although we had it down in individual servers, when we moved to filers now we have all these new issues.
  • I have a filer in my environment and we have Centrify as well, I know it can help but I don't now where to start.

Example of one of the issues

Let's look at an example.  In my environment with a domain-joined Netapp the appliance does a great job at discovering LDAP servers (this happened once I searched for one of my users):

netapp1> Sat Jul  5 11:26:52 EST [netapp1:auth.ldap.trace.LDAPConnection.statusMsg:info]: AUTH: TraceLDAPServer- AD LDAP server address discovery for CORP.CONTOSO.COM complete. 2 unique addresses found.

netapp1> wcc -s george.constanza
(NT - UNIX) account name(s):  (CORP\george.constanza - pcuser)
        ***************
        UNIX uid = 65534

        NT membership
                CORP\george.constanza
                CORP\UNIX-Model-Samba Users
                CORP\UNIX-Model-All Users
                CORP\UNIX-Model-dbaadmin
                CORP\Domain Users
                CORP\UNIX-Model-Sysadmins
                CORP\UNIX-Model-webadmin
                CORP\UNIX-Model-All UNIX Groups
                BUILTIN\Users
        User is also a member of Everyone, Network Users,
        Authenticated Users
        ***************

This is great from a Windows perspective, however, look at the Unix UID (65534), when you look at the options, this means that the user is being assigned a "nobody" user from a UNIX perspective.  We can further confirm this with this command:

netapp1> wcc -u george.constanza
no passwd entry for george.constanza

The way I have my system configured, although I can derive the user's identity leveraging the DCs, I can't see the user's Unix identity.  It is stored in the zone. See the output from a centrified system:

george@ubu1:/etc/centrifydc/openldap$ adquery user george.constanza -A
unixname:george
uid:1149240406
gid:1149240406
gecos:George Constanza
home:/home/george
shell:/bin/bash
auditLevel:AuditIfPossible
isAlwaysPermitLogin:false
dn:CN=George Constanza,OU=Staff,DC=corp,DC=contoso,DC=com
samAccountName:george.constanza
displayName:George Constanza
sid:S-1-5-21-2180375406-786980114-1643973036-1110
userPrincipalName:george.constanza@corp.contoso.com
canonicalName:corp.contoso.com/Staff/George Constanza
passwordHash:x
accountExpires:Never
passwordExpires:Wed Aug 13 11:28:48 2014
passwordWillExpire:39
nextPasswordChange:Thu Jul  3 11:28:48 2014
lastPasswordChange:Wed Jul  2 11:28:48 2014
accountLocked:false
accountDisabled:false
zoneEnabled:true
unixGroups:dbaadmin,george,webadmin
memberOf:corp.contoso.com/UNIX/Provisioning/UNIX-Model-All UNIX Groups,corp.contoso.com/UNIX/Provisioning/UNIX-Model-All Users,corp.contoso.com/UNIX/RBAC/UNIX-Model-Samba Users,corp.contoso.com/UNIX/RBAC/UNIX-Model-Sysadmins,corp.contoso.com/UNIX/UNIX Groups/UNIX-Model-dbaadmin,corp.contoso.com/UNIX/UNIX Groups/UNIX-Model-webadmin,corp.contoso.com/Users/Domain Users

Our goal is to make sure that our filer (or application) gets the correct Identity information for the purposes of proper file/folder ownership, access and permissions.


Who's affected

As you can see, the variety of problems outlines have multiple constituents:
  • Security needs to make sure that users have access to what they need and to comply with policies
  • IT (business) need to make sure that users can do their jobs
  • IT (operations) wants to be efficient and make sure that an army of people is not needed
  • The End User just wants to get their job done
As with all Business Problems, we'll use the Plan, Do, Check, Adjust methodology.

Planning

As discussed in previous posts, the key to this issue is Identity.  In this case, the NAS appliance needs to know not only the user's AD information, but the extended attributes (RFC2307) like unixname, UID, GID, Home, GECOS, Shell, etc., and unlike other approaches, Centrify stores this information in the zone.  This makes the solution more flexible because an AD principal can have multiple Unix identities.

Note:  If you've read this blog, you know that I've been very vocal about overrides (what enables multiple identities and roles).  Every process needs to have constraints; constraints make solutions simpler.  Having a normalized UNIX namespace is the goal and destination of any enterprise, even if Centrify allows you to put off this goal.  

Identity and Access Planning
  1. Do the best you can to have a normalized namespace.  Leverage Centrify's ability to assign users a unique UID by generating it from the AD SID (using Centrify or Apple's Scheme).
  2. Perform a migration if necessary (this post talks about strategies and Centrify tools for that purpose)
  3. Leverage the power of hierarchical zones:  provision all identities at the top-most zone.  This will ensure that all pertinent systems will know the user's identities.
  4. Continue to enforce the least-access principle:  Use the "listed" role to make users known to the systems (e.g. the LDAP proxies) and ensure that they can't sign-in to the systems.
Planning your LDAP Proxies

The Centrify LDAP proxy leverages the Centrify client (adclient) to present AD information to clientless devices or programs.  The benefits of leveraging the proxy are:
  • It flattens AD for the application:  depending on the enterprise, AD can be complex.  There may be multiple forests, child domains, one-way, two-way trusts, etc.
  • It leverages the agent's built-in capabilities:  optimal DC selection, site-awareness and offline cache.
Plan for high-availability:  the NAS (or application) is going to require redundancy, plan to deploy and configure multiple proxies.
Plan for confidentiality:  make sure that only authenticated connections over secure transports (TLS, SSL, etc) in case your appliance or application does not do it natively.
Plan for high-performance:  As always, have NSCD on the Centrified system, and plan for co-location near the appliance, application and be close to Global Catalog servers in complex environments.

Plan for your file-sharing use case

This section varies based on what you want to accomplish.  Planning for home directories is not the same as planning for a workgroup share.  

Implement (Do)

  1. Unix-enable all your relevant users (you don't need to Unix-enable users that won't ever access via NFS).  You can do this manually, with ZPA or with your own IdM solution.   
  2. Assign roles as required:  keep the least-access principle intact by leveraging the "listed" role.
  3. Install the LDAP Proxy(es):
    1. Copy the Centrify LDAP proxy binaries to the platfrom.
      e.g. for Ubuntu on 2014:  centrifydc-ldapproxy-5.1.3-deb5-x86_64.deb
    2. Log in and install the package
      e.g. dpkg - i centrifydc-ldapproxy-5.1.3-deb5-x86_64.deb
      The LDAP proxy binary is on /usr/share/centrifydc/libexec
      The config files and schemas are in /etc/centrifydc/openldap
      The LDAP utilities (like ldapsearch)  are on /usr/share/centrifydc/bin
    3. Modify the RFC 2307 map
      1. Edit the /etc/centrifydc/openldap/rfc2307.map file
      2. Add the following line (for NetApp compatibility):
        # Added for NetApp
        posixAccount.userPassword: _userPassword
    4. For testing only, start slapd manually:
      dzdo /usr/share/centrifydc/libexec/slapd -f /etc/centrifydc/openldap/ldapproxy.slapd.conf -h ldap://ubu1.corp.contoso.com
    5. Check that the proxy is running
      $ ps -ef | grep slapd
      root     23192     1  0 Jul04 ?        00:00:00 ./slapd -f /etc/centrifydc/openldap/ldapproxy.slapd.conf -h ldap://ubu1.corp.contoso.com
    6. Verify that the proxy is responding to queries (e.g. check the Administrator account)
      $ /usr/share/centrifydc/bin/ldapsearch -h ubu1.corp.contoso.com-x -b "dc=corp,dc=contoso,dc=com" "(cn=Administrator)"
      # extended LDIF
      #
      # LDAPv3
      # base <dc=corp,dc=contoso,dc=com> with scope sub
      # filter: (cn=Administrator)
      # requesting: ALL
      # with pagedResults control: size=100
      #
      # Administrator, Users, corp.contoso.comdn: cn=Administrator,cn=Users,dc=corp,dc=contoso,dc=comaccountExpires: 0
      (output truncated***)
  4. Configure your NAS appliance (e.g. on NetApp Ontap v 8.1.2)
    1. Housekeeping:  Make sure that the name of the appliance is resolvable (add an A record for it) and that all Centrified systems, Windows Systems can resolve it.  The NetApp system should resolve all systems as well.  E.g.
      netapp1> ping ubu1
      ubu1.corp.contoso.com is alive
      netapp1> options dns
      dns.cache.enable             on
      dns.domainname               corp.contoso.com
      dns.enable                   on
      dns.update.enable            off
      dns.update.ttl               24h
    2. Housekeeping:  Make sure that CIFS and NFS are licensed, enabled and the NetApp filer is joined to the domain.  (use the license command, the cifs setup command )
    3. Verify that there's a computer object for the netapp device and that you can (as a Domain Admin) connect to it via Computer Management.  E.g. using ldapsearch:
      george@ubu1:/etc/centrifydc/openldap$ /usr/share/centrifydc/bin/ldapsearch -h
      ubu1.corp.contoso.com -x -b "dc=corp,dc=contoso,dc=com" "(cn=NETAPP1)"
      <truncated>
      # NETAPP1, Appliances, corp.contoso.com
      dn: cn=NETAPP1,ou=Appliances,dc=corp,dc=contoso,dc=com
      <truncated>
    4. Optional:  Make sure that Domain Administrators are not mapped to root the NetApp filer:
      netapp1> options wafl.nt_admin_priv_map_to_root off
    5. Configure NetApp to use the LDAP Proxy (Example corp.contoso.com;  ubu1)
      1. Set up the LDAP base container
        netapp1> options ldap.base dc=corp,dc=contoso,dc=com
      2. Set up the LDAP server(s) to be used by the NetApp appliance
        netapp1> options ldap.servers ubu1.corp.contoso.com
      3. Set up the name of the Active Directory Domain
        netapp1> options ldap.ADdomain corp.contoso.com
      4. Map the userPassword attribute to avoid null results
        netapp1> options ldap.nssmap.attribute.userPassword cn
      5. Enable LDAP
        netapp1> options ldap.enable on
      6. Modify the /etc/nsswitch.conf to make LDAP the first source for user, group and shadow entries.
        netapp1> wrfile /etc/nsswitch.conf
        hosts:  files  dns
        passwd:  ldap files
        group: ldap files
        netgroup:  files nis
        shadow:  files nis
      7. Verify the results
        1. Query and note the UID from Windows
          wcc -s jerry.seinfeld 
        2. Query and note the UID from UNIX
          wcc -u jerry.seinfeld
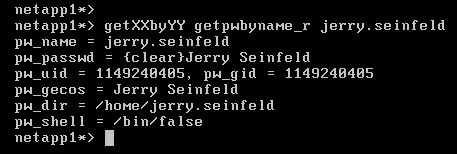
        3. Advanced query using NSS
          priv set diag
          getXXbyYY getpwbyname_r jerry.seinfeld


          Compare the results with the zone information.  At this point it should match the UNIX identity on Access Manager

Check the Results

To verify the results, use a multi-protocol (CIFS/NFS) share and make sure that the identity information is consistent.

  1. From a Windows system in the target domain, map or browse to the share via CIFS.  Create a file.
  2. From a Unix/Linux or Mac system, mount the share as an NFS mount and issue the ls -la and ls -lan.  Compare the results from before.

Adjustments to the Implementation

Adjustments are based on your existing environment, however, based on ours here are some key modifications:

  • There's only one LDAP proxy, we need several for high-availability
  • The LDAP Proxy is accepting anonymous connections, we need to make sure that only authenticated connections are accepted.
  • Ideally we would use Secure LDAP or implement TLS or IPSec for additional confidentiality controls.
  • Operations needs to monitor the health and status of the LDAP Proxies

Lab Videos


What you'll need to follow along:
  • Active Directory
  • Centrify Standard Edition
    • A Centrify zone
    • Client for Unix, Linux or Mac
    • Centrify's LDAP Proxy
  • A Multi-protocol filer (we'll use NetApp's  ONTAP Simulator)
Installing, Configuring and Testing the Centrify LDAP Proxy


Configuring the NetApp appliance to use the Centrify LDAP Proxy


Verifying the NetApp CIFS/NFS share provides consistent identities

Saturday, December 28, 2013

Basics: UNIX-Enabling Active Directory Users

Background

In a previous posting we discussed how UNIX systems identify users.
By default, UNIX/Linux systems using Centrify in Zone mode do not allow any user to log in to the systems unless they have:
  1. A UNIX Identity (login, UID/GID, Home, Shell and GECOS)
    This is what we call "UNIX-enabling" a user (hence the title of the posting)
  2. A role that allows the user to log-in.
UNIX-enabling simply means to provide a user (or a group) a UNIX identity in a Centrify Zone in Active Directory

Since we have established the Plan-Do-Check-Adjust model.  Here is the model for UNIX identities and Access

(Plan)ning UNIX Identities

  • Having a proper naming and identification strategy
    • What is the right login name?  Are there systems that don't like more than 8 characters?  (like HP-UX or AIX)
    • Does it have to be programmatically derived
    • What are the considerations for home directories?  Is there a central filer?
    • Is there an enterprise Shell?
    • Does anything need to be added to the GECOS field?
    • Are there different primary groups and secondary groups (other than private)?
  • What is the current state?
    • Is the namespace normalized(*)? Or does it need to be cleaned up?
      Are there users with different UIDs across systems?
      Are there different GID definitions for the same system?
      Are UNIX group memberships uniform?
    • Does the organization engage in Mergers and Acquisitions?
  • What will be the strategy if the company acquires another organization that has UNIX systems?
  • Are Samba or NFS in use?
(*) normalization is the process of rationalizing the names pase so everyone has a unique UNIX identity across the enterprise.  This is not a pre-requisite to deploy Centrify.

UNIX-enabling Users with Centrify (Do)

Users can get UNIX profiles using various methods:
  • Manually via Access Manager., Active Directory Users and Computers or ADSIEdit
  • Automatically via Centrify Zone Provisioning Agent
  • Automatically with any programming interface that can manipulate AD  (On Windows using vbscript, PowerShell, etc, and on UNIX/Linux using adedit).

Manual Method 1:  From Windows using Access Manager

  1. In Access Manager, expand the Zone, then UNIX Data, and right click Users.  
  2. Select Add Users to Zone
  3. In the Find box, type the name of the AD User account that is going to be enabled.  Select it and press OK
  4. Now, check all the boxes to pick the defaults OR, override each value to match your needs.

Manual Method 2:  From Windows using ADUC

Note: ADUC needs to have the Centrify Profile tab installed and activated
  1. In ADUC, right click the user object to UNIX-enable and select Properties
  2. Go to the Centrify Profile tab and select Add.  
  3. In the find window, press find and select the zone that the user will be added to.
  4. Follow the instructions from Step 3 above.

Manual Method 3:  From UNIX using adedit

Adedit is a TCL-based programming language included with the Centrify agent.
  1. On a Centrified UNIX system, type /usr/bin/adedit
  2. Bind to the domain with the proper credentials
    bind corp.contoso.com
  3. Select the zone to add the user to
    select_zone "cn=HQ,OU=Zones,OU=UNIX,dc=corp,dc=contoso,dc=com"
  4. Unix-enable the user
    new_zone_user jessie.matthews@corp.contoso.com
  5. Specify the UNIX identity
    set_zone_user_field uname jmatthews
    set_zone_user_field uid 0x8000000
    set_zone_user_field gid 0x8000000
    set_zone_user_field gecos "Jessie Matthews"
    set_zone_user_field home "%{home}/%{user}"
    set_zone_user_field shell "%{shell}"
    Note:  the 0x8000000 code after UID/GID specifies to use uniquely genereated code that is derive dfrom the AD object's SID.  Also, the variables under home and shell, allow this information to be picked based on the system's defaults.
  6. Verify the information
    show
    Bindings:
            corp.contoso.com: dc1.corp.contoso.com
    Current zone:
    CN=HQ,OU=Zones,OU=UNIX,DC=corp,DC=contoso,DC=com
    Current nss use:
    jessie.matthews@corp.contoso.com:jmatthews:1149240406:1149240406:Jessie Matthews:%{home}/%{user}:%{shell}:
  7. Save the Object
    save_zone_user

Manual Method 4:  From Windows using Centrify PowerShell

  1. On a Windows system with the Active Directory or Centrify PowerShell Modules
  2. Open PowerShell or PowerShell ISE as a user that has the rights to add and modify user profiles in the zone.
    Load these modules:
    Import-Module ActiveDirectory
    Import-Module Centrify.DirectControl.PowerShell
  3. Bind to the Centrify Zone in question
    $zone = Get-CdmZone -Name "HQ"
  4. Unix-enabling Jessie with defaults
    New-CdmUserProfile -Zone $zone –User jessie.matthews@corp.contoso.com -login jessie.matthews -UseAutoUid -AutoPrivateGroup –HomeDir "%{home}/%{user}" –Gecos "%{u:displayName}" –Shell "%{shell}"

Granting a UNIX Role

Once the user has an identity, the next step is to give him (or her) a role that grants them the ability to log in(*).  By this point a roles exercise has been conducted and the proper AD groups have been assigned UNIX roles.  This means that ADUC, Scripting/Programing, Identity Management Solutions and many other tools
(*) This is because users can be listed in a system, with no rights to log-in.

From Windows using ADUC
  1. Open ADUC and find the AD Group that has been assigned the role.
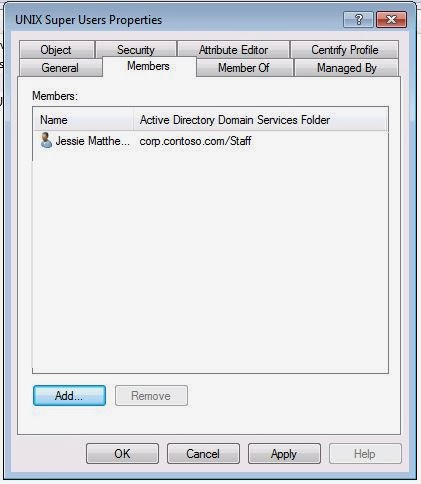
  2. Go to the Members tab and Click Add
  3. Find the newly UNIX-enabled user and Press OK Twice.

From UNIX Using adedit
  1. Log into UNIX/Linux with an account that can modify the group (or use kinit) and open adedit
  2. Bind to the domain
    >bind corp.contoso.com
  3. Add the ade_lib library
    >package require ade_lib
  4. Use the add_user_to_group function
    >add_user_to_group "jessie.matthews@corp.contoso.com" "UNIX Super Users@corp.contoso.com"
With PowerShell
Add-ADGroupMember "UNIX Super Users" -members "Jessie.Matthews"

At this point, when the cache refresh interval hits in the UNIX computer, the user will have the ability to log in with the corresponding role.


Verify the Access (Check)

There are multiple ways to check that the right identity and access have been provided:
  • In Windows:  via ADUC, Access Manager's User Effective Rights or Reporting
  • In UNIX with the adquery command and the dzinfo command.

To Verify the Identity in ADUC or Access Manager
  1. In ADUC, go to the user's properties, in the Centrify Profile tab, and double-click the entry.
  2. In Access manager, go to the Zone/UNIX Data/Users and double-click the user
  3. In any UNIX/Linux System in scope, run the adquery user <user name> command:
    $ adquery user jessie.matthews
    jessie.matthews:x:1149240406:1149240406:Jessie Matthews:/home/jessie.matthews:/bin/bash
To verify the level of access:
  1. In Access manager, go to the Zone/UNIX Data/Users and right-click the user and select "User Effective Rights"
  2. Select the system that you want to verify the level of access and review the settings.
Or
1. In Access Manager, go to the Reporting node.  Select the User's report or the UNIX User Effective Rights report, expand it, right click current and select Display Report

Review the systems that the user has access and what rights have been granted.
                                                                               Or 
In any System in scope, run the dzinfo <username> command.


(Adjust)ing the Identities or Roles assigned to a user

Due to various reasons there may be a need to adjust the user's identity or the role(s) that they may have in the systems.  Review the previous steps to perform any adjustments.  However, the most common operations are:
a) Identity Overrides:  This is when any of the default settings are modified.  E.g. they system admin does not want to change ownership of files and folders in multiple systems.  At this point he can change the UID/GID of the user to match their existing one.
b) Identity de-provisioning:  A user does not need access to UNIX systems anymore.  At this point their UNIX identity can be removed.
c) Access Changes:  A user may need to have access to more (or less systems) than required.  This may mean that they need to be added (or removed) from role assignments at the Computers Group level.
d) Temporary Access to a single or multiple systems:  These are normally exceptions. They can be dealt with temporary role assignments or computer level overrides.

Thursday, January 2, 2014

Labs: UNIX Enabling Active Directory users using Centrify (Video)

    In this lab:

    • We UNIX-enable the System Admin by using Access Manager
    • We UNIX-enable one of the DBAs using Active Directory Users and Computers
    • We UNIX-enable another DBA using adedit
    • We discuss the issues that arise when a UNIX-enabled AD user has a conflicting account in the system.

    Prior to this lab, review the following posts:

  • Basics: UNIX-Enabling Active Directory Users

  • Basics: The Centrify Agent Cache


    Part 1
    Part 2

Monday, December 23, 2013

Lab # 6: Role Creation and Assignment

In this lab
  • We will create the PAM access rights required for our roles
  • We will create a privileged command for the system administrators
  • We will create and configure the roles
  • We will assign the roles to the appropriate Groups in AD.
Planning for the lab
We will use the PDCA methodology outlined in the previous basics post, to address business problem # 1. in which we agreed that there will be 3 groups of users:  System Admins, Web Server Users and Database Server Users.  After the PDCA table-top exercise, the Security, UNIX and Windows leads came up with this table:

Planning Question
  Roles
 

 Super User

Regular User
What is the role supposed to allowed do?
To allow super users perform actions as root 
To allow the member to perform user activities
What is their UNIX experience? (controlled or flexible)
Flexible
Flexible
What is the role NOT supposed be allowed to do or know?
Users don’t need to know the root password
No privileged commands
Are there any time/day restrictions to this role?
No restrictions
No restrictions
How is the role supposed to access the UNIX system?
All protocols including the console.
SSH access only
Are there any particular platform implications?
None
SOL1 uses sshd-kbdinit fork.
Are any additional controls required when privileges are used?
Authentication required
N/A
Is this assignment temporary or permanent?
Permanent
Permanent
What is the scope of this assignment?
All Systems (Zone)
Database Servers – for DB Users
Web Servers – for web users
Will this role be audited?
Yes
Yes
Will we have a group of people or a single individual have this role?
Group:  UNIX System Admins
Group(s)
UNIX Database Server Users
UNIX Web Server Users


Create the Oracle Solaris SSH daemon PAM access right
  1. Log on to CLIENT1 as Jessie Matthews
  2. Open Access Manager and navigate to the HQ zone/Authorization/UNIX Rights, right click PAM Access and select Add PAM access right.
  3. Create the SSH daemon for Solaris.  The name and application is sshd-kdbinit press OK
Create Privileged Command for the System AdministratorsThis command should allow system admins to run any command as super users with the requirement of having this action authenticated with their AD password.
  1. In Access Manager and navigate to the HQ zone/Authorization/UNIX Rights, right click PAM Access and select New Command.
  2. In the General tab, name the command (e.g. run any command as root), and in the command box, type the wildcard character (*);  and in Match Path, select Specific path, and type the wildcard again.  This makes it *.*
  3. In the Restricted Shell tab, uncheck the checkbox.
  4. In the Run As tab, make sure the root account is selected
  5. In the Attributes tab, make sure you check the "Authentication Required" box and select the user's password.  Press OK.
 Create the UNIX System Admin role
  1. In Access Manager and navigate to the HQ zone/Authorization/UNIX Rights, right click Role Definitions and select Add Role. 
  2. In the General Tab, give the role a name  (UNIX System Admins)
  3. In the System Rights, UNIX rights section, check:
    Password login and non-password (SSO) login are allowed
    Non-Password (SSO) is allowed
    Login with a Non-Restricted Shell
  4. Press OK
    Now the role is created, but it doesn't have any rights.
  5. Right-click on the newly created role, and select Add Right.  Check the following:
    login-all:  this will enable the role to log in via any PAM module including the console.
    run any command as root: this is the previously created privileged command.

    Then press OK.
  6. This role is complete.
  Create the UNIX Regular User role
  1. In Access Manager and navigate to the HQ zone/Authorization/UNIX Rights, right click Role Definitions and select Add Role. 
  2. In the General Tab, give the role a name  (UNIX Regular User)
  3. In the System Rights, UNIX rights section, check:
    Password login and non-password (SSO) login are allowed
    Non-Password (SSO) is allowed
    Login with a Non-Restricted Shell
  4. Press OK
    Now the role is created, but it doesn't have any rights.
  5. Right-click on the newly created role, and select Add Right.  Check the following:
    ssh:  ssh daemon for Debian and Ubuntu
    sshd: ssh daemon for all Linux and UNIX distributions except for above
    sshd-kbdinit: ssh daemon for Solaris

    Then press OK.
  6. This role is complete.
Assign the Roles
Remember - sysadmins manage all systems; DB and Web Server users can only sign-in to their Server Groups.
  1. In Access Manager and navigate to the HQ zone/Authorization and right click Role Assignments and select Assign Role, select the UNIX System Admin role and press OK
  2. Click AD Account and in the Find drop box, select Group.
  3. In the Name, type the UNIX and press Find.  In the results select the UNIX Super Users group and press OK Twice.
    Note: before performing the following assignments, make sure you have created the corresponding AD security groups.
  4. Expand the Computer Roles node, then expand the Database Servers group, right click Role assignments and select Assign Role.  Select the UNIX Regular User role and press OK.
  5. Click AD Account and in the Find drop box, select Group.
  6. In the Name, type the UNIX and press Find.  In the results select the UNIX Database Servers Users group and press OK Twice.
  7. Repeat 4-6 for Web Servers.  Use the same role (UNIX Regular User) and assign it to the UNIX Web Server users AD Group.
Process Reuse
From this point on, assigning (or removing) roles in UNIX will be performed by adding (or removing) users from those groups in AD  (you can use ADUC, PowerShell, Access Manager, vbscript and anything that can manipulate Groups in AD)

We have performed the Plan-Do.  In a later post we will perform the Check-Adjust.

Thursday, January 2, 2014

Labs: Managing UNIX Groups fom Active Directory using Centrify

    In this lab:

    • We UNIX-enable the System Admin by using Access Manager
    • We UNIX-enable one of the DBAs using Active Directory Users and Computers
    • We UNIX-enable another DBA using adedit
    • We discuss the issues that arise when a UNIX-enabled AD user has a conflicting account in the system.

    Make sure you review the following postings before this lab:

Saturday, January 4, 2014

Basics: Strategies for UNIX Identities with Centrify

Background

In lab 8b, we UNIX-enabled some of the users of our test environment and accessed one of our systems. Here are the session results:


The screenshot above outlines some of the issues that will be encountered when a system is integrated in to Active Directory with Centrify and the users are UNIX-enabled with a proper planning exercise.  For our purposes this is OK, because we need to understand why planning and design exercises should be done.  After all, not everyone is a UNIX/Linux identity management expert.

Duplicated Identities

An identity conflict happens when a key user field (like login or UID) are duplicated.  In the example above the OS (CentOS/RedHat) was designed to be smart enough to warn the user about this, but this is not true of all UNIX and Linux distributions.  This problem has a trickle-down effect in many aspects.  Let's look at the root cause in depth, the culprit is the Name Server Switch (NSS) framework.  Let's look at an excerpt of the file /etc/nsswitch.conf in that system:

passwd:        centrifydc    files
shadow:        centrifydc    files
group:         centrifydc    files


All this means is that any NSS-enabled program will look first at the centrifydc source (in our case Active Directory) and if there's an identity match (for login in this case) this will be the identity picked.  CentOS was just smart enough to continue checking and letting us know that there was a match in the local /etc/passwd too.  This was verified with the subsequent command (getent) that returned a UNIX-enabled jmatthews with an AD SID-derived UID (1149240406) and the local jmatthews with UID 503.

This is true regarding the different sources that a system may have.  In complex environments you could have local databases, OpenLDAP directories, Network Information System services, etc.  It can be as complex as this:

passwd:        ldap nis  files db

In this case, any NSS-enabled program will check LDAP, then NIS, then local files, and so on for users.
This issue is very broad, because it not only applies to users (passwd), but to groups too and with all NSS-enabled programs like login, passwd, sshd, sudo, etc.

The next problem that happens has to do with file/folder ownership.  Notice that our user was unable to change folders to the home directory, in turn he is unable to read his basic environment settings!!!!  This has direct-impact in the productivity of the user, and most likely people will have to get involved to do a change of ownership of files and folders.  This is extremely inefficient.

A final, but important issue has to do with usability.  The user does not have any visual cues to find out the context of the user that he is working with.  Is this the local or the AD account?  We can finish this with some group policies.

The reasons outlined above are why companies with mature identity practices for their UNIX systems do a rationalization (normalization or flattening) of their namespace.  Users have unique login names and UIDs.  Many solutions in the market require organizations to rationalize their namespace prior to implementing the solution, but with Centrify that is not the case.  This is where Active Directory and Centrify Zones come into play.  The following video illustrates how we resolve this one-off:

Strategies for UNIX User Identities with Centrify

The correct strategy depends a lot on the current environment of the customer, but, the preferred strategy is typically the end-state for the majority of the deployments: a normalized user state. The biggest constraint is that the business must go on and there are impact assessments and change-control windows to work with.

A New World of Flexibility with Centrify

Centrify allows for UNIX user identities to be defined at the Zone level, Child Zone (CZ) level and Server level.  This means that a user that is uniquely known in AD as jmatthews@corp.contoso.com, in UNIX, then can have these identities:

Level/Field
Login
UID
GID
GECOS
Home
Shell
Zone (HQ)
jmatthews
1149240406
1149240406
%{u:displayname}
%{home}/%{user}
%{shell}
CZ (Marketing)
jessie.matthews
(same as above)
(same as above)
(same as above)
(same as above)
(same as above)
Server (SOL1)
jmatthew
101
101
Jessie SysAdmin
/exports/home
/bin/bash

Notice that the user's identity was defined with the basic defaults, the login name overridden at the child zone level, and then the whole identity revamped at the Solaris server level.  Notably a truncated login name, more friendly UID/GID as well as defined Home and Shell fields.  Flexibility can be a two-edge blade because it allows for exceptions at multiple levels, and this is against two important Information Technology principles: standardization and simplicity.

Note:  The following strategies assume that the previous questions about AD-domain design, naming conventions, Zone structure, Computer Groups, Roles and Rights and naming conventions have been discussed.

The Recommended Strategy:  Normalize now and have peace of mind

  1. Perform a table-top exercise to normalize your users and groups.
  2. UNIX-enable (or migrate) all users at the zone level with a unique login and a UID generated from SID
  3. Perform any role assignments at the Zone, Hierarchical Zone and Computer Role levels.
  4. Pre-create all the UNIX computer accounts in Active Directory
  5. Place the computer account in their corresponding Computer Role
  6. Join the UNIX/Linux Systems to Active Directory.
  7. Run the adfixid utility
  8. Run the adrmlocal utility
This strategy works if you have committed to fixing this problem and are thinking about the future.  Maybe there are mergers and acquisitions in the future and the namespace is uncertain.  The drawbacks are that the identity rationalization exercise is lengthy and the implementation requires wide change-control windows.  The biggest benefit is that as new systems come online, there's a clean-slate across the board.

Another option:  Obtain results now and normalize later

Use this strategy if you are confident in the existing namespace
  1. UNIX-enable all users at the zone level with a unique login and a UID generated from SID
  2. Perform any role assignments at the Zone, Hierarchical Zone and Computer Role levels.
  3. Pre-create all the UNIX computer accounts in Active Directory
  4. Place the computer account in their corresponding Computer Role
  5. Override all user identities at the system level (to their existing login/UID/GID)
  6. Join the UNIX/Linux Systems to Active Directory.
  7. Use the adrmlocal utility
  8. Normalize opportunistically (with adfixid) or as new servers come online.
This strategy is the fastest path to productivity, however it does not solve the identity issues right away.  If you haven't done so, you may be forced to rationalize accounts that are using exported filesystems.  This allows for waves of systems to be normalized if needed.

Status Quo:  Be stubborn and reactive

  1. Perform a user migration from an existing source (NIS, files, etc.) making sure you conserve the existing identity at the Zone
  2. Perform any role assignments at the Zone, Hierarchical Zone and Computer Role levels.
  3. Pre-create all the UNIX computer accounts in Active Directory
  4. Place the computer account in their corresponding Computer Role
  5. Join the UNIX/Linux Systems to Active Directory.
  6. Use the adrmlocal utility to remove local users (if local) or clean your network-based (NIS) files
  7. If inconsistencies are found, perform local-level overrides.
At the user level, a typical inconsistency is that a user may have different identities in different servers. E.g. in our test environment.  jmatthews has UID 503 on cen1, UID 1001 on suse1 and UID 101 on sol1.
Although this is possible, it's highly inefficient and promotes the same disadvantages of local administration:  non-standardization, exceptions and more exposure.  Unfortunately, this administrative model was highly promoted by Classic zones.  Use this model if you are politically defeated.

Monday, January 18, 2016

[LABS] Testing the Local Account Management feature of Centrify Suite 2016

Background
There are several kinds of non-user accounts like local admin accounts (e.g. root, Administrator), application service accounts (e.g. oracle, Apache), network services (e.g. hdfs, yarn) or batch job/multi-tier apps (e.g. sftp, ssh, etc.)  The goal of Local Account management is to leverage the existing management infrastructure and framework (Active Directory, Centrify Zones, DirectMange/PowerShell/UNIX adedit) and the Centrify client (DirectControl) to provide an additional set of security controls. Centrify Suite 2016 provides the ability to:
  • Control local UNIX user accounts (provision, disable, visibility or removal from /etc/passwd)
  • Control local UNIX primary or secondary groups (provision, visibility control membership, or removal from /etc/group)
  • Perform actions upon user creation/deletion, e.g. home directories, environment variables, password management/lifecycle.
We will provide the basic building blocks for you to evaluate this feature in your lab to explore the feasibility of it.
Like other posts, we'll use the Plan-Do-Check-Adjust model.

Planning
Use these planning steps for your test environment. We'veve added enough information that can be recycled towards production deployments.

Potential Stakeholders
  • Centrify SME or Security Lead:  These users are entitled to perform management of zone operations inside Active Directory.
  • Account Owners:  These are the subject matter experts that understand how the user or group accounts are used in the environment.  They can answer questions like these
    a) What local user (or group) accounts are required in a system or collection of systems?
    b) Should the account have a password?  should the password be managed?
    c) What are the group account members?
    d) Should the user or group account be visible to apps using name service (NSS)?
  • Security Lead for Password Management:   This is the SME for a shared account password management solution.  They may know how to invoke any tools to manage the lifecycle for a shared account.
Technical Requirements
Active Directory and Centrify
  • A licensed or evaluation copy of Centrify Suite 2016
  • An Active Directory test or production environment with Centrify a Centrify Hierarchical zone
  • A UNIX/Linux system with Centrify DirectControl 5.3+
Password Management (optional)
  • If using Centrify Privilege Service (CPS), you need the CLI toolkit for your platform and a Cloud Connector that can reach your test systems.
  • If using a 3rd party password manager, you need the tools and knowledge of the methods provided by the vendor
    In this example, we'll be using CPS.
Resources
How Local Account Management Works
The design and management is very similar to what you're used today with Centrify and UNIX-enabled AD users or Groups.
Local Mgmt - Concept.PNG
Information about the local user or group is stored in Active Directory.  The local users or groups are defined in the zone.  The scope of the local account is determined by where the identity is defined and the role that is assigned.  For example, if an account should exist and be enabled in all servers, then it's defined in the topmost zone and assigned a role with visibility at that level.  If it should only be visible to a group of systems (e.g. Database Servers) this can be done at the child zone or computer role level.  The management is exactly identical to UNIX-enabled AD users.
Once the changes are made in AD and the flush interval passes (or the adflush command is issued) the local account actions will be triggered.
There are additional CLI tools:
  • admanagelocal:  to view existing managed local accounts or refresh the changes (or use adflush).
  • handle_local_accts.sh:  this is a sample script provided to perform post-provisioning actions (e.g. home directory creation).  There are two versions of this script, one included with DirectControl, another one included with the CPS CLI Tools.

A Basic Lab Design
In my test environment I have:
Local Mgmt - my lab.png


1. An AD domain (centrify.vms) with a single domain controller (dc.centrify.vms)
2. A domain-joined server called "member" that has Access Manager installed (Suite 2016)
3. A Centrify zone called global with 2 computer roles:  App Servers and Web Servers
4. Two Linux servers (engubu1404 in the App Servers collection and engcen6 a Web Server)
5. Optional:  because I'll be testing the password lifecycle management, I have a CPS tenant and a cloud connector running on member.  CPS will provide the shared account password management functionality and workflow.

Use Cases

We are going to focus in several use cases:
Local UNIX Group Tests
  • Provision a local group:
    - to all domain-joined systems
    - to a subset or individual system
  • Manage group memberships
  • Remove from /etc/group
Local UNIX UserTests
  • Provision a local user
    - to all domain-joined systems
    - to a subset or individual system
    - have the password randomized and the home directory created
  • Disable the user
  • Remove from /etc/passwd
Local User and Password Management (optional*)
  • Provision a local user and manually manage the account's password
  • Provision a local user and automatically manage the account's password
  • Retrieve the password for usage in break glass or scripting scenarios (admin or request via workflow)
    * These tests are optional given that they require a password manager that provides certain toolsets
Implementation
Download and Install the Centrify Suite 2016 bits
  1. Download the Standard Edition 2016 Consoles
  2. Download the Centrify client bits for your platform
  3. Install Access Manager
  4. Install or upgrade your agents  (e.g. install.sh, rpm or yum, apt or dpkg, etc)
  5. Join a zone (use adjoin)
Although these steps should be straightforward to you, they are documented here:


General Test Cadence
There's a simple methodology to these tests:
  1. Perform the change or update (e.g. create the local user/group, make visible, remove, change membership, etc)
  2. Open a session to a system in scope of the previous change
  3. Run getent (passwd or group) [target user or group]  > these result should not yield the results
  4. Run adflush or 'admanagelocal --reload' (with sudo or dzdo) > this step causes the flush interval to expire and the changes in the zone to be committed by DirectControl
  5. Run getent (passwd or group) [target user or group]  > these result should yield the results expected.
For example, if you create a new UNIX group called my-group (GID 3232) in all systems, after an adflush all systems should produce the same result.  If you do this in an individual system (or group of systems.

Differences between Group and User tests
a) Local Users follow the same rules as UNIX-enabled AD users 
Local users must have an identity and a role assigned to be visible in a system.  This allows for you to scope the visibility to the zone (all), child-zone (subset), computer role (subset) or individual system.  This differs from Groups that can be enabled at the zone, child-zone or individual system.
Local Mgmt - local user assignment.png
You can even time-bound the visibility of the role assigned to a local user.
b)Users must belong to at least a singe existing primary group
Local Mgmt - user profile-group.png
Otherwise, the provisioning won't work.
c) Post-provisoning actions must be defined via parameter or GPO
Provisioning users does not mean that home directories, environment variables or the password lifecycle will be handled by the Centrify agent; those actions are customizable.  Centrify provides a parameter called adclient.local.account.notification.cli; it can be used with a provided script /usr/share/centrifydc/samples/localaccmgmt/handle_local_accts.sh to perform these actions.

d) Don't fall in the poor habits
Always prefer computer roles (users) and child zones (users, groups) instead of computer overrides.

Local Group Testing Video

Local User Testing Video (without actions)


Testing local user provisioning plus actions
Using the provided handle_local_accts.sh to enable provisioning actions
In order to allow for actions to be performed upon user provisioning (or de-provisioning), Centrify provides a sample script called handle_local_accts.sh that will perform actions like assign a random password, create home directories, etc.  To enable this script:
  1. Enable the adclient.local.account.notification.cli parameter (set for none)
    $ dzdo vi /etc/centrifydc/centrifydc.conf
    # search for adclient.local.account.notification.cli
    # enable the parameter by removing the pound and
    # set it to the path of the sample file
    adclient.local.account.notification.cli /usr/share/centrifydc/samples/localacctmgmt/handle_local_accts.sh
    
  2. Run adreload (as root or with sudo/dzdo) and restart your testing.
    For example, to verify that a home directory was created after enabling a local account, you can use the following sequence:
    # use access manager to enable the account (e.g. james-foo)
    $ dzdo /usr/share/centrifydc/bin/admanagelocal --reload
    $ getent passwd managed-all
    # this should confirm that the user is enabled
    $ ls -l /home
    # there should be an entry for the recently-created account

Testing local user provisioning plus password management
Using CPS to manage the password lifecycle of a Centrify-provisioned local user account
This test can be performed with any password manager that provides UNIX/Linux-based CLI utilities.  The idea is that upon local account creation, the password manager is notified of the account creation, the password is randomized, changed and managed by the solution.   This example uses Centrify Privilege Service to illustrate the use case.

To set up this test, you need to have a CPS tenant with a Cloud Connector that can reach your systems and a Linux system with the CLI Toolkit.
  1. Create a CPS role for the systems that will be used for testing and assign the Privileged Management right
    CPS - add right.png
    You can also use an AD group and add your computer objects and use it to nest it into the CPS role.
  2. Now you can download and copy the CLI toolkit to your test system.
    cli toolkit.PNG
    You can add the bits to your repository or copy the installation files manually.
  3. Install the CLI toolkit and add the system as a CPS resource (e.g. in my engcen7 RHEL system)
    # install the CPS CLI toolkit bits
    $ dzdo yum install centrifycc-rhel6-x86_64.rpm
    # add the system as a CPS resource
    $ dzdo cjoin -k -n engcen7 -a engcen7.centrify.vms
    # The command joins a system using Kerberos, names it engcen7 and gives it the 
    # hostname/ip of engcen7.centrify.vms (FQDN instead of address).  
    # You can verify the status using the cinfo command.
  4. Switch the provisioning handler.  The CPS CLI toolkit includes another version of the handler.
    $ dzdo vi /etc/centrifydc/centrifydc.conf  # modify the parameter below
    adclient.local.account.notification.cli /usr/share/centrifycc/samples/localacctmgmt/handle_local_accts.sh
    
  5. Run adreload (e.g. dzdo/sudo adreload)
  6. Now you can add a new local account using access manager (e.g. managed-all)
  7. First, verify that the home directory has been created, and then verify in the CPS accounts page that the account exists under the server.
    CPS - managed.PNG
  8. You can also use the cgetaccount command to check-out the password for temporary use directly from the CLI.
    CPS - managed.PNG
    This is not really a practical example, most likely you'd assign the value of the password to a variable and use it on a script.
Provisioning local account with actions (random password/home directory) video

Provisioning local account with password lifecycle management (requires CPS or Password Manager)


This last video provides an example of Server Suite and Privilege Service working together:
  1. We review the set up in the Centrify Privilege Service (connector, managed system role)
  2. We verify the CLI toolkit in the target systems
  3. We join the system as a resource in CPS (using cjoin)
  4. We enable the adclient.local.account.notification.cli parameter to use the handle_local_accts.sh provided with CPS and reload the configuration
  5. We enable our test account in Access Manager
  6. We verify that the account exists in /etc/passwd and that home directory has been created
  7. We verify that the acccount exists under the CPS server resource
  8. We check-out the password via CPS Web GUI and UNIX CLI (with cgetaccount)
  9. We perform an assisted SSH session with the account via CPS console.

Adjustments
There are several improvements to be made, for example:
  • Customize the handler script to be suited to your environment
  • Use your existing password manager to manage the lifecycle
  • Upon deprovisioning, the home folder can be gzipped+tar and removed