Wednesday, September 24, 2014

Utilities: The powerful "copy files" GPO

Background

As you know, Centrified systems can process group policies (basics here).  However, did you know that there is a group policy object named "Copy files" that can be used to:

  • Distribute files
  • Make sure config files stay consistent
  • Deploy software
  • and many many more creative uses.
The copy files GPO
It's located under Computer Configuration > Centrify Settings > Common UNIX Settings 

How does it work?

The copy-file GPO uses the Centrify agent's GP engine along with adsmb and the computer credentials to connect to the AD SYSVOL (or an alternate share) and obtain the files and it will place it in the target folder of the Unix/Linux or Mac system.

Copy-file GPO options

Because adclient is a privileged process the destination file can be manipulated (permissions, ownership, etc.).  The file gets copied under two conditions:
  • If enabled, when the group policy refresh interval is met (every 90 minutes by default with a random offset of 30 minutes.
  • When the adgpupdate command is triggered.
Considerations when using this GPO (and group policies in general):
  • Perl needs to be installed.  (5.8 minimum as of 9/2014)
  • The sysvol or alternate share have to be reachable, therefore the requirements to make a CIFS connection are in play.  This may be undesirable in firewall scenarios.
  • When writing to sysvol, an appropriate AD account needs to be used.
  • Group Policy Objects for users are not enabled on *NIX by default, they are on the Mac.

File Copy GPO in action


Sunday, September 21, 2014

Labs: PCI DSS 3.0 Req # 7 - Implement Strong Access Controls 10-minute Challenge

Challenge Accepted!

In a previous post, we outlined the PCI DSS3 Requirement 7 10-minute challenge.
This entry is to outline current environment, high level steps and verification protocol.

Here's the current environment as of today (excluding the 2-node Hadoop cluster):

Here's what we're adding for the challenge:


The cast of characters
  • J. Peterman and Elaine Benes are the PCI Developers
    • On Windows - PCI Developers shall perform developer tasks like:
      • Opening SQL Server Studio
      • Resetting IIS websites
      • Control System Services
    • On Linux -  PCI Developers shall perform LAMP functions like:
      • Control the httpd service
      • Elevate to the mysql account (without knowing the credentials)
      • Edit the httpd daemon config file /etc/httpd/conf/httpd.conf
  • Jerry Seinfeld is a Domain Admin
  • George Constanza is the UNIX Sysadmin

Steps to the Challenge - 10 minutes

Planning
- Will use a new zone to prove this concept (may be needed for separation of duties) - name: PCI
- Will reuse the existing ZPA service (provisioning has nothing to do with PCI, will control access with Roles)
- A Combined UNIX/Windows role will be created with the following access:

  • Role Properties
    • Available 24x7
    • Password Login and SSO enabled
    • Non-Restricted Shell
  • Access Rights
    • PAM SSH
    • Remote (Windows)
  • UNIX Commands
    • systemctl (start|stop|restart)*httpd  as root (authenticated)
    • su - mysql  as root (authenticated)
    • vi /etc/httpd/conf/httpd.conf
  • Windows Applications
    • iisreset.exe  as local administrator
    • services.msc as local administrator
    • SQL Management studio as local administrator

- PCI Developers group will be called - PCI Developers

Implementation

On the management station:
  1. In ADUC create the PCI Developers role
  2. In access manager set up the new zone.
  3. Set up the Unix identity properties
  4. Set up the UNIX commands
  5. Set up the Windows Applications
  6. Create the PCI Developers role, set up properties, add the rights
  7. Perform the role assignment at the zone level.
On CEN2
  1. Unpack the Centrify agent bits
  2. Run adcheck
  3. Join the zone
  4. Run adquery user and dzinfo
On APP2
  1. Install the Centrify Agent
  2. Join the Zone and Reboot

Test Plan (Check) - 5 minutes

  • We'll verify that PCI developers can:
    • Only log in via SSH (Linux) and RDP (Windows)
    • Perform administrative tasks on APP2 (Win Server 2012 R2)
      Not a member of Local Administrators or Domain Admins
    • Perform LAMP admin duties on CEN2 (CentOS 7)
      They shall not know the root account.
  • Windows Domain admins should not be allowed to log in to the PCI systems (Jerry)
  • Enterprise UNIX admins - should not be allowed to log in to the PCI systems (George)
  • Any other users can't access the systems (Soup Nazi)
  • The model should work for both Unix/Linux and Windows.

First Video - Challenge Explained (5:03)


Second Video - Implementation (9:40)


Third Video - Verification (6:49)


Utilities: adcert - a UNIX/Linux/Mac Microsoft CA PKI client

Background

Public Key Infrastructure (PKI) is the key building block for many IT capabilities and has been around for a long time.  It is poorly understood.  Let's start by defining some key terms:

PKI - Public key infrastructure (or standard x.509) defines the infrastructure, policies and usage of digital certificates.

Digital Certificate - a digital file pair that allows us to implement capabilities like
  • confidentiality - making sure data stays secret (at rest and in transit) 
  • integrity - making sure a message has not been tampered with in transit
  • non-repudiation - making sure that a party is who they say they are

Certification Authority:  A trusted computer that governs the policies, issuance, revocation and workflow of digital certificate operations.  There are Root CAs, Intermediate CAs, and Registration Authorities.  These roles (although NOT recommended) can be satisfied by a single system.

Certificate Policies:  Define how a certificates is going to be used, issued, revoked, etc.
Certificate Revocation:  When a certificate is revoked (e.g.  user is disabled, or the computer role changes, certificate expires or is replaced), the revocation protocol is used.  The legacy protocol is certificate revocation lists (CRLs), this has been replaced by the Online Certificate Status Protocol (OSCP).

PKI is all about the Trust Model and the standard as of how certificates are going to be handled.  My advice is that standing a CA in an enterprise is a process that should not be taken lightly.  The technology is the easy part.

For a great blog on PKI from the Microsoft PKI experts, go here:  http://www.css-security.com/category/public-key-infrastructure/

Challenge:  Managing the Lifecycle

Once a PKI infrastructure is established, in a Windows environment the lifecycle of issuing, revoking, renewing and provisioning certificates is very simple:  It can be done via self-service or with workflow, but we'll focus on the automatic method - using Group Policies.

It's all about simplicity:  The group policy client will check if either the user or computer needs a certificate, the PKI client will do the rest.  If a computer belongs to an OU that has a GPO for PKI certificates, there's a usable certificate template and the right permissions are in place, the certificate will be issued and provisioned to the computer.  Depending the policy, a few weeks before the certificate is revoked, the certificate will be renewed.

We already outlined these steps with the Mac platform.

adcert:  Centrify's hidden gem

For any PKI expert, adcert is a gem.  Why?  The variability of UNIX and Linux platforms and the evolution of them have not produced several basic standards as of how certain things are going to be done.  Since Centrify focuses in maximizing the investment in Active Directory with the Centrify Suite the answer is simple:  Use the Microsoft CA.

adcert is an Active Directory PKI client that works on Unix, Linux and Macs.  It also can be combined with Group Policies so the lifecycle can be managed the same way as in Windows.

adcert must be run as root and it exists in /usr/share/centrifydc/sbin.  Certificates (CRLs,  are placed in the /var/centrify/net/certs folder.
Some key switches:

-e  enroll certificates for this computer
-u <user>  - retrieve the certificates for the user.  In UNIX/Linux user GPOs are not enabled by default.
-m retrieve certificates for the computer. There has to be a usable certificate.

Example - to enroll the computer-based certificates for a computer:

$ dzdo /usr/share/centrifydc/sbin/adcert -e -m -V
Certificate AutoEnrollment for suse1$@CORP.CONTOSO.COM in domain CORP.CONTOSO.COM
Retrieved 17 templates with client or server authentication
Check template Administrator
Check template Centrify-Autoenroll
Check template Centrify-Autoenroll-Macs
    autoenrollment is allowed
Check template ClientAuth
Check template DomainController
Check template DomainControllerAuthentication
Check template KerberosAuthentication
Check template MacAutoenroll
    autoenrollment is allowed
Check template Machine
Check template OfflineRouter
Check template RASAndIASServer
Check template SmartcardLogon
Check template SmartcardUser
Check template User
Check template UserSignature
Check template WebServer
Check template Workstation
2 templates found with autoenrollment set
Checking certificate template Centrify-Autoenroll-Macs ...
    certificate and private key exist on computer
    revision (100) matches value in template
    expiration is Mon Sep 21 13:00:58 2015 GMT
    certificate public key matches private key
    No OCSP url in AIA section of certificate.
    ocsp operation not performed
    certificate is valid
Checking certificate template MacAutoenroll ...
No issuing CA found for template MacAutoenroll.
No CA's found for all templates requiring new/updated certificates: [MacAutoenroll].
1/1 templates requiring a new certificate could not have one issued.

The only usable template is the one I set up for Mac Autoenrollment in a previous lab.  The contents of the /var/centrify/net/certs shows:

$ ls -l
total 12
-r--r--r-- 1 root root 2069 2014-09-21 09:10 auto_Centrify-Autoenroll-Macs.cert
-r--r--r-- 1 root root 3357 2014-09-21 09:10 auto_Centrify-Autoenroll-Macs.chain
-r-------- 1 root root 1671 2014-09-21 09:10 auto_Centrify-Autoenroll-Macs.key
dzdo cat auto_Centrify-Autoenroll-Macs.cert
-----BEGIN CERTIFICATE-----
MIIFyjCCBLKgAwIBAgIKIiSOLwAAAAAAHDANBgkqhkiG9w0BAQUFADBaMRMwEQYK
CZImiZPyLGQBGRYDY29tMRcwFQYKCZImiZPyLGQBGRYHY29udG9zbzEUMBIGCgmS
JomT8ixkARkWBGNvcnAxFDASBgNVBAMTC2NvcnAtREMxLUNBMB4XDTE0MDkyMTEz
MDA1OFoXDTE1MDkyMTEzMDA1OFowITEfMB0GA1UEAxMWc3VzZTEuY29ycC5jb250
b3NvLmNvbTCCASIwDQYJKoZIhvcNAQEBBQADggEPADCCAQoCggEBANCZDHWJaHKR

Understanding the benefits

The key here is process consolidation and cost savings, especially for internal certs.  The Microsoft root CA is trusted by all domain-joined computers, this means that Unix, Linux and Mac computers can easily participate in getting their own SSL, 802.1x, Code Signing and other types of certs;  all with a single infrastructure and consolidated process.  That is power.

Video - Using adcert (5:18)


Saturday, September 20, 2014

Security Corner: PCI DSS 3.0 Requirement 7 - Implement Strong Access Controls 10-minute Challenge

Background


The Payment Card Industry (PCI) Data Security Standards (DSS) is a great measuring stick for the security posture of any organization.  In fact, I love it because it's so clear.
Requirement 7: "Restrict access to cardholder data by business need to know" poses an interesting set of challenges, because it requires the enforcement of the principles of:
  • Least Access - users shall only access the systems they need access to
  • Least Privilege - once in these systems, they shall only do what they're supposed to do
  • Implement a Role-Based Access Controls (RBAC) model
  • Shall be enforced across heterogeneous platforms (7.2.1)
  • Ideally the process is consistent and easy to document and adhere to workflow (7.1.4, 7.3)
  • Closed systems - All systems default to deny access unless (7.2.3)

Challenge

  1. Implement the technical(1) controls of Requirement 7
  2. Multi-platform:  Unix/Linux & Windows
  3. Implement it in less 10 minutes or less
  4. Prove compliance in 5 minutes or less

The Environment:

  1. Active Directory 2012 Domain (based on the Microsoft Test Lab Guides)
  2. One Windows Server
  3. One RHEL 7
  4. Centrify software already loaded on a management server (MMCs) and copied in target systems.

Access Rules

The access rules have to be defined as per 7.1.1.

 The card data environment consists of one Windows Server 2012, a RHEL 7 and an Ubuntu 14.04 servers.  The nature of the work performed is database (SQL Server) and Web (IIS) work on Windows.  The RHEL platform is used for an Apache/MySQL app.  There are two types of roles in this environment:

  • Sysadmin (cross-platform)
    • Sysadmins shall perform tasks as root in RHEL systems without knowing the root password. (7.1.2/7.1.3/7.2.2)
    • Sysadmins shall be able to perform tasks as Administrator on Windows platforms without being a permanent member of the Local Administrators or Domain Admins group. (7.1.2/7.1.3/7.2.2)
  • Developer (cross platform)
    • Developers shall perform service control of Apache and IIS services  (service httpd start | stop | restart) and iisreset.exe - No root/apache/ credentials or ocal admin rights. (7.1.2/7.1.3/7.2.2)
    • Developers shall be able to elevate to the mysql service account and to run the services.msc snap-in in Windows (to stop/start/pause) SQL without the root/mysql credentials or local windows admin rights. (7.1.2/7.1.3/7.2.2)
Additional Guidelines
  • Because these are PCI systems, no one than the PCI Sysadmin and PCI developer Role can log in to the system.  This includes any other trusted administrators like Domain Admin. (7.2 - deny-all)
  • Access to both roles is restricted to the terminal (SSH on Linux and RDP on Windows) no console access.
  • The add/moves/changes process shall be controllable via AD Group membership.  This makes easy for other upstream tools to control workflow and approvals. This makes compliance with 7.1.4 (approvals) and 7.3 (documentation) much easier.

Monday, September 15, 2014

Business Problems: Leveraging UNIX-enabled AD Groups and Kerberos to Control Unix/Linux/Mac Access to a Windows Share

Background

In the previous post we discussed how to leverage the Kerberized environment provided by Centrify's UNIX/Linux client and the computer's AD account to access a read-only Windows (CIFS) share. By leveraging Kerberos, the mount command (or filesystems table) does not have to use a cleartext password.

Windows (CIFS) shares are all over the Enterprise (for files and printers) and most likely a read-only share is not a very practical example, however, a departmental share that is used by a workgroup to share files is much more common.  This time, we will implement an example.

The Marketing Share

In our mock example we have a share in APP1 set for the Marketing department.  Both Elaine and J.Peterman are members of this department, however they consistently access these shares from OS X, Unix and Windows machines.  Today a Marketing Share Access AD group is used to control access by way of memberships.

Requirements:


  • Marketing users should have the ability to exchange files (read/write)
  • The current heterogeneous environment consists of Windows, Mac OS X and UNIX/Linux stations
  • Users should be able to access the information from any type of platform
  • Controlling access to the Windows share should not deviate from the current process.
  • Users should alingn with the security policy and don't use cleartext passwords when mounting CIFS shares.

Challenges:

  • This would not be an issue in a homogeneous environment
  • Identity is key, UNIX identities should be uniform across platforms (for users and groups)
  • Users should not have access to the root account to use the mount command

The Proposed Solution:

  • Centrify the non-Windows platforms  (Mac OS X, Unix/Linux) - this provides the AD Integration, Kerberos environment and Privilege Elevation
  • Leverage a common UID/GID scheme by leveraging Zones and the Autozone
  • UNIX-enable the Matkeing Share Access AD group.
  • On UNIX Platforms, allow the Marketing users to use the mount command with privileges


Video Labs

Lab Part I - Initial Setup (13.30 min):  https://www.youtube.com/watch?v=flp4L200o4c 
Lab Part II - Verification (11 min):  https://www.youtube.com/watch?v=M-fdtZeYYtk 

Elaine's mount command (CentOS 6.5):
dzdo mount -t cifs //app1.corp.contoso.com/marketing /mnt/share -o sec=krb5,user=elaine.benes,uid=1149240407,gid=99998,group=marketing-share-access,umask=0002,file_mode=0775,dir_mode=0755 --verbose
Share Permissions:
(this can be improved since the rest of the world would get read access given that ACL)
Marketing Share - Permissions.jpg
NTFS Permissions:
Marketing NTFS - Permissions.jpg
Role created for Marketing Users
Marketing - mount command.jpg

We can improve on this by using Automount to access the user's Windows home.

Sunday, September 14, 2014

Security Corner: Eliminating Cleartext Password Usage in Scripts and Facilities

Background

In the previous post "What is a Kerberos Keytab and why should I use it?"  we discussed that once you have a Centrified system, Kerberos-enabled applications can leverage this authentication mechanism.  The key benefit being that the Centrify agent (adclient) automatically maintains the Kerberos environment (e.g machine keytabs and krb5.conf files are updated based on the AD sites and services info) and both the OS and Centrify offer an array of "Kerberized" apps to help the most seasoned Sysadmins.

In this post I will discuss some popular use cases:
  • Using the Centrify DNS utility (addns) to leverage Active Directory DNS Dynamic Updates
  • Eliminating cleartext passwords from the mount command or from /etc/fstab

Using AD DNS Dynamic Updates and addns to keep your DNS entries up to date


One of the coolest Centrify tools is addns.  As discussed in an earlier post, this utility can help in performing dynamic or manual updates to DNS registrations for Centrified systems.  Think about the "ipconfig /registerdns"  command on Windows.  This is very useful especially when servers are being built with static IP addresses an in a Mixed UNIX/Linux and Windows environment. 

How does it work?

As per TechNet:  "Domain Name System (DNS) client computers can use dynamic update to register and dynamically update their resource records with a DNS server whenever changes occur. This reduces the need for manual administration of zone records, especially for clients that frequently move or change locations and use Dynamic Host Configuration Protocol (DHCP) to obtain an IP address.

Dynamic updates can be secure or nonsecure. DNS update security is available only for zones that are integrated into Active Directory Domain Services (AD DS). After you directory-integrate a zone, access control list (ACL) editing features are available in DNS Manager so that you can add or remove users or groups from the ACL for a specified zone or resource record."


This means that in cases in which there are workstations (like Macs or Linux) that change networks frequently or when servers are being provisioned and there's no available Windows DNS administrator, addns can be a very useful tool.

The addns utility supports the -m (or --machine) switch, this means that instead of providing a valid AD account to update the DNS records for a computer, you can use the computer account's credentials instead.  The key benefit here is that there's no need to type credentials.

[root@engcen7 ~]# cat /etc/redhat-release
CentOS Linux release 7.0.1406 (Core)
[root@engcen7 ~]# adinfo -v
adinfo (CentrifyDC 5.2.0-218)
[root@engcen7 ~]# addns -U -m
Updating host records for engcen7.centrifyimage.vms on 192.168.81.10.
Updated host records engcen7.centrifyimage.vms.
Updating reverse lookup records for engcen7.centrifyimage.vms on dc.centrifyimage.vms.
Updated reverse lookup record 167.81.168.192.in-addr.arpa.

Alternatively, if you know the credentials of an AD DNS administrator (or have a keytab), you can kinit and launch addns without the need to specify the --user (or -u) switch:

[root@engcen7 ~]# /usr/share/centrifydc/kerberos/bin/kinit dwirth
Password for dwirth@CENTRIFYIMAGE.VMS:
[root@engcen7 ~]# addns -U
Updating host records for engcen7.centrifyimage.vms on 192.168.81.10.
Updated host records engcen7.centrifyimage.vms.
Updating reverse lookup records for engcen7.centrifyimage.vms on dc.centrifyimage.vms.
Updated reverse lookup record  167.81.168.192.in-addr.arpa.

Potential Uses:
  • Troubleshooting DNS connectivity for a roaming computer (Linux or Mac)
  • Automated provisioning of IP addresses during Server provisioning.
Keep in mind, all the Centrify "ad" tools that take the -u (--user) option are Kerberized, including adjoin, adleave, addns, adcert, adsmb, adkeytab, etc;  so your scripts don't require interactive attention or the use of cleartext passwords!


Eliminate Cleartext Passwords from the Mount Command or the filesystems table

The mount command traditionally lends itself for the use of cleartext passwords.  Although Centrify has nothing to do with this command (there's a great degree of variability based on the distribution);  the key continues to be Kerberos.

Let's pick on this example.  The idea is to use the mount command from a Unix or Linux system to mount a CIFS share that is on a NAS device or Windows Share.


Both the Mount Syntax
# mount -t cifs //ntserver/download -o username=vivek,password=myPassword /mnt/ntserver
and the fstab entry
//ntserver/docs /mnt/samba      smbfs   username=docsadm,password=D1Y4x9sw 0 0
specify the use of a cleartext password.  Let's improve on this example by leveraging a Centrified system in the modified Microsoft Test Lab Guide.  The idea is to leverage the AD Kerberos environment, the Centrify client, the machine account and the user account to eliminate the use of the cleartext password.

Using the Machine Account to access a Read-only Share

On APP1 - Assign permissions to the Unix/Linux system
  1. Open Windows Explorer and go to the root of the C: drive.
  2. Create a new folder and call it 'mysmb'
  3. Right-click the folder > Properties > Sharing > Advanced Sharing > Permissions and set:
    Authenticated Users :  Read
    Domain Admins :  Full Control
  4. Right-click the folder > Properties > Security > Edit > and Add
    Select Type: Computers
    CEN1$ (or your centrified system) : Read
  5. Create a a text file in the folder (myfile.txt) and put some text in it.
On CEN1 (or your Centrified system) - Test your mount
Note: Make sure the cifs-utils package is installed on RHEL derivatives.
  1. Log on with a user that has the ability to elevate.
  2. Use the following command:
    mount -t cifs //app1.corp.contoso.com/mysmb //mnt/share -o sec=krb5
  3. Test your share.
    This mapping is done right without the need of cleartext passwords.
The active session comes from the Linux computer.

Because the mapping has been done with the Kerberos ticket of the machine account and typically per policy, these only last 10 hours;  a mechanism to renew the ticket for the lifetime of the mount has to be implemented.  For example, a cron job that renews the ticket before it expires like this:

Runs every day at midnight, 8AM and 4PM.  This assures there’s a fresh ticket every 8 hours.

# crontab -l
01 00 * * * /usr/share/centrifydc/kerberos/bin/kinit -k cen1$
01 08 * * * /usr/share/centrifydc/kerberos/bin/kinit -k cen1$
01 16 * * * /usr/share/centrifydc/kerberos/bin/kinit -k cen1$

Or you can leverage the Set Crontab Entries GPO.

Crontab entries can be controled using Group Policy

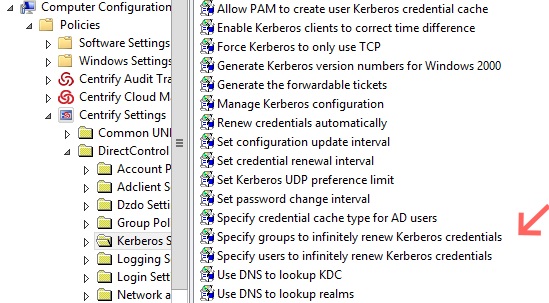
In addition, and in support of Hadoop, Centrify has come up with another set of GPOs to help with Kerberos ticket renewal.  This parameter can be specified in the configuration file or via GPOs:

Infinite ticket renewal GPOs
This sets up the building blocks for our next entry.  Leveraging UNIX-enabled AD groups to control access to a Windows share leveraging Centrify.