Showing posts with label Plan-Do-Check-Adjust. Show all posts

Monday, July 7, 2014

Labs: Securing Multi-protocol File Access (NFS/CIFS) on NAS (NetApp) Using Centrify and Windows Security Groups

Background

In the previous post, we discussed how to overcome identity limitations in NAS sharing scenarios.  In heterogeneous environments the main issue is about Identity - the filer is unable to consistently translate the Windows identity to a UNIX identity.  With Centrify Zones and the LDAP Proxy we solved the issue providing a unified identity consistently across Windows, Unix, Linux and Macs.

In Summary, here's what we accomplished:


The LDAP Proxy present's user information for the filer with consistency.  The UNIX information corresponds to what the AD user has in the Centrify Zone.

Now, we can let the NetApp filer do it's magic.  Let's look at a very simple example:

Testing Mixed Share Permissions

Set up the NetApp share
  1. Create a new qtree
    qtree create /vol/vol0/mixed
  2. Change the security model as mixed
    qtree security mixed
  3. Export the newly created qtree
    exportfs -p rw /vol/vol0/mixed
Create a New AD Security Group for the Mixed Share Access
  1. Open ADUC browse to an OU for groups
  2. Select New > Group
  3. Give it a name  (e.g. "Mixed-Share-Access")
  4. Add a test user to the newly created share.
Publish the share in Windows
    1. Open Computer Managemetnt
    2. Connect to your NetApp filer
    3. Navigate to System Tools > Shared folders
    4. Follow the wizard to create your share
    5. In the Share Permissions, remove Everyone and add your previously-created AD Group

Now you have:
  • A CIFS share that is a shared folder protected by a Security Group in AD.  Access is governed by group membership and the permissions on the share.  NTFS permissions will be assigned at file/folder creation based on the user's identity.
  • An NFS share that can be mounted from any Unix, Linux or Mac system;  UNIX file permissions will be assigned at folder/file creation based on the user's identity.  We'll leverage the NETGROUPS option with Centrify-exposed options to accomplish this.
Let's see this in action


Improvements

As outlined in the latter part of the video, there's definitely improvements that can be implemented:
  • On the NetApp side, Kerberos can be implemented for additional security.  Remember that Centrify already provides "hands-off" Kerberos environment optimized for Microsoft's Kerberos.
  • The AD Group used to control access can be UNIX-enabled, this opens the possibility of leveraging the group's UNIX identity as a group owner on the UNIX side.

Key benefits

  • Process consolidation - now a single AD group can be leveraged to control access.
  • Better Security - there's a better grasp on who has access to what.

Saturday, July 5, 2014

Business Problems: Conquering the NAS multiprotocol (CIFS/NFS) file sharing in a mixed (Unix, Linux, Windows, Mac) environment using Centrify

Background

Network Attached Storage (NAS) is a key part of any enterprise today; they provide flexibility and an abstraction layer from an infrastructure perspective.  In the heterogeneous enterprise, the easy part is the infrastructure piece;  the hard part has to do with the diversity of platforms and the multiple file-sharing protocols in use.  This post and a series of labs will illustrate how leveraging Active Directory, Centrify Zones, the Centrify agent for UNIX, Linux & Mac and the Centrify LDAP Proxy we can ensure consistency with multi-protocol CIFS/NFS shares and enhance operational efficiency.

In previous posts, we have addressed how to to solve the consistency issue individually:


This posts uses a NetApp filer as an example(*).  The concepts outlined here can be used on any NAS device that supports LDAP.  We will assume that you understand that the fundamental problem is how to solve the issue of identity across multiple platforms and how we accomplish that with the Centrify Agent and Active Directory (I highly recommend that you read the previous links).

The Issues (or variations of it)

  • We have a NAS device, we integrated it with AD and it works great as long as the user is performing file operations on Windows.  However, we have to keep separate NFS shares.  We also have to manage permissions in multiple groups (Windows or UNIX) and that takes a lot of effort.
    Note, in my example with NetApp, the appliance does a great job at discovering LDAP servers:

    netapp1> Sat Jul  5 11:26:52 EST [netapp1:auth.ldap.trace.LDAPConnection.statusMsg:info]: AUTH: TraceLDAPServer- AD LDAP server address discovery for CORP.CONTOSO.COM complete. 2 unique addresses found.

    However, although it can resolve the AD portion, it is plain wrong about the Unix UID:
  • We have a multi-protocol share (CIFS/NFS), everything is great on Windows, when the user wants to access their files over NFS he has to call to have the file/folder ownership taken care of
  • We are tired of having to resolve file ownership issues.  Our organization is globally very diverse and each time we have a new visitor we spend significant amount of time helping them get access.
  • We have a combination of Unix, Linux, Mac and Windows users and although we had it down in individual servers, when we moved to filers now we have all these new issues.
  • I have a filer in my environment and we have Centrify as well, I know it can help but I don't now where to start.

Example of one of the issues

Let's look at an example.  In my environment with a domain-joined Netapp the appliance does a great job at discovering LDAP servers (this happened once I searched for one of my users):

netapp1> Sat Jul  5 11:26:52 EST [netapp1:auth.ldap.trace.LDAPConnection.statusMsg:info]: AUTH: TraceLDAPServer- AD LDAP server address discovery for CORP.CONTOSO.COM complete. 2 unique addresses found.

netapp1> wcc -s george.constanza
(NT - UNIX) account name(s):  (CORP\george.constanza - pcuser)
        ***************
        UNIX uid = 65534

        NT membership
                CORP\george.constanza
                CORP\UNIX-Model-Samba Users
                CORP\UNIX-Model-All Users
                CORP\UNIX-Model-dbaadmin
                CORP\Domain Users
                CORP\UNIX-Model-Sysadmins
                CORP\UNIX-Model-webadmin
                CORP\UNIX-Model-All UNIX Groups
                BUILTIN\Users
        User is also a member of Everyone, Network Users,
        Authenticated Users
        ***************

This is great from a Windows perspective, however, look at the Unix UID (65534), when you look at the options, this means that the user is being assigned a "nobody" user from a UNIX perspective.  We can further confirm this with this command:

netapp1> wcc -u george.constanza
no passwd entry for george.constanza

The way I have my system configured, although I can derive the user's identity leveraging the DCs, I can't see the user's Unix identity.  It is stored in the zone. See the output from a centrified system:

george@ubu1:/etc/centrifydc/openldap$ adquery user george.constanza -A
unixname:george
uid:1149240406
gid:1149240406
gecos:George Constanza
home:/home/george
shell:/bin/bash
auditLevel:AuditIfPossible
isAlwaysPermitLogin:false
dn:CN=George Constanza,OU=Staff,DC=corp,DC=contoso,DC=com
samAccountName:george.constanza
displayName:George Constanza
sid:S-1-5-21-2180375406-786980114-1643973036-1110
userPrincipalName:george.constanza@corp.contoso.com
canonicalName:corp.contoso.com/Staff/George Constanza
passwordHash:x
accountExpires:Never
passwordExpires:Wed Aug 13 11:28:48 2014
passwordWillExpire:39
nextPasswordChange:Thu Jul  3 11:28:48 2014
lastPasswordChange:Wed Jul  2 11:28:48 2014
accountLocked:false
accountDisabled:false
zoneEnabled:true
unixGroups:dbaadmin,george,webadmin
memberOf:corp.contoso.com/UNIX/Provisioning/UNIX-Model-All UNIX Groups,corp.contoso.com/UNIX/Provisioning/UNIX-Model-All Users,corp.contoso.com/UNIX/RBAC/UNIX-Model-Samba Users,corp.contoso.com/UNIX/RBAC/UNIX-Model-Sysadmins,corp.contoso.com/UNIX/UNIX Groups/UNIX-Model-dbaadmin,corp.contoso.com/UNIX/UNIX Groups/UNIX-Model-webadmin,corp.contoso.com/Users/Domain Users

Our goal is to make sure that our filer (or application) gets the correct Identity information for the purposes of proper file/folder ownership, access and permissions.


Who's affected

As you can see, the variety of problems outlines have multiple constituents:
  • Security needs to make sure that users have access to what they need and to comply with policies
  • IT (business) need to make sure that users can do their jobs
  • IT (operations) wants to be efficient and make sure that an army of people is not needed
  • The End User just wants to get their job done
As with all Business Problems, we'll use the Plan, Do, Check, Adjust methodology.

Planning

As discussed in previous posts, the key to this issue is Identity.  In this case, the NAS appliance needs to know not only the user's AD information, but the extended attributes (RFC2307) like unixname, UID, GID, Home, GECOS, Shell, etc., and unlike other approaches, Centrify stores this information in the zone.  This makes the solution more flexible because an AD principal can have multiple Unix identities.

Note:  If you've read this blog, you know that I've been very vocal about overrides (what enables multiple identities and roles).  Every process needs to have constraints; constraints make solutions simpler.  Having a normalized UNIX namespace is the goal and destination of any enterprise, even if Centrify allows you to put off this goal.  

Identity and Access Planning
  1. Do the best you can to have a normalized namespace.  Leverage Centrify's ability to assign users a unique UID by generating it from the AD SID (using Centrify or Apple's Scheme).
  2. Perform a migration if necessary (this post talks about strategies and Centrify tools for that purpose)
  3. Leverage the power of hierarchical zones:  provision all identities at the top-most zone.  This will ensure that all pertinent systems will know the user's identities.
  4. Continue to enforce the least-access principle:  Use the "listed" role to make users known to the systems (e.g. the LDAP proxies) and ensure that they can't sign-in to the systems.
Planning your LDAP Proxies

The Centrify LDAP proxy leverages the Centrify client (adclient) to present AD information to clientless devices or programs.  The benefits of leveraging the proxy are:
  • It flattens AD for the application:  depending on the enterprise, AD can be complex.  There may be multiple forests, child domains, one-way, two-way trusts, etc.
  • It leverages the agent's built-in capabilities:  optimal DC selection, site-awareness and offline cache.
Plan for high-availability:  the NAS (or application) is going to require redundancy, plan to deploy and configure multiple proxies.
Plan for confidentiality:  make sure that only authenticated connections over secure transports (TLS, SSL, etc) in case your appliance or application does not do it natively.
Plan for high-performance:  As always, have NSCD on the Centrified system, and plan for co-location near the appliance, application and be close to Global Catalog servers in complex environments.

Plan for your file-sharing use case

This section varies based on what you want to accomplish.  Planning for home directories is not the same as planning for a workgroup share.  

Implement (Do)

  1. Unix-enable all your relevant users (you don't need to Unix-enable users that won't ever access via NFS).  You can do this manually, with ZPA or with your own IdM solution.   
  2. Assign roles as required:  keep the least-access principle intact by leveraging the "listed" role.
  3. Install the LDAP Proxy(es):
    1. Copy the Centrify LDAP proxy binaries to the platfrom.
      e.g. for Ubuntu on 2014:  centrifydc-ldapproxy-5.1.3-deb5-x86_64.deb
    2. Log in and install the package
      e.g. dpkg - i centrifydc-ldapproxy-5.1.3-deb5-x86_64.deb
      The LDAP proxy binary is on /usr/share/centrifydc/libexec
      The config files and schemas are in /etc/centrifydc/openldap
      The LDAP utilities (like ldapsearch)  are on /usr/share/centrifydc/bin
    3. Modify the RFC 2307 map
      1. Edit the /etc/centrifydc/openldap/rfc2307.map file
      2. Add the following line (for NetApp compatibility):
        # Added for NetApp
        posixAccount.userPassword: _userPassword
    4. For testing only, start slapd manually:
      dzdo /usr/share/centrifydc/libexec/slapd -f /etc/centrifydc/openldap/ldapproxy.slapd.conf -h ldap://ubu1.corp.contoso.com
    5. Check that the proxy is running
      $ ps -ef | grep slapd
      root     23192     1  0 Jul04 ?        00:00:00 ./slapd -f /etc/centrifydc/openldap/ldapproxy.slapd.conf -h ldap://ubu1.corp.contoso.com
    6. Verify that the proxy is responding to queries (e.g. check the Administrator account)
      $ /usr/share/centrifydc/bin/ldapsearch -h ubu1.corp.contoso.com-x -b "dc=corp,dc=contoso,dc=com" "(cn=Administrator)"
      # extended LDIF
      #
      # LDAPv3
      # base <dc=corp,dc=contoso,dc=com> with scope sub
      # filter: (cn=Administrator)
      # requesting: ALL
      # with pagedResults control: size=100
      #
      # Administrator, Users, corp.contoso.comdn: cn=Administrator,cn=Users,dc=corp,dc=contoso,dc=comaccountExpires: 0
      (output truncated***)
  4. Configure your NAS appliance (e.g. on NetApp Ontap v 8.1.2)
    1. Housekeeping:  Make sure that the name of the appliance is resolvable (add an A record for it) and that all Centrified systems, Windows Systems can resolve it.  The NetApp system should resolve all systems as well.  E.g.
      netapp1> ping ubu1
      ubu1.corp.contoso.com is alive
      netapp1> options dns
      dns.cache.enable             on
      dns.domainname               corp.contoso.com
      dns.enable                   on
      dns.update.enable            off
      dns.update.ttl               24h
    2. Housekeeping:  Make sure that CIFS and NFS are licensed, enabled and the NetApp filer is joined to the domain.  (use the license command, the cifs setup command )
    3. Verify that there's a computer object for the netapp device and that you can (as a Domain Admin) connect to it via Computer Management.  E.g. using ldapsearch:
      george@ubu1:/etc/centrifydc/openldap$ /usr/share/centrifydc/bin/ldapsearch -h
      ubu1.corp.contoso.com -x -b "dc=corp,dc=contoso,dc=com" "(cn=NETAPP1)"
      <truncated>
      # NETAPP1, Appliances, corp.contoso.com
      dn: cn=NETAPP1,ou=Appliances,dc=corp,dc=contoso,dc=com
      <truncated>
    4. Optional:  Make sure that Domain Administrators are not mapped to root the NetApp filer:
      netapp1> options wafl.nt_admin_priv_map_to_root off
    5. Configure NetApp to use the LDAP Proxy (Example corp.contoso.com;  ubu1)
      1. Set up the LDAP base container
        netapp1> options ldap.base dc=corp,dc=contoso,dc=com
      2. Set up the LDAP server(s) to be used by the NetApp appliance
        netapp1> options ldap.servers ubu1.corp.contoso.com
      3. Set up the name of the Active Directory Domain
        netapp1> options ldap.ADdomain corp.contoso.com
      4. Map the userPassword attribute to avoid null results
        netapp1> options ldap.nssmap.attribute.userPassword cn
      5. Enable LDAP
        netapp1> options ldap.enable on
      6. Modify the /etc/nsswitch.conf to make LDAP the first source for user, group and shadow entries.
        netapp1> wrfile /etc/nsswitch.conf
        hosts:  files  dns
        passwd:  ldap files
        group: ldap files
        netgroup:  files nis
        shadow:  files nis
      7. Verify the results
        1. Query and note the UID from Windows
          wcc -s jerry.seinfeld 
        2. Query and note the UID from UNIX
          wcc -u jerry.seinfeld
        3. Advanced query using NSS
          priv set diag
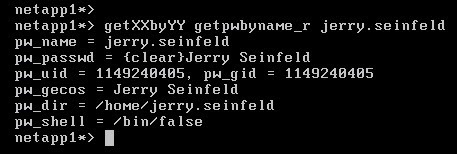
          getXXbyYY getpwbyname_r jerry.seinfeld


          Compare the results with the zone information.  At this point it should match the UNIX identity on Access Manager

Check the Results

To verify the results, use a multi-protocol (CIFS/NFS) share and make sure that the identity information is consistent.

  1. From a Windows system in the target domain, map or browse to the share via CIFS.  Create a file.
  2. From a Unix/Linux or Mac system, mount the share as an NFS mount and issue the ls -la and ls -lan.  Compare the results from before.

Adjustments to the Implementation

Adjustments are based on your existing environment, however, based on ours here are some key modifications:

  • There's only one LDAP proxy, we need several for high-availability
  • The LDAP Proxy is accepting anonymous connections, we need to make sure that only authenticated connections are accepted.
  • Ideally we would use Secure LDAP or implement TLS or IPSec for additional confidentiality controls.
  • Operations needs to monitor the health and status of the LDAP Proxies

Lab Videos


What you'll need to follow along:
  • Active Directory
  • Centrify Standard Edition
    • A Centrify zone
    • Client for Unix, Linux or Mac
    • Centrify's LDAP Proxy
  • A Multi-protocol filer (we'll use NetApp's  ONTAP Simulator)
Installing, Configuring and Testing the Centrify LDAP Proxy


Configuring the NetApp appliance to use the Centrify LDAP Proxy


Verifying the NetApp CIFS/NFS share provides consistent identities

Sunday, March 2, 2014

Lab 16: Configuring ZPA for Automatic UNIX Group Provisioning

Background


Posting:  http://centrifying.blogspot.com/2014/03/basics-automatic-unix-profile.html
Automatic Provisioning for Users: http://centrifying.blogspot.com/2014/01/labs-centrify-zone-provisioning-agent.html

Part 1

  1. We configure grant the proper rights to the Centrify ZPA AD service account
  2. We create the Source Group
  3. We create a test group (UNIX-HQ-webadmin) and nest it to the source group.
  4. We test and verify that automatic provisioning is working


Part 2

  1. We verify that add/moves/changes are working as expected.
  2. We modify the UNIX group profile with account overrides
  3. We modify the UNIX group provisioning to automatically set the unix name and GID based on our needs.
  4. We add the dbaadmin group.
  5. We verify that regardless of the membership, only the users who have been granted rights to the system are the ones in the NSS group.

Saturday, March 1, 2014

Basics: Configuring the Centrify Zone Provisioning Service for Automatic Secondary UNIX group provisioning

Background

In a previous posting we discussed how to implement automatic provisioning of UNIX user identities using Centrify's Zone Provisioning Agent (ZPA).
As part of BP#2, one of the key requirements was to implement a provisioning model for secondary UNIX groups and to make it resemble the existing one for users.
This capability consists in the automatic creation of the secondary UNIX group as well as the lifecycle maintenance of members (add/moves/changes).

All the principles applied in the basic posing about ZPA apply here, but in the context of UNIX secondary groups.  Let's apply the Plan-Do-Check-Adjust methodology.

Planning for Secondary Group Provisioning

Is the secondary group needed
The first place to start is to ask "Why is this secondary group required?" -  remember that with Centrify there is no need to have these groups for Access or Privilege purposes, Zones and RBAC take care of all that. In these exercises, the typical answer "Because that's the way is done" is not a good answer so you may have dig deeper.

Naming Conventions
The same rules of UNIX systems apply here as well, but they are a bit more stringent;  the 8 character limit for users is platform-dependent;  the UNIX group case, it may be more of a hard requirement.

Active Directory
Basically the way UNIX Groups work in Centrify is as follows;  there is a security group in AD for each secondary group in UNIX;  the memberships are handled from AD (the process consolidator and time saver), however, governance and processes have to be taken into account.  Questions such as:
  1. How are AD Security group are requested today?
  2. How is the membership lifecyle managed (add/moves/changes)?
  3. Are group memberships subject to any attestation process?
Need to be understood and agreed upon.  

Group Merging
Group Merging is the ability to mix members from other Name Server Switch groups (like /etc/group) with UNIX Enabled AD groups. For example, if an application requires the enumeration of all the members from the software group (UID 200) and the application uses local users (e.g. like the db2inst account) and AD users (like jessie.matthews), then this feature needs to be implemented as well.

Implementing (Do) Secondary Group Provisioning

The process is as follows:
  1. Make sure the service account used for ZPA has the proper delegation to add/remove/modify group profiles.  This is done through the Delegation Wizard of the zone.
  2. An Active Directory "Source" Group is created.
  3. ZPA is configured to look at that group as the source group.  For consistency, this group is stored in the OU designated for provisioning 
  4. The rules for GID are set, the options are:
    • An unique value generated from the group's System ID (SID)
    • The RFC 2307 attribute (has to be populated in the object manually or programatically)
    • Using the defaults set in the zone (Group Defaults tab)
    • Using Apple's scheme (this is new for version 2014)
  5. The naming rules are set (truncation, character sets, prefixes, etc)
  6. Once this is set, ZPA is ready to provision UNIX groups.

Verifying the Implementation (Check)

Verifying group creation:
  1. Restart ZPA (so the new zone provisioning configuration is processed)
  2. Create an AD Security group.
  3. Nest the group (make it a member) of the source group in the previous step.
  4. Wait the ZPA refresh cycle or restart the service.
  5. Verify that the new group exists under Zone > UNIX Data > Groups.
  6. Verify that the group exists in the adequate UNIX systems.  There are several ways:
    getent group | grep <unix name of group>
    adquery group | grep <unix name of group>
  7. To verify the group's deletion, just remove the AD group from the source group and cycle ZPA;  the UNIX group will be removed from the zone.
Verifying Add/Moves or Changes
  1. Add a user to the previously provisioned group
    Note:  this user needs to be at least listed in the system, otherwise he/she won't show. For example, if the user has a UNIX identity, but only has access to web servers, the user will not show in the Database Servers by virtue of the access rules enforced by Centrify.
  2. Wait the ZPA refresh cycle or restart the service.
  3. Verify that the user's UNIX name is in the list of users for that group.
    There are several ways:
    getent group | grep <unix name of group>
    adquery group | grep <unix name of group>
  4. Remove the user from the AD group (go to step 2) and in step 3 verify that the user is gone.

Performing Adjustments

Adjustments may vary depending on the results.  They can be:
  • Adjusting how the GID is generated (or reviewing the provisioning process)
  • Adjusting how the UNIX name of the group is generated.
  • Adjusting group merging options.

Sunday, January 19, 2014

Basics: Privilege Management Implemeting (Do) on UNIX/Linux using Centrify and Active Directory

Background


This is the implementation portion of the 4-part series around Privilege Management with Centrify for UNIX/Linux.  Read the previous post to catch up.  The basic knowledge for this post, although focused on UNIX, it's applicable with the exception of rights, applies to Windows too.  The activities required to implement roles with Centrify requires:
  1. Create Computer Roles if needed
  2. Create and Configure Roles
    • Build the PAM access rights if needed
    • Build the Commands if needed
  3. Assign the role

Creating Computer Roles

Centrify computer roles are groupings of systems that perform a particular role.  I like to call them computer groups.  Systems can be grouped any way it makes sense to you.  The real power of computer roes is that they are based on AD Security groups, this means that you can have computers (just like users) that have multiple roles.   Examples:

  • Fragmented (vertical) model:  Web, Database, Utility, Network Services, etc.
  • Mixed mode (horizontal/cross funtional)l:  Application X - Dev; Application X - Prod  (Application X has Database, Web and Application servers).


To create a computer role:
  1. Create an AD Security Group  (this is the Computer Role container)
  2. In Access Manager, Open the Zone, and expand Authorization > Computer Roles
  3. Right click Computer Roles and select Create New Computer Role
  4. Set the name, and browse for the AD group created in step 1.

What happens when you create a Computer Role?

A computer role adds a new scope to assign RBAC and to categorize systems.  The operations associated with Computer Roles are role assignment and member add/moves/changes.

The add/moves/changes for roles are performed within the AD group that grants the role, this makes the Role Assignment a first time/adjustment activity.

Creating Roles

Centrify roles are the building blocks for Role-Based Access Controls.  Roles are defined, then assigned to AD security principals.  In UNIX roles are composed of PAM Access and Commands.

  • PAM Access:  Defines the PAM-aware protocols that are allowed in the the role.  Examples:  Secure Shell (ssh), xdm, VNC, and of course, not recommended:  pure telnet & FTP.  The built-in login-all  PAM right allows access on all protocols including the console.
    Note for AIX:  Some AIX platforms are configured for LAM can't provide granular access.
  • Commands:  are the privileged (or non-privileged) commands defined for the role.  They can be defined explicitly, or with regular expressions, tied to the Centrify restricted shell, scoped for a particular user, and defined with additional authentication requirements.

To create roles:

You need to know how the role will access the system (e.g. via SSH), what privileged commands it needs (e.g. service control for httpd), any time restrictions and if you have Centrify Enterprise, you

  1. In Access Manager open the Zone > Authorization > Role Definitions
  2. First, always review your roles to see if a role exists that can be reused.
  3. Examine PAM The UNIX Rights definitions node for PAM and Commands and make sure the building blocks exist.
  4. Right Click Role definitions and Select Add Role
  5. Name the role, use the description field and add any time/day restrictions if needed.
  6. Go to the System Rights tab.  Define the logon experience. 
    • Password login and non-password login (SSO) are allowed:  if  you plan to use both SSO and passwords  (check it)
    • Non-Password SSO login allowed:  You would uncheck the one above and only check this if you're in a Smart Card scenario.  (check it)
    • Account disabled in AD can be used by sudo, cron, etc:  Only required if you're defining a role for a service account managed from AD.  (leave unchecked)
    • Login with a non-Restricted Shell:  This is going to be not selected if using the Centrify Restricted shell (white-list mode).  (check it)

      Note the Windows rights, not covered in this posting.
  7. If using Enterprise Edition, go to the Audit Tab, and select the appropriate option:
    Especially when Auditing roles for Windows, the integration of RBAC and auditing can result in auditing risky actions and less storage usage in the Audit database.
  8. Press OK.
    Very important: At this point, the role is defined, but it has no rights assigned to it, this has to be the most common mistake in the area of RBAC along with assigning a role without granting an identity.  
  9. Right-click the newly-created role and select Add Rights
    Check all the rights (PAM) and commands for the role and press OK.
Now the role is ready to use (be assigned).


Assigning Roles

As described, Role assignment is the granting of a UNIX (or Windows) role to an AD Security Principal in the correct scope.  Roles can be assigned at:

  • Zone Level:  This role will apply to all systems in the zone.  (Limited Use)
  • Child Zone:  This role will apply to the child zone (Depends on your design)
  • Computer Role:  This role will apply just to the set of systems in the role (Optimal usage)
  • Computer:  This is a local override or exception  (If you find yourself doing this a lot, you have a governance problem)
Time-bounding Role Assignments
Permanent vs. Temporary Role assignments:  Time-bounding of role assignments is a powerful feature of Centrify, this allows for scenarios like this:
  • Change-control windows:  You can have your population be regular users all the time, and only get a role with privileges when a change control has been granted.  The access/rights expire automatically at the time specified.
  • Contractor scenarios:  A set of external users may need access to systems in a specified period of time.
With the AD Group, scope and time, all the information is ready for do do an assignment.

  1. In Access Manager, go to Zone > Authorization
  2. At this point, it's time to pick the scope:
    • To assign at the zone/child zone level, select the Role Assignments node right under authorization.
    • To assign at the Computer Role level, expand Computer Roles, find the correct system group, and expand to expose Role assignments
    • Exception:  At the system level, go to the Computers node, find the computer, expand it and find Role Assignments.
  3. Right click Role Assignments and select Assign Role, then pick the role you are going to assign.
  4. In the Assign Role box, time-bound based on your information (scope or permanent), then use the Add AD Account button and find the Group (or user -not recommended- promotes exceptions) that you will grant the role to and press OK.
Process Reuse: The biggest benefit of assigning the role to a group is that this makes the integration with other tools and process reuse much easier.

In the next post we will talk about the Check (Verify the implementation) portion of Privilege Management.

Saturday, January 18, 2014

Basics: Privilege Management Planning on UNIX/Linux using Centrify and Active Directory

Background


Privilege Management (or Privilege Access Management):  is the capability to control and limit users activities in accordance with the least privilege principle, some key goals:

  • Limit access to systems based on business need-to-know
  • Limit privileges or actions to those required to perform the job function
  • Provide timely information for the purposes of attestation or auditing
  • Enforce separation of duties.
In the context of UNIX and Linux systems, Centrify provides capabilities to establish a Privilege Management model that satisfies all these goals (since version 2013, these benefits extend to Windows systems too).
To perform a Plan-Do-Check-Adjust exercise on Privilege management, we will break down the activities in Access, Privileges, Governance and Reporting.  To keep the posts a short read, we'll focus on planning.

Planning Privilege Management with Centrify for UNIX/Linux


Governance

Governance is related to separation of duties and ideally, the people who define the access, rights and privileges (Security Analysts, compliance, etc.) are different than the people who access the systems (System Admins, DBAs, etc);  however, in the real world the expertise and organizational history required to establish a governance model is in the hands of the most senior administrators.  

Delegation of Centrify objects is performed in two places:
  • In Active Directory (this is another topic)
  • At the zone level, Centrify breaks the actions to be performed as follows:
Rights
Category
Description
Change zone properties
Operational
Changing zone properties may imply changing the UID/GID defaults, renaming the zone or how the zone is provisioned.  These actions should be change-controlled.
Add users
Operational
Adding users is basically UNIX-enabled AD users.  This is delegated to the ZPA service account in an automatically provisioning scenario.  In a manual zone, this is just day-to day activities. 
Add groups
Operational
Same as above, but with groups; however, this is a one-time setting, the real operations are Add/Removes from the mapped AD group.
Join computers to the zone
Operational
This is the equivalent to joining computers to the domain, the Windows process can be reused here.  UNIX operations are typically granted this role.
Remove zones
Operational
Deleting zones (in production) should be a change-controlled activity.
Remove users
Operational
See “Add users”
Remove groups
Operational
See “Add groups”
Remove computers from the zone
Operational
See “Join computers to the zone”
Modify user profiles
Operational
See “Add users”
Modify group profiles
Operational
See “Add groups”
Allow computers to respond to NIS
client requests
Operational
With Centrify, NIS maps can be reused securely in a clientless scenario, Operations may need to configure computers to act as NIS proxies for appliances, legacy systems, etc.
Import users and groups to the zone
Operational
See “Add groups”
Manage roles and rights
Governance
Roles and rights are the building blocks of RBAC.  See below.  This activity should be reserved for Security or Compliance, although in an initial implementation may be granted to UNIX administrators.
Manage role assignments
Governance
Role assignments entitle AD user or group principals to access or privileges based on a role.  The guidance is the same as “Manage roles and rights.”
Modify computer roles
Governance
Computer Roles are the groupings of systems.  They define the types of systems and the scope of access. The guidance is the same as “Manage roles and rights.”
Add or remove NIS map entries
Operational
With Centrify, NIS maps can be reused securely in a client scenario, Operations may need to add/remove/change those maps.
Modify NIS map entries
Operational
See “Add/Remove NIS map entries”
Remove NIS maps
Operational
See “Add/Remove NIS map entries”

During the implementation phase, the trusted administrators that are implementing Centrify may have full control, but as the implementation matures, as part of the adjust phase, the governance rights can be split from operations.  The key questions are:


  • Who are the individuals that have operational responsibility for your UNIX/Linux systems?
  • Who are the individuals that have governance responsibility for your UNIX/Linux systems?
  • Is there a geographical o divisional breakdown that we should be aware of?
    The answer to this final question is very important.  It may trigger the need to have parallel or child zones.  Try to do as much as you can to keep things as flat as possible.

Privileges


Planning for privileges is one of the hardest activities;  and this is because the people using the system may not be used to thinking about Roles-Based Access Controls.  A good starting point may be a sudoers file (Centrify can import them); but even that may carry legacy information;  the worst case scenario is the implementation of a centralized mess.  Here are some base questions for a table-top exercise:

Questions
Typical answers
Comments
1.      What are the user populations that access UNIX/Linux systems?
DBAs, Developers, System Administrators, etc.
The goal of this question should be to identify user populations.  Moderating the scope of this answer is critical.
Also, try to find out if users are within an AD domain, across domains, etc.  This has an effect on the type of Security groups used for role assignment.
2.      What are the groups of systems they access today?
Oracle servers, Apache servers, Dev Servers, Filers, etc.
The goal of this question is to identify how systems should be grouped.  This question is the key to establish the governance model because it will produce the Computer Roles.  An advantage of Centrify is that a system can have multiple roles.  It can be a Database System and a Web System at the same time.
3.      What are the groups of systems they should have access to?
The answer varies
It’s possible that this may be the hardest question to answer; this is because other than Netgroups, organizations may not have a mature way to group systems and grant access.
4.      How do these users access the systems today?
SSH, console, VNC, FTP, NFS, Samba, etc
This is key, because Centrify can control how PAM access is granted.
5.      How do these users should access these systems?
This varies too
With Virtualization, console access is rare; also, unless there are HPUX, Solaris or AIX systems, console access is limited to a trusted set of administrators; there will be a bias towards SSH, but even that can be controlled granularity with Centrify.
6.      How do people use privileges today?
The answer to this question may vary.
The best way to explain this is with an example. 
How do DBAs use the oracle account?
Answer: “they access with their account, and sudo as oracle or su to oracle”
Upon verification, turns out those DBAs were logging in directly with the Oracle account.
7.      What are the privileges that they have today?
Everyone is can be root, sudo access, etc.
The answer to this question depends on the maturity level of the organization. 
8.      What are the privileges that they should have?
The answer varies
Just like the answer to question 3, since the possibilities are unknown, it may be hard to get.

Again, the hardest part of this planning exercise is to get people that know enough about what's possible with Centrify (see implementation below), and that privilege management has its own roadmap. 

Access


Access involves planning the types of systems available in the enterprise.  Grouping systems based on type,  or environment allows the scoping of roles to be tied to groups of servers, effectively enforcing both access and privileges.  For example, a group of systems may be defined for Application A, that has web, application and database servers; it's possible to group these systems together and have a different access/privilege model for DEV, QA and Prod.


The Output of the Planning Session


In Business Problem # 1, the access model was well defined;  and in Business Problem #2, the privigeles are going to be expanded:

User Populations
Access / Protocols
Privileges
System Administrators
All Systems via any protocol
Run any command as root
DBAs
Database Systems via SSH
Elevate to db2inst
Run db2 commands as db2inst
DB2 instance service control
Web Admins
Web Systems via SSH
HTTP daemon service control (as root)
Edit http daemon configuration file (as root)
Developers
Database and Web Systems via SSH
Run application X, service control
All UNIX-enabled users
Listed on Filers
No access, no privileges.

Stay tuned, in the next post we'll talk about Implementation and Verification.