Showing posts with label UNIX admin. Show all posts

Saturday, January 11, 2014

Business Problem # 2: Network Shares, Granular Privileges, Security, Availability, Secondary Groups and Usability Enhancements

Background


After conquering Business Problem #1, there are some other challenges related to network shares, privilege management and other usability requests.


Network Shares
  • End-users are calling in with issues accessing their files over the network (permissions issues) in NFS and Samba shares
  • Some of these shares are hosted in non-centrified systems and appliances that are closed boxes.
Granular Privileges
  • Database users are requesting the ability to run certain utilities with in the context of certain privileged local accounts.
  • Web Administrators are requesting the ability to perform certain operations with the Apache server.
  • Offshore operations:  The company has outsourced some functions (backup operations) to an external group.  They need to perform backups in late hours of the night.
Security Enhancements
  • Access reports are produced with more efficiency, however, the Security department would like to be able to generate them on their own without the assistance of the UNIX administrators.
  • Passwords stored in script utilities:  there is an initiative, now that there are better tools, to eliminate the practice of using service accounts and embedded passwords in scripts or with reversible encryption.
Enhanced Availability
  • Since the number of servers is increasing, especially in remote sites, there's a need to make sure that a limited set of trusted administrators can access the systems in the event of an outage, even if they have not signed into the system before.
Usability Enhancements
  • Certain users are requesting that since the identities are consolidated in AD and the OpenSSH versions deployed support the Generic Security Services Application Program Interface (GSSAPI) if it's possible to get silent sign-on to UNIX/Linux servers using SSH.
Secondary UNIX groups
  • Secondary UNIX groups are still used for different purposes.  Although they are not used anymore for access or privileges with sudo, they are still used for various applications.  There's an interest in streamlining this process and make it as automatic as possible.

Stakeholder Concerns


UNIX/Linux Admin
-          We should be able to maintain the auto mount maps to NFS shares.
-          The process of provisioning Secondary groups should be aligned with the existing process of user provisioning.
Security Analyst
-          Additional rights can be granted to Database and Web users as long as privilege accounts are not shared.
-     The offline mechanism for trusted administrators in remote servers, should not store passwords in the clear;  this would conflict with another initiative.
IT Manager
-          Users are allowed to leverage SSO, as long as it doesn't affect the deployment schedule or require additional components.
NetApp filer administrator
-          The filer is a closed system.  Any solution should use the facilities exposed by the appliance.


Planning Activities 

Network Shares  (UNIX Admins, Appliance  admins)
During the initial rollout, some identities were overridden at the system level, this means that when users log into those systems there is inconsistencies with their identities.  These systems need to be converted.
In addition, there are stand-alone servers running Samba and NFS that need to be aligned with the new solution.
Finally, there's NetApp filer that needs to be integrated to the system, leveraging Centrify tools.

Additional Privileges  (all)
After working together with the Security Analyst, Web and Database Managers, the UNIX administrator decide to extend the privileged rights for the Database users (DBAs) and Web Administrators.
  • DBAs: 
    • Will continue to access only database systems via SSH
    • Will be able to elevate to the db2inst account
    • Will be able to run the db2 commands as the db2inst account
  • Web Admins can
    • Will continue to access only web systems via SSH
    • Will be able to edit the files in the /etc/httpd/conf
    • Will be able to control the status of the httpd service
      Controls should be implemented to limit abuse.
  • Offshore Operators
    • Will have SSH access to Utility Servers
    • Will be able to run the tar command to perform home directory backups
    • The privileges will be limited from 10 PM - 6 AM
Security Enhancements (UNIX admin, Windows Admin, Security Analyst)
Reporting for Security Analysts
Since the reporting facility of Access Manager is an MMC snap-in, the Windows administrator states that it would not be a problem to allow read-only access to the Security Admins.

Improving Script/Service Account Security
As part of the initiative to have better security, the UNIX administrator will explore options to eliminate the practice of knowing service account passwords and the possibilities to improve the security of scripts that leverage those accounts.

Usability (UNIX Admin, Security Analyst)
There should not be any issues because both versions of SSH Server and client support GSSAPI.  No additional components are required.

Thursday, January 9, 2014

Business Problems: State of Business Problem # 1

Background

In the description of business problem # 1, we outlined that Contoso was looking to accomplish the following goals:

  • Eliminate the usage of shared privileged accounts 
  • Make sure people are uniquely identified (PCI 8.1) 
  • End users will authenticate to Unix systems with their AD credentials 
  • Make sure that when accounts are enabled/disabled/constrained in their Active Directory, the same is expanded to Unix and Linux systems 
  • The security policy for passwords needs to be uniform across platforms (Windows, UNIX, Linux) 
  • User passwords can be changed from Windows/Unix/Linux without synchronization.


Eliminate the usage of shared privileged accounts 


Shared privileged account use has been limited by using Centrify-enhanced sudo (dzdo).  Although our UNIX admin can still do things like "dzdo su -" the technical controls are in place.  All that is required is the detective controls to complement this capability.  We will fine-tune the privilege management later.


Make sure people are uniquely identified (as in PCI DSS 8.1)


Users are uniquely identified in Active Directory.  Each user has a unique User Principal Name (UPN) and sAMAccountName.  In a more complex scenario, this can also be associated to an EmployeeID.  Notice that in the context of the UNIX identity, Centrify offers the flexibility of Identity Overrides.


End users will authenticate to UNIX systems with their AD Credentials


Users can authenticate with their AD UPN, with their login name or any overridden login name at the zone, child zone or system levels.  The authentication uses Kerberos, therefore there's the benefits of encryption, ticketing system (no passwords don't travel on the wire) and high-availability.


Make sure that when accounts are enabled/disabled/constrained in AD, the same behavior is experienced in UNIX/Linux


First off, by default, All AD users don't have access to the UNIX/Linux systems joined to the domain via Centrify.  They need a UNIX identity and a role that allows them to log in.  Least access is enforced by default. Centrify users PAM, and the account module in the PAM stack will check:
- if the account is enabled, disabled or expired
- if the account is allowed to log in at the time  (at the AD account and Role level)
- if the account is allowed to log in from that workstation (at the AD account and Role level)

The security policy for passwords needs to be uniform across platforms (Windows, UNIX, Linux, Macs)


This has been accomplished by way of consolidating the accounts identity in AD and by using the Centrify Agent's group policy capability and it's ability to perform these transactions using Kerberos.


Your AD password will expire in 26 days  <= this is also from GPO
Last login: Wed Jan  8 16:26:59 2014 from client1.corp.contoso.com
jmatthews@suse1:~> passwd
Changing password for jmatthews.
Changing password for jmatthews
(current) AD  password:
Enter new AD password:  <non-compliant password>
Confirm new AD password: <non-compliant password>
The password change operation failed due to a policy restriction set by the Active Directory administrator. This may be due to the new password length, lack of complexity or a minimum age for the current password.

External Benefits


  • The processes of  provisioning (and deprovisioning) of UNIX identities as well as Role Assignments  can be consolidated manually, programmatically or with an Identity Management solution.  These are efficiencies.
  • Any existing self-service (or assisted) password reset process has been flattened (there's no deviations for UNIX/Linux accounts), this is because the identity is unique.
  • As a by-product of joining the systems into AD, there's higher visibility to these assets via AD (this means that tools like System Center can be used to account for these assets) and more security visibility - successful and failed login attempts to UNIX systems are viewable in the Security log of the Domain Controllers.
  • The infrastructure is reused, the knowledge is reused, the processes are reused.

Individual Stakeholder Concerns 


(comments in RED)
UNIX/Linux Admin
-          It’s becoming very hard to keep track and maintain local accounts.
This concern has been addressed and there's mechanisms to continue to conserve local identities if necessary.  The recommendation or end state should be a normalized namespace.
-          We have some old NIS servers and maps that need to go away (legacy)
We have yet to address this.  Future postings.
-          Each time there’s I need to scramble to make information available to auditors
The fact that we have implemented RBAC and that the information is stored in AD, makes the use of the  "Show Effective User Rights" and Reporting facilities of Access Manager a great tool to produce this information.
-          The root, oracle and other service accounts are shared; it’s hard to establish who did what.
UNIX-enabled AD users can use Centrify-enhanced sudo to perform privilege actions as these accounts without knowing the password, accountability is increased because users perform functions as themselves and these actions are written in the system log.  More on this on the Privilege Management topics.
-     Ideally, any service accounts are managed within the UNIX system and not provisioned in the directory
Service accounts can remain locally, and by way of using PAM, this is not an issue to coexist with Centrify.
-     I am concerned that if AD (or the network) is not available, it will be impossible to log in to servers.
Centrify implements several high-availability scenarios:  first, it's AD sites aware, which means that it's smart enough to pick another domain controller in case the current one is not available.  If no network or AD is available, Centrify has the offline cache to rely on.

-     I am concerned of not being able to perform functions to do my job (superuser) or that it will be hard to elevate to get rights
The Centrify agent implements privilege management modules that allow accounts to run with privileges.
Security Analyst
-          We will start processing credit card data soon, therefore I need to make sure that privileged accounts are not shared
-          We need to make sure that everyone has a unique identity
-          We need to carry over the security policy defined on Windows to UNIX (password policy:  length, complexity and expiration)
See above. All objectives have been met.
IT Manager
-          Our workflow for provisioning and password resets is very complex.  When somebody needs a UNIX account for our systems, more teams need to be involved.
-          We have to be ready to process credit card data
-          We have an Identity Management System (FIM) and we would love to leverage some of the existing processes
      The initial PCI requirements 8.1 and 7 are covered.
Since identities have been consolidated
 in AD, the provisioning, deprovisioning, self-service or assisted password reset, privilege management processes can be integrated easily to any tool, by just adding (or removing) users from Active Directory Security groups.  Automatic Provisioning with ZPA was demonstrated in this post and video.
Windows Administrator
-          Whatever solution is coming in should not require schema extensions to AD and no Software in domain controllers.
In the preparation lab and the installation lab we did not require any schema extensions and we didn't even go into the DC.
-          We should be able to keep the same organization and naming conventions that we use in the directory today.
In the preparation lab, we proved that UOs and Groups can be leveraged to establish a storage and governance model in AD, same model works for Group Policy processing.

Monday, January 6, 2014

Basics: Using Group Policy on UNIX/Linux and Mac OS X Systems with Centrify

Background

As per Wikipedia: "Group Policy provides the centralized management and configuration of operating systems, applications, and users' settings in an Active Directory environment"  but what does this mean:
  • For the IT Administrator:  It allows the enforcement and management of computer and user settings to be much easier.  It's also easier to achieve standardization from a central administrative place.
  • For Security:  It allows for security policy definition in a single place, with enforcement in multiple endpoints.
  • For End-Users:  It means that the two parties above can control my experience.  :-)  All joking aside, group policies can make the user's experience more consistent.
  • For IT Management:  Group Policies promote better compliance, more standardization and operational efficiency.
Centrify provides Group Policy objects for the UNIX/Linux (including GNOME), Mac OS X and in the user suite for iOS, Android, etc.

How does group policy work?

In a Windows network, client reads a special share in the SYSVOL share of a domain controller and based on the scope (Site, Domain, OU), the processing rules and security settings they may or may not be processed.  They can change computer settings (upon reboot) or user settings (upon login) or after the gpupdate command is issued.

But UNIX/Linux systems are not Group Policy capable?  Yes, this is true.  Unless the system has been Centrified.  The section below explains how Centrify can process group policies.

Note:  Group Policy processing is available on the licensed versions of Centrify for UNIX, Linux and Mac OS X, with the exception of the Password and Kerberos policy that can be enforced in the Express (community) version.  This blog does not cover Centrify Express, but the reason why this is possible is due to the shared objects that comprise the Account PAM module provided by Centrify.

How does Centrify enable Group Policy for UNIX/Linux and Mac Systems?

There are several components that allow group policies to be processed in UNIX systems.
On the Windows side:  Group Policy templates and definitions (.adm and .xml) files provided with the Centrify Suite. A trusted administrator links and configures the GPOs, which in turn are copied in the SYSVOL share of the domain controller (and replicated in the domain).
On the UNIX/Linux/Mac OS X system side:  The Centrify agent (adclient), mapping files, the mapper process, a virtual directory and config files.


The simplified process works like this:
  1. At the group policy refresh interval or when the adgpupdate command is issued, adclient reads the SYSVOL share of the current domain controller.
  2. The client determines which group policies apply according GP processing rules.
  3. The group policies are interpreted and implemented by the mappers process
  4. The corresponding changes are made to the configuration files in the system.
For example, the Windows logon banner, specified in the "Interactive logon: Message text for users attempting to log on" GPO under Computer Configuration > Windows Settings > Security Settings > Local Policies > Security Options is mapped to the text in the  /etc/issue file in the UNIX/Linux system.

Other very important GPOs are verified by the PAM Password Module, like these options on the "Computer Configuration > Windows Settings > Security Settings > Account Policies > Password Policy" Section:  
Enforce password history
  • Maximum password age
  • Minimum password age
  • Minimum password length
  • Password must meet complexity requirements
Process Reuse:  This means that all the password policies can be reused in the UNIX, Linux and Mac OS X systems that are joined via Centrify commercial editions!!!

Video Chalk-talk

For a deeper dive on group policies provided for Mac OS X by Centrify, take a look at this chalktalk:


Documentation

Group Policy-related Centrify Utilities

adgpupdate

The adgpupdate command is the equivalent to the gpupdate command in Windows.  What it does is described above.  

usage: adgpupdate [options]
options:
  -T, --target <Computer | User>
                     Only refresh the computer or user policy (default both).
  -V, --verbose      Print debugging diagnostics to stderr.
  -v, --version      Print version information.
  -h, --help         Print this help text.

Sample output:
$ adgpupdate -V
session opened
Refreshing Computer Policy...
Success
Refreshing User Policy...
User Policy disabled on this machine.

To view the settings processed by group policy, inspect the gp.report file under /var/centrifydc/reg/machine  (and /user if the system is a Mac or if it was enabled for GNOME policies)

adgpresult

In the 2015 version of the Centrify DirectControl agent (5.2.2), the adgpresult command has been introduced.  This command works just like the Windows gpresult tool.  It shows all the group policies processed locally by the agent in a very neat output.

$ adgpresult --help
usage: adgpresult [options]
    e.g. adgpresult -a
    or adgpresult -m -u uname1 -u uname2 ...
options:
    -a, --all           Dump both gp settings for machine and current user.
                        Default option if no option is given.
    -m, --machine       Dump the machine's gp settings.
    -u, --user <name>   Dump the specified user's gp settings.
    -h, --help          Print this help information and exit.

Wednesday, January 1, 2014

Basics: The Centrify Agent Cache

Background

In a previous post we described the Centrify agent (adclient) and we mentioned that the cache exists for two objectives:  performance and offline access (availability control in case AD is not accessible). Understanding the cache allows any system administrator to be more effective at using the solution.   The client caches DNS, object and authorization information.

The NSCD service

NCSD stands for name server cache daemon.  It is the best method to retrieve cached information since it's implemented and optimized for each version of UNIX/Linux.  As a basic computer science principle, retrieving items from memory is always preferable than retrieving from permanent storage. The rule of thumb is to always implement NSCD in your systems.  This is a very important design consideration.
The best thing you can do to improve performance of any application that uses Name Server Switch is to implement NSCD.  This applies to Centrify for Unix/Linux.

The Object cache

This cache stores the UNIX-enabled users and managed groups that belong to the client's zone. It's implemented as a database that is stored in the /var/centrifydc folder.  It is used so the client does not have to go to Active Directory for each query and provides support for offline access.

Object expiration and refresh intervals

When objects are retrieved they are tagged with a time-stamp and some of the AD information is retrieved (mainly the update sequence number), while the refresh interval is current, the object will be returned "as is" (no queries to AD are made), if the refresh interval expires, then the object's USN is compared to 
the one in the cache, only if the numbers are different the object will be refreshed, otherwise the time-stamp
is renewed.
The notable exception to this logic is when an end-user attempts to log in; at this point (among other things)
the validity of the account is checked (e.g. is the account disabled, locked, expired, allowed to log in at the time, etc) those checks are performed in real time.
Although there are more parameters to fine-tune the cache, the adclient.cache.expires interval governs when objects are expired. Traditionally, by default is set to 1 hour.

The Authorization Cache

This cache is used for the purposes of authorization (roles, rights etc) and it's separate from the object cache.
It uses the AD azman schema and Centrify algorithms to determine if there are changes to the group memberships (or principals) that have roles and rights tied to them. It uses the USN and the adclient.azman.refresh.interval (set to 30 minutes by default).

Depending on the complexity of the AD infrastructure, the operation can be expensive (in terms of LDAP queries) this is because corporate domains are complex and in certain scenarios it's possible that groups are merged.  Since the memberships are fully enumerated, this is something to think about.

How the Authorization Cache affects the User's ability to log in

Notice that before we have mentioned that for a user to log in they require two things: A UNIX identity, and a role that allows them to log-in. One component relates to identification, the other relates to authorization.
This means that it's possible to have a proper login, UID, GID, etc; but still be unknown to a system because the user does not have a role assigned or the role that is assigned doesn't have a PAM login right.

Note that users can be "listed" in a system.
There are other types of cache, but the two most relevant are the Object and Authorization caches.

What does this all mean?

It means that there's a fine balance to be understood in order to provide performance and high-availability. It also means that there are planning implications to the workings of the agent.  Questions like:

  • What is this system used for?
    Very different settings for a shared developer's system than a slave node in a number-crunching system.
  • What are the current provisioning/de-provisioning SLAs?
    This opens a great question.  The SLA dictates a lot of settings.  For example in a scheme in which users are provisioned using an IdM solution from an HR system, and there are workflows involved to approve access to UNIX/Linux systems, all components have to be accounted for, Including Active Directory replication intervals.

Adfush described

Adflush is a command line utility that allows system administrators to manipulate the cache.  It shouldn't be used without understanding how the cache works.  

usage: adflush [options]
options:
  -f, --force             flush cache even adclient is in disconnected mode
  -a, --auth               flush cached authorization data
  -d, --dns                flush the adclient dns cache and DC locator cache
  -e, --expire             expire everything in the DC and GC object cache
  -o, --objects            flush only the DC and GC object cache
  -t, --trusts             rediscover the trusted domains
  -b, --bindings           force refresh binding
  -v, --version            print version information
  -V, --verbose            print debugging information
  -h, --help               print this help information and exit.

The type of adflush can have implications from slowing things down a bit, to consuming resources to actually eliminating the ability to log-in offline.  This is important to know for roaming users of Macintosh platforms.  A user that runs a forced adflush while at home will have to wait to get back to the office to log in!!!

Saturday, December 28, 2013

Basics: UNIX-Enabling Active Directory Users

Background

In a previous posting we discussed how UNIX systems identify users.
By default, UNIX/Linux systems using Centrify in Zone mode do not allow any user to log in to the systems unless they have:
  1. A UNIX Identity (login, UID/GID, Home, Shell and GECOS)
    This is what we call "UNIX-enabling" a user (hence the title of the posting)
  2. A role that allows the user to log-in.
UNIX-enabling simply means to provide a user (or a group) a UNIX identity in a Centrify Zone in Active Directory

Since we have established the Plan-Do-Check-Adjust model.  Here is the model for UNIX identities and Access

(Plan)ning UNIX Identities

  • Having a proper naming and identification strategy
    • What is the right login name?  Are there systems that don't like more than 8 characters?  (like HP-UX or AIX)
    • Does it have to be programmatically derived
    • What are the considerations for home directories?  Is there a central filer?
    • Is there an enterprise Shell?
    • Does anything need to be added to the GECOS field?
    • Are there different primary groups and secondary groups (other than private)?
  • What is the current state?
    • Is the namespace normalized(*)? Or does it need to be cleaned up?
      Are there users with different UIDs across systems?
      Are there different GID definitions for the same system?
      Are UNIX group memberships uniform?
    • Does the organization engage in Mergers and Acquisitions?
  • What will be the strategy if the company acquires another organization that has UNIX systems?
  • Are Samba or NFS in use?
(*) normalization is the process of rationalizing the names pase so everyone has a unique UNIX identity across the enterprise.  This is not a pre-requisite to deploy Centrify.

UNIX-enabling Users with Centrify (Do)

Users can get UNIX profiles using various methods:
  • Manually via Access Manager., Active Directory Users and Computers or ADSIEdit
  • Automatically via Centrify Zone Provisioning Agent
  • Automatically with any programming interface that can manipulate AD  (On Windows using vbscript, PowerShell, etc, and on UNIX/Linux using adedit).

Manual Method 1:  From Windows using Access Manager

  1. In Access Manager, expand the Zone, then UNIX Data, and right click Users.  
  2. Select Add Users to Zone
  3. In the Find box, type the name of the AD User account that is going to be enabled.  Select it and press OK
  4. Now, check all the boxes to pick the defaults OR, override each value to match your needs.

Manual Method 2:  From Windows using ADUC

Note: ADUC needs to have the Centrify Profile tab installed and activated
  1. In ADUC, right click the user object to UNIX-enable and select Properties
  2. Go to the Centrify Profile tab and select Add.  
  3. In the find window, press find and select the zone that the user will be added to.
  4. Follow the instructions from Step 3 above.

Manual Method 3:  From UNIX using adedit

Adedit is a TCL-based programming language included with the Centrify agent.
  1. On a Centrified UNIX system, type /usr/bin/adedit
  2. Bind to the domain with the proper credentials
    bind corp.contoso.com
  3. Select the zone to add the user to
    select_zone "cn=HQ,OU=Zones,OU=UNIX,dc=corp,dc=contoso,dc=com"
  4. Unix-enable the user
    new_zone_user jessie.matthews@corp.contoso.com
  5. Specify the UNIX identity
    set_zone_user_field uname jmatthews
    set_zone_user_field uid 0x8000000
    set_zone_user_field gid 0x8000000
    set_zone_user_field gecos "Jessie Matthews"
    set_zone_user_field home "%{home}/%{user}"
    set_zone_user_field shell "%{shell}"
    Note:  the 0x8000000 code after UID/GID specifies to use uniquely genereated code that is derive dfrom the AD object's SID.  Also, the variables under home and shell, allow this information to be picked based on the system's defaults.
  6. Verify the information
    show
    Bindings:
            corp.contoso.com: dc1.corp.contoso.com
    Current zone:
    CN=HQ,OU=Zones,OU=UNIX,DC=corp,DC=contoso,DC=com
    Current nss use:
    jessie.matthews@corp.contoso.com:jmatthews:1149240406:1149240406:Jessie Matthews:%{home}/%{user}:%{shell}:
  7. Save the Object
    save_zone_user

Manual Method 4:  From Windows using Centrify PowerShell

  1. On a Windows system with the Active Directory or Centrify PowerShell Modules
  2. Open PowerShell or PowerShell ISE as a user that has the rights to add and modify user profiles in the zone.
    Load these modules:
    Import-Module ActiveDirectory
    Import-Module Centrify.DirectControl.PowerShell
  3. Bind to the Centrify Zone in question
    $zone = Get-CdmZone -Name "HQ"
  4. Unix-enabling Jessie with defaults
    New-CdmUserProfile -Zone $zone –User jessie.matthews@corp.contoso.com -login jessie.matthews -UseAutoUid -AutoPrivateGroup –HomeDir "%{home}/%{user}" –Gecos "%{u:displayName}" –Shell "%{shell}"

Granting a UNIX Role

Once the user has an identity, the next step is to give him (or her) a role that grants them the ability to log in(*).  By this point a roles exercise has been conducted and the proper AD groups have been assigned UNIX roles.  This means that ADUC, Scripting/Programing, Identity Management Solutions and many other tools
(*) This is because users can be listed in a system, with no rights to log-in.

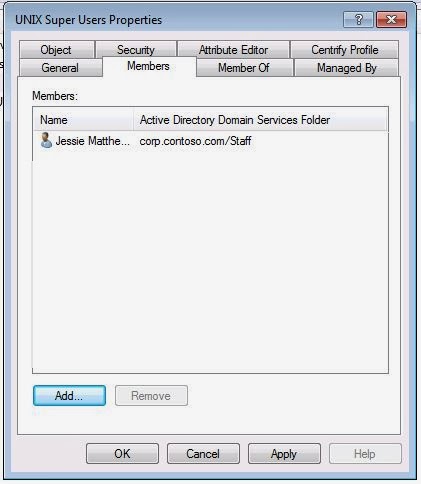
From Windows using ADUC
  1. Open ADUC and find the AD Group that has been assigned the role.
  2. Go to the Members tab and Click Add
  3. Find the newly UNIX-enabled user and Press OK Twice.

From UNIX Using adedit
  1. Log into UNIX/Linux with an account that can modify the group (or use kinit) and open adedit
  2. Bind to the domain
    >bind corp.contoso.com
  3. Add the ade_lib library
    >package require ade_lib
  4. Use the add_user_to_group function
    >add_user_to_group "jessie.matthews@corp.contoso.com" "UNIX Super Users@corp.contoso.com"
With PowerShell
Add-ADGroupMember "UNIX Super Users" -members "Jessie.Matthews"

At this point, when the cache refresh interval hits in the UNIX computer, the user will have the ability to log in with the corresponding role.


Verify the Access (Check)

There are multiple ways to check that the right identity and access have been provided:
  • In Windows:  via ADUC, Access Manager's User Effective Rights or Reporting
  • In UNIX with the adquery command and the dzinfo command.

To Verify the Identity in ADUC or Access Manager
  1. In ADUC, go to the user's properties, in the Centrify Profile tab, and double-click the entry.
  2. In Access manager, go to the Zone/UNIX Data/Users and double-click the user
  3. In any UNIX/Linux System in scope, run the adquery user <user name> command:
    $ adquery user jessie.matthews
    jessie.matthews:x:1149240406:1149240406:Jessie Matthews:/home/jessie.matthews:/bin/bash
To verify the level of access:
  1. In Access manager, go to the Zone/UNIX Data/Users and right-click the user and select "User Effective Rights"
  2. Select the system that you want to verify the level of access and review the settings.
Or
1. In Access Manager, go to the Reporting node.  Select the User's report or the UNIX User Effective Rights report, expand it, right click current and select Display Report

Review the systems that the user has access and what rights have been granted.
                                                                               Or 
In any System in scope, run the dzinfo <username> command.


(Adjust)ing the Identities or Roles assigned to a user

Due to various reasons there may be a need to adjust the user's identity or the role(s) that they may have in the systems.  Review the previous steps to perform any adjustments.  However, the most common operations are:
a) Identity Overrides:  This is when any of the default settings are modified.  E.g. they system admin does not want to change ownership of files and folders in multiple systems.  At this point he can change the UID/GID of the user to match their existing one.
b) Identity de-provisioning:  A user does not need access to UNIX systems anymore.  At this point their UNIX identity can be removed.
c) Access Changes:  A user may need to have access to more (or less systems) than required.  This may mean that they need to be added (or removed) from role assignments at the Computers Group level.
d) Temporary Access to a single or multiple systems:  These are normally exceptions. They can be dealt with temporary role assignments or computer level overrides.

Tuesday, December 24, 2013

Lab # 7: Installing the Centrify agent and joining Active Directory

In this lab

  • We will install the Centrify agent in CEN1 using RPM and join Active Directory manually
  • We will install the Centrify agent in SUSE1 using install.sh in interactive mode and join Active Directory manually
  • We will install the Centrify agent and join Active Directory on SOL1 using install.sh in unattended mode.
  • We will use some of the tools and CLI commands including with the base agent.

 Install Centrify on CEN1 using RPM

  1. Log in to CLIENT1 with Jessie Matthews (UNIX administrator) account.
  2. Open PuTTY and connect to CEN1
  3. Go to the /temp folder (or where you copied the Centrify agent files)
  4. Decompress the tarball (elevate if necessary)
    tar xzvf centrify-suite-2013.3-rhel3-x86_64.tgz
  5. Use RPM to install the base agent centrifydc-5.1.2-rhel3-x86_64.rpm
    rpm - Uvh centrifydc-5.1.2-rhel3-x86_64.rpm
  6. To verify that Centrify is installed, run the adinfo command.  Notice the output
    $ adinfo
    not joined any domain
    Licensed Features: Enabled

    The last line means that the agent can see a valid license in AD.

Join CEN1 to Active Directory

Information
Domain to join:  corp.contoso.com
Place to put the computer account:  "OU=Servers,OU=UNIX"
Zone to join:  HQ
User account that can join systems to the target container:  jessie.matthews
Desirable command output:  verbose
  1. Type the following command (requires elevation if you're not root):
    sudo adjoin -z HQ -c "OU=Servers,OU=UNIX" -V -u jessie.matthews corp.contoso.com
  2. Type the sudo and Jessie's AD password when prompted.
  3. To verify that the computer has joined successfully, type the adinfo command:
    [centrifying@cen1 temp]$ adinfo
    Local host name:   cen1
    Joined to domain:  corp.contoso.com
    Joined as:         cen1.corp.contoso.com
    Pre-win2K name:    cen1
    Current DC:        dc1.corp.contoso.com
    Preferred site:    CorpHQ
    Zone:              corp.contoso.com/UNIX/Zones/HQ
    CentrifyDC mode:   connected
    Licensed Features: Enabled
  4. Exit the PuTTY session.

Install Centrify on SUSE1 using install.sh

  1. Open PuTTY and connect to SUSE1
  2. Go to the /temp folder (or where you copied the Centrify agent files)
  3. Decompress the tarball (elevate if necessary)
    tar xvfz centrify-suite-2013.3-suse9-x86_64.tgz
  4. Use the install.sh and in interactive mode, select a custom installation and accept the DirectControl Agent, select N for the rest of the options.
    How do you want to proceed? (E|S|X|C|Q) [E]:C
    Install the Centrify DirectControl 5.1.2 package? (Q|Y|N) [Y]:Y
  5. When presented with the confirmation option, select Y.
    You chose Centrify Suite Custom Edition and entered the following:
        Install CentrifyDC 5.1.2 package: Y
        Install CentrifyDC-nis 5.1.2 package: N
        Install CentrifyDC-openssh 5.1.2 package: N
        Install CentrifyDC-ldapproxy 5.1.2 package: N
        Install CentrifyDA 3.1.1 package: N
        Express authentication mode      : N
        Run adcheck                      : N
        Join an Active Directory domain  : N
If this information is correct and you want to proceed, type "Y".
To change any information, type "N" and enter new information.
Do you want to continue (Y) or re-enter information? (Q|Y|N) [Y]:Y


To join SUSE1 to AD, follow the instructions outlined for CEN1.  Keep in mind that the adjoin command is in /usr/sbin in case you don't have it in your path.

Install the Agent and Join AD on SOL1 using an unattended installation

  1. Open PuTTY and connect to SOL1
  2. Go to the /temp folder (or where you copied the Centrify agent files)
    You may need to su to root or use Solaris roles to perform the following tasks.
  3. Run tar to decompress the tarball
    tar xvf  centrify-suite-2013.3-sol9-x86.tar
  4. Edit the following lines in the  centrifydc-install.cfg file.  Uncomment lines if necessary.
    ADJOIN="Y"
    DOMAIN="corp.contoso.com"
    USERID=jessie.matthews
    PASSWD=Jessie's or your user's password
    CONTAINER="OU=Servers,OU=UNIX"
    ZONE=HQ

    Comment the following line (add a # in front of it)
    #CentrifyDC_openssh=
    This is to stop Centrify OpenSSH from being installed with the base package.
  5. Save the file.
  6. Run install.sh in non-interactive mode
    ./install.sh -n
At this point the script will run adcheck and read the unattended file.  Some output:
Joining the Active Directory domain corp.contoso.com ...
Using domain controller: dc1.corp.contoso.com writable=true
Join to domain:corp.contoso.com, zone:HQ successful
Centrify DirectControl started.
Initializing cache
.
You have successfully joined the Active Directory domain: corp.contoso.com
in the Centrify DirectControl zone: CN=HQ,OU=Zones,OU=UNIX,DC=corp,DC=contoso,DC=com

Verify the objects in Active Directory

Open ADUC and expand the corp.contoso.com domain, expand UNIX, then Expand Servers.
  1. Verify that the two new computer objects are present  (refresh if necessary)
  2. Right-click the CEN1 computer object, select Properties and go to the Operating System tab.
Notice that the OS type and version exhibit the proper version.

Add each system to their corresponding computer group

  1. Open Access Manager and Navigate to the Zones/HQ/Authorization/Computer Roles node
  2. Expand Database Servers, right click Members and select Add Computer
  3. In the find box, type cen1;  click on cen1 from the results box and press OK.
  4. Expand Web Servers, right click Members and select Add Computer
  5. In the find box, type suse1;  click on suse1 from the results box and press OK

Now all the systems are joined in to AD and properly categorized, we are ready to start working with users and accessing systems.


Appendix

Installing Using a YUM Repository
http://centrifying.blogspot.com/2015/11/setting-up-simple-yum-repository-to.html
Installing Using a Simple Chef recipe
http://centrifying.blogspot.com/2015/11/deploy-centrify-and-join-active.html
Tools: Install.sh
http://centrifying.blogspot.com/2015/10/utilities-installsh.html

Basics: Installing the Agent, Joining Active Directory and About Computer Accounts

Installing the Agent - Multiple Avenues

Centrify provides multiple ways for system administrators to install and deploy the Centrify agent.  The agent (adclient) is supported in a variety of systems; the rule of thumb is this:  any commercial system that uses PAM and NSS is likely to be supported.  A great resource is this page.
The installation options are:
  • Native packages:  Centrify includes native packages for each platform (rpm, deb, etc.)
    The benefit of native packages is that it allows the use of existing package management and software distribution, repositories or configuration management platforms. Here's an example with YUM.
  • The installation script (install.sh):  This is an orchestrator that will install the software based on an interactive menu or an answer file.
    The benefit of install.sh is that it allows for easy manual setup and the integration of scripting.
  • DevOps tools like Chef, Puppet, Satellite or Ansible:
    - Example with Chef
    - Example with Puppet
  • Deployment Manager:  This is a free tool included with the suite designed to aid in deployments for very small environments.  It's not a substitute for a software distribution or configuration management solution.
    Moderation Note:  Deployment Manager is not covered in this blog.
When the Centrify agent is installed, the binaries are in place, but there are no changes to the system until it is joined to Active Directory.

Joining Active Directory on Windows - Basics

When a Windows computer joins Active Directory (at a very high level) these operations are performed:
  1. The user account performing the join operation is checked for the right authorization
  2. AD is checked for any duplicate computer account names
  3. A computer object is created for the computer account
  4. A secret is shared between Active Directory and the Computer
    This shared secret allows for encrypted communications (secure channel), Kerberos ticket processing, etc.
  5. Domain Users (and any trusted domains) become users for the computer
  6. Domain Administrators can perform administrative duties in the computer
  7. Targeted Group Policies are set to be processed
    Note:  to really find out what happens when you join a Windows computer, just read the NETSETUP.LOG file under the system folder  (or %systemroot%)\debug folder.
In general there are 3 major pre-requisites to perform a join in Windows:
  • The system needs to be able to resolve the name of the domain (proper DNS configuration)
  • The system needs to be able to establish communications correctly
  • The user account performing the join is authorized for the operation in the target container
The process is very similar with the Centrify agent, step 5 being the most notable exception.  In standard edition in zone mode, only Unix-enabled users with the proper rights can log in to the AD-joined UNIX/Linux system (centrified system).

Joining UNIX/Linux (and Mac) systems to Active Directory - Basics

 
adcheck - the Quality Assurance tool

adcheck is a tool included with the package that is used to assess the readiness of the system to join AD.  The general syntax is:  ./adcheck-platform domain
E.g. for RedHat 64 bit:   ./adcheck-rhel3-x86_64 corp.contoso.com
It's also a great tool to troubleshoot connectivity issues.   It will check

OSCHK    : Verify that the system is supported by that version of the package.
PATCH    : If there's any pre-requisite OS patches (great for AIX, HPUX and Solaris)
PERL     :  Perl is required to perform the installation tasks and to process group policies.
SAMBA    : If the system is running it, will warn to use Centrify-enhanced Samba for proper UID/GID assignments
SPACECHK : Check if there is enough disk space in /var /usr /tmp
HOSTNAME : Verifies if the hostname is acceptable (localhost and some others aren't allowed)
NSHOSTS  :  Verifies the configuration of this entry in the /etc/nsswitch.conf
DNSPROBE : Will try to communicate the DNS servers.  Will warn if there's only one entry.
DNSCHECK : Same as above.
WHATSSH  : Verifies that the SSH version has been tested and there's no issues.  It will warn to use Centrify-enhanced SSH if you will use Kerberos authentication.  Stock SSH will be fine.
SSH      : Checks the SSH configuration
DOMNAME  : Will check for the domain name, it will warn if it's a .local domain.
ADDC, ADDNS, ADPORT, GCPOR, DCUP, SITEUP: It will perform a series of checks:
- SRV records for the domain
- DNS communications
- Will verify that the proper communication ports are open for each DC and Global Catalog
- Will check for domain controllers in the AD Site.
DNSSYM   :  It will check the consistency of the DNS configuration.
ADSITE, GSITE:  It will check that the subnet is within an AD Site and that the correct site is selected.
TIME     : It will check that the clock between AD and the local time source is not skewed more than 5 minutes (Kerberos requirement)
ADSYNC   : It will check that the domain controllers are in the same page.
Typically, the most common issues are around DNS configuration, Communications, DNS symmetry and clock skews. Solve all the issues before moving forward. Warnings can be typically ignored but should be addressed depending on the situation.  After that, you can move on to join the system

adjoin - to Join Active Directory Domains

With Centrify, computers can be joined with:
  • install.sh in interactive or unattended (quiet) mode
  • the adjoin command
  • with Deployment Manager
All these methods ultimately use the adjoin command.

Joining a system is a privileged operation, so it has to be performed as root or elevating with sudo.

Adjoin Syntax

usage: adjoin [options] domain
options:
  -u, --user user[@domain] user name
  -p, --password pw        user password, prompts if absent
  -c, --container dn       subtree to create below or move to.
                           LDAP is used to create computer object,
                           if computer object does not exist.
  -n, --name comp          computer account name
  -N, --prewin2k name      pre-windows 2000 computer account name
                           must be 19 characters or less
  -D, --dnsname name       optional parameter to override the
                           dNSHostName attribute in the computer object
  -f, --force              overwrite existing joined computer
  -a, --alias alias        add an alias computer account name
  -C, --noconf             do not update PAM or NSS config
  -z, --zone zone          zone to join
  -s, --server ds          domain server for join operations
  -Z, --zoneserver ds      domain server for zone operations
                           useful if zone is in another domain
  -g, --gc ds              domain server for global catalog searches
  -U, --upn upn            user principal name for the account
  -T, --trust              trust computer for delegation, requires
                           administrator permission
  -k, --des                use DES key only
  -P, --precreate          precreate computer and extension object
  -m, --compat             make computer and extension object
                           compatible with DirectControl 2.x.
  -S, --selfserve          use reset computer account credentials to perform
                           a self-service join
  -w, --workstation        join computer to Auto Zone
  -l, --ldap               use LDAP method to create the computer object
  -x, --extramap mapname   add named nss map to nss configuration. Can be repeated
  -i, --noinit             skip cache preload
  -A, --attempt            attempt to grant authenticated users read permissions to PSO objects so that the computer account can read fine grain password security policies in the current domain.
Note that the administrator(s) may also need to grant authenticated users read permissions to PSO objects in trusted domains and forests as well for more accurate password expiration times for cross domain and cross forests users.
  -v, --version            print version information
  -V, --verbose            print debug information for each operation
  -h, --help               print this help information and exit.

Example:  To join the corp.contoso.com domain in the HQ zone, place the computer account in the Servers OU under the top level UNIX OU in verbose mode with Jesse's AD account, the adjoin command is:
adjoin -z HQ -c "OU=Servers,OU=UNIX" -V -u jessie.matthews corp.contoso.com

What happens in a system when you join Active Directory?

Several things happen:

Type

On


File location


Kerberos configuration file


Most platforms


/etc/krb5.conf


Solaris


/etc/krb5/krb5.conf


Kerberos keytab file


Most platforms


/etc/krb5.keytab


Solaris


/etc/krb5/krb5.keytab


NSS configuration file


Most platforms


/etc/nsswitch.conf


PAM configuration file


Red Hat Linux


/etc/pam.d/system-auth


All other Linux


/etc/pam.d/*


HPUX, Solaris


/etc/pam.conf


LAM configuration file


AIX


/usr/lib/security/methods.cfg


Login control files


AIX


/etc/security/user
The previous configuration is saved to be restored if the system leaves the domain.
(*) Note that these changes only apply to the centrifydc (adclient) program.  If you also install Centrify-enhanced OpenSSH, other modifications pertaining to the SSH server are made.

Sample entries in /etc/nsswitch.conf file after a system is joined to AD:
passwd:   centrifydc    nis   files
shadow:   centrifydc    nis   files
group:    centrifydc    nis   files

What does this mean?
Name Server Switch is a UNIX facility that allows for network-based services, including directory services.  As a consequence:

a) Any NSS-enabled program will check for the user or group in AD (centrifydc), an existing NIS domain, and then in the local /etc/passwd or /etc/group files. 
b) Users from local files, NIS or LDAP can coexist happily, also migrations are easier because they can be done in a phased-approach.
c) This also means that local users, service accounts and super user accounts are available and can be managed locally.
d) Hands-off approach:  any NSS (or PAM, or Kerberos-related) file does not need to be touched.  Centrify makes it work out of the box.  This includes if there's any changes in Active Directory.

Entries in the /etc/pam.d/system-auth

# lines inserted by Centrify Direct Control (CentrifyDC 5.1.0-494)
auth       sufficient     pam_centrifydc.so
auth       requisite      pam_centrifydc.so deny
account    sufficient     pam_centrifydc.so
account    requisite      pam_centrifydc.so deny
session    required       pam_centrifydc.so homedir
password   sufficient     pam_centrifydc.so try_first_pass
password   requisite      pam_centrifydc.so deny

What does this mean?
PAM is a framework to allow program to leverage authentication services.  Therefore, any PAM-enabled program will perform the account, password, session and authorization checks using Centrify's shared libraries in addition to the existing system methods.  For example, if a UNIX-enabled AD user issues the passwd command, since this command is PAM-enabled, the password module will be invoked to enforce things like length, complexity, expiration, etc. in AD  (defined in Group Policy).
At this point you define policy once (in AD) and it will be enforced in the Centrified UNIX/Linux system in addition to Windows.  More process and policy reuse!

The opposite of joining a domain is leaving the domain, and since Centrify's tools are very consistent the command is adleave.

How do I know if a system is joined to AD?
Use the adinfo command.
If the system has the Centrify binaries but is not joined to a domain, the output is
No joined to any domain
Licensed Features: Enabled

If the system has the Centrify binaries and is joined to a domain, the output is
Local host name:   suse1
Joined to domain:  corp.contoso.com
Joined as:         suse1.corp.contoso.com
Pre-win2K name:    suse1
Current DC:        dc1.corp.contoso.com
Preferred site:    HQSite
Zone:              corp.contoso.com/UNIX/Zones/HQ
CentrifyDC mode:   connected
Licensed Features: Enabled

Notice that the output of adinfo is very helpful to understand what is going on in your system and the agent.  You can tell how the system was joined, to what domain, what domain controller the agent is talking to, and if there's communications to AD.

About Computer Accounts

In Active Directory, computer accounts (just like user accounts) have passwords too, and by default they change automatically every 30 days, this applies to AD-joined systems using Centrify.
Computer accounts can belong to AD Groups.  In fact, Centrify Computer Roles (the collections of systems) are all contained within a previously created AD group.  E.g. in our lab, we have a UNIX Database Servers group, to hold the computer accounts of Database Servers.

Process and knowledge reuse

All the processes outlined by Microsoft (add, remove, move, pre-create, disabling, renaming, etc.) can be performed with centrified systems.  http://support.microsoft.com/kb/320187 
These operations affect provisioning processes, operations and even group policy processing.  Most likely, any major organization has processes in place for Windows computer accounts and they can be leveraged for the UNIX/Linux  (or Mac) systems.

Update 1  (March 2015)

This update is based on feedback, the original post has been left intact, typos and all.

Should I install Centrify-enhanced OpenSSH?
Short answer:  No
Why would you need Centrify OpenSSH?
  • If you have a version of SSH Server that is not compiled/configured for PAM support.
    Older box UNIXes used not to be ready out of the box (e.g. old HPUX, AIX, Solaris)
  • If you want granular PAM access controls to be set up automatically for you.
    For example, if you wanted to set up an account to be able to only scp a file, but not login. Centrify-enhanced OpenSSH has all those settings done for you.
  • If you want optimized Kerberos or GSSAPI support on SSH
    This version of OpenSSH is compiled to use the Centrify AD shared objects and MIT Kerberos tools.  This means that in scenarios with complex AD infrastructures (one-way trusts, etc) you don't have to worry about SSO working.
  • Smartcard Environments
    Somewhat related to the previous bullet.  In some environments, interactive sign-on is with Smartcard, then the rest is via Kerberos.
Basically the answer is No, but choosing Yes, helps in many advanced scenarios.

Should the system be restarted after Centrify installation and AD join?

The answer really depends.  Most of the time the answer is no, but the determining factor is have long-running daemons (e.g. like DB2 on UNIX, or X-Window, etc), then a restart is in order.  This is because unlike dynamic daemons (like sshd) these programs only read the PAM configuration at start-up.

A note of warning
My advice is that you reboot the system PRIOR to installing any new program.  This is because most of the pride of UNIX, Linux and post 2008 windows admins is uptime, but the longer the system is up, the more possibility that changes may have been made while the system was running.  Services may have been altered, environment variables modified but not committed, etc.  

If the system restarts, and something is not right, the logical conclusion will be to blame it to the last program that was installed. This leads to flawed troubleshooting and possibly introducing additional issues.  So, prior to a major change, have the system(s) rebooted and working again for a week, then the next window the programs or upgrades can be performed and any failures can be attributed to the recent event with accuracy.