Showing posts with label RBAC. Show all posts

Friday, April 28, 2017

Examples of Identity Assurance with Centrify MFA in AWS (Console, EC2 and CLI with PowerShell)

Note:  This is a repost of an article I recently wrote for the Centrify Community Techblog

Background
Centrify recently commissioned a study with Forrester Research that yielded some important information about the state of Security.  Bottom-line, we have decided to throw money and resources to the problems around information security rather than rethinking our approach, the results are more breaches and exposures.
You can access the study results here: https://www.centrify.com/lp/rethink-security-ebook

A key conclusion on over 200 organizations surveyed is that those with higher Identity and Access Management (IAM) maturity were breached 50% less while maintaining operational efficiency. 

As you read the previous paragraph, you may ask yourself: what is the first step the journey to the continuous improvement required for IAM maturity?  As illustrated in the model below,
a the key component is to establish identity assurance with technologies like MFA or PKI, however this is challenging enough because many organizations have not achieved this on-premises, much less in IaaS/PaaS platforms like Amazon AWS.

This is where Centrify can help.  This article is about guiding you on how to use the Centrify platform to establish identity assurance in several use cases:  
  • Accessing the AWS Consoles with shared accounts (like Amazon root) or Federated identities
  • Accessing EC2 instances locally (Linux or Windows)
  • Accessing AWS commands via the CLI (E.g. PowerShell or Python)
Please note that identity assurance concepts apply to both users and systems (due to API access);  in this use case we'll focus on interactive (user) use cases.  For system/system or app/app, other mechanisms like PKI or Kerberos can be used and we can cover in another entry.

The Centrify Advantage
The biggest advantage for Centrify lies in it's platform and integrations, as a company that covers both Identity as a Service (IDaaS) as well as Privileged Identity Management (PIM) we understand that everything starts with Identity Consolidation.   This is not the "legacy" (metadirectory/connector-based mid-2000s) identity consolidation, this is the "straight-to-the-source" standards based approach using Federation in the IDaaS side, plus direct-integration (with Kerberos) in the case of heterogeneous OS platforms.  We add to this a series of services:
  • A policy service
  • A multi-factor authentication engine (that includes modern and legacy-based support)
  • A risk-based engine (analytics) 
Our native integrations with Active Directory make us a prime vendor to consolidate capabilities;  here's an example, if an organization wants to secure access to a web app, integrate a non-windows platform to a central directory like AD and get MFA, they may engage 3 distinct vendors, however Centrify can help with world-class solutions on the three areas.  Let's look at a the examples.
  
Securing Shared or Federated Access to the AWS Console
Centrify Identity Service provides several turn-key templates to help with shared or federated (via SAML or using the AWS API) SSO for Amazon Web Services.  We have covered these integrations here:

However, the powerful policy engine and the support for multiple authentication profiles makes this integration simple and flexible.  
Here's a quick demo on how this integration is enabled and the user experience:
Notice how we achieved our goals:  identity consolidation and assurance while maintaining usability.

Securing Access to Linux and Windows AWS EC2 Instances
Centrify Server Suite provides native integration with Active Directory, regardless of your deployment model. 
By leveraging AD (hosted by you or in AWS), you are eliminating the duplication of identity sources caused by SSH keys with the addition of DirectAuthorize technology that provides role-based access control and privilege elevation and is fully-integrated with the policy and authentication profiles provided by Identity Service or Privilege Service.  We have discussed these integrations here:
 
Provided the Identity Service/Privilege Service setup is correct and the proper PKI trust is in place, for Access and Privilege elevation, all we need to do is set up the proper checkbox at the role, UNIX command or Windows desktop or application.
 
Here's the user experience that meets the requirements for identity assurance via MFA for both Linux and Windows in the context of access and privilege elevation.
 
Notice how we achieved our goals:  identity consolidation and assurance while maintaining usability.

Securing Access to AWS CLI (e.g. PowerShell)
Administration of AWS Services is often performed via the AWS CLI (implemented via Windows PowerShell or UNIX CLI).
If you're using Centrify Identity Service with SAML federation into AWS, you can implement the SSO plugin provided with the template.
References:
Here's the user experience in PowerShell.  Note that the experience will be based on the authentication profile that applies to the user by policy.
If you have multiple roles, you get to select them:
 
Finally, the authentication token is stored in the $me variable and the user can move-on to use AWS PowerShell commandlets.   See the pattern here?  Identity assurance with MFA and role-based access without compromising usability and achieving this with with a single solution set.
  
Metrics
A cliché of business schools is the statement "you can't manage what you can't measure"; but since we're dealing with IT security, you may want to track how we are performing towards our goal of consistent identity assurance, in these AWS examples, we can use AWS CloudWatch metrics to measure the percentage of access in the proper context (e.g. Console, EC2, etc) is performed with assurance.  Therefore a good metric to track would be:
 

MFA events are tracked for Linux, Windows and Identity Platform, this allows you to be creative and get information from CloudWatch or from Identity Service.
Note the CloudWatch widgets above.  In my Linux space, I have a ratio of close to 60% identity assurance (4 out of 7 successful logins were with MFA), however my track record on the sample data I created on Windows is much better (100%).  You use the same approach for privilege elevation via Centrify-enhanced sudo or Centrify Agent for Windows.

In the case of Identity Service or Privilege Service, the platform provide dashboards and reports like the Security Overview - User Logins
These dashboards allow for reviewing information within 7 days or 24 hours and to look at specific date-time ranges. 

Conclusion
Identity assurance is closer than what you think, with the "barriers of entry" for MFA solutions going down, it's all about working with the right partner and Centrify excels at securing apps, endpoints, infrastructure and secrets; finally, the obvious challenge is organizational dynamics;   If you still have groups opposed to centralizing directories or maintaining legacy infrastructure, you can split the project in several phases and attack the platforms that are easier from a people/process standpoint.  Once you can demonstrate identity assurance within those applications or infrastructure, it's going to be hard for those "holding on to the past" to ignore that the best practices are here to stay. The model applies to all aspects of any risk-sensitive information technology area and like every other framework it's not a silver bullet; new threats, attack vectors, compliance requirements and tools are introduced, therefore this has to evolve as well.

Friday, November 25, 2016

HOWTO - Implement a cross-platform mixed DBA Role (Oracle+SQL Server) using Centrify Server Suite

What you'll need
  • Active Directory and a Centrify Zone
  • Centrify Access Manager and access to perform the configuration
  • A UNIX or Linux System and the Centrify Enterprise Edition Agent (DirectControl/DZ & DirectAudit)
  • A Windows System and the Centrify Enterprise Edition Windows Agent (DZWin/DAWin)
  • Two Active Directory Groups and a test user.
Planning

Privileges Based on Roles
In the previous entry, you saw how we conquered the issue of limiting access to systems based on business need-to-know and how we can create a SuperUser-like role across platforms.  Now it's time to implement a true Role Based governance model.  Just like with any capability (security included) you must achieve balance on the people-process-technology triad, in the context of Roles, its key is to understand how people use privileges in their job functions, implement a process around it and leverage the technology to implement it.  Here's an oversimplified example for DBAs in a mixed Oracle and SQL Server shop.

How DBAs access systems:   SSH and Toad on Linux and RDP on Windows
Typical tasks needed for operations:  In Linux, DBAs need to run the sqplus command as the Oracle account and switch user to oracle.  In Windows, DBAs need to run SQL Server Manager and to manipulate the SQL Server Service.
Typical tasks needed for change-control:  DBAs need to elevate to Root during upgrades and installations.

In my fictitious company, I will allow the SSH PAM access role and the commands to run sqlplus and switch to oracle.  The Sysadmin role (that allows to elevate to root) will only be granted with a change-control number and duration.

This process needs to be adjusted because of two things:
  • Resistance to change
    I guarantee you that users will initially think that you're making their jobs harder and will try to find ways to resist.
  • Nuances around how people perform their jobs
    For example, a Windows DBA may also need access to SQL Server Configuration tools; or a UNIX DBA may like to switch user without profile  (su oracle, instead of su - oracle).
So be ready to have a review of roles and rights with certain cadence, to add/remove commands or apps; as well a to make usability adjustments.  Make it part of your attestation process.

In our example, we'll use the Centrify-Model-Mixed-Role-DBAs group to provision this role.

Access Based on Roles
The concept continues to be the same as the previous post, but now you are further breaking down your access governance model based on your needs.  For example:  you may have a DEV-QA-PROD train for an application and you can grant access just to that set of systems, and you can classify systems based on that model;  This is where your investment in Centrify Professional Services can pay the most.   In my example, I'll just use a Computer Role called Mixed Database Servers, based on an AD group called Centrify-Model-Mixed-CR-Database Servers.

Security Operations Requirements
In the previous example we leveraged both the UNIX Syslog and the Windows Event log to augment log collection capabilities.  Since DirectAudit data is contained inside a SQL server database, this is another repository that can be tapped by log aggregators.  Since DirectAudit provides session data, information gathered from security operations can be further investigated by looking at session data.

Provisioning
Here the principles continue to be the same as the previous entry. Granting or revoking the role or making a system part of the collective is performed via AD Group Membership (Manually with ADUC, Programmatically with PowerShell or Scripting and controlled via any Workflow engine)

Planning for Platforms
Same exceptions apply:  IBM AIX with LAM enabled don't allow the breakdown of PAM access rights.

Implementation
Just like the previous entry, remember that these steps can be automated via Centrify adedit on UNIX/Linux or Centrify Access Module for PowerShell as well as the DirectManage SDK.

Recap: Rights go into Roles, Roles are configured and Assigned to AD Principals in a Given Scope (zone, child zone, computer role or individual computer)

Step 1:  Create the AD Groups for the Computer Role and to assign the Roles
  1. Manually you can open Active Directory Users and Computers (ADUC)
  2. Navigate to your designated OU, right click > New > Group.
  3. Select the appropriate scope and give it a name.  In our case we repeat this for both Centrify-Model-Mixed-CR-Database Servers and Centrify-Model-Mixed-Role-DBAs
Step 2:  Create the Mixed Database Systems Computer Role
  1. Open Access Manager and right-click your Zone > Authorization > Computer Roles and Select Create New Computer Role.
  2. In the New Computer Role window, give it a name (Mixed Database Systems), description and browse for the Centrify-Model-Mixed-CR-Database Servers group.  Then Press OK.
Step 3:  Create the DBA commands to be used in UNIX and Linux platforms

SQL Plus as Oracle
Creating this command requires a bit of research. Information about the diversity of platforms, versions and their differences are relevant. For example, in my environment, I’m using Oracle Express 11G running on Linux.

Another important detail has to do with the environment variables. I want to conserve them in this case so sqlplus has all it needs to launch correctly:

Switching to the Oracle account
Some DBAs may need to do a simple (no profile) elevation, or they would want the opposite, Centrify offers the flexibility of Regular or Global expressions.

Service Control for the Oracle Service
More research required. In my environment, the service is oracle-xe and I will limit the directives available for service.


Step 4:  Create the DBA commands to be used in Windows platforms

SQL Server Management Studio
Windows application rights provide a lot of flexibility. Some key highlights
  • You can consolidate several applications in a single command
  • Applications can be defined manually, by looking at local or remote processes or by browsing directly to the file.
  • Application arguments can be evaluated with or without case sensitivity
  • Application types can be further broken down (e.g. exe, bat, cmd, vbs, ps1, etc.)
  • Additional criteria can be added based on the file metadata (e.g. version, company, etc)
  • Application rights can be executed in 3 different contexts
    • As a service account: the user in the role does not need to know the credentials.
    • As a member of an AD group without persistent membership
    • As a member of a Windows built-in group (like Power Users, etc.)
In the case of the SQL Server Management studio, I have a Windows native deployment with a SQL management account. I can easily use an AD group, but since I have this privilege elevation mechanism, I don’t need to fall into the bad habit sharing that account - there are many other ways to accomplish the same objective.

Stop, start and query the SQL Server Service command
I'm choosing to use the service control command line utility (sc.exe) in the context of the local administrator account to provide the DBA with the ability to control the SQL server service.  The alternative today is to grant the DBA administrator rights, which they can use to stop other services (like the AV or firewall).


Step 5: Creating, configuring, assigning the role and provisioning a user
This process follows exactly the same steps of the previous post. Keep in mind that the Windows rights will be for remote (RDP or Citrix) and to add the UNIX and Windows rights after the role is created.

The role assignment will be performed at the Computer Role level, so it only applies to computers provisioned into that group. Finally you can add your test user to the group that gets the role assigned.

Part of our process dictates that if they do need higher privileges, they can request it based on a change control approval.


Step 6: Verifying and the rights on the UNIX/Linux system
To view the role attributes and definition, use the dzinfo command
$ dzinfo
User: thomasf
Forced into restricted environment: No

  Role Name        Avail Restricted Env
  ---------------  ----- --------------
  Mixed            Yes   None
  DBA/Global

    Effective rights:
        Password login
        Non password login
        Allow normal shell

    Audit level:
        AuditIfPossible

    Always permit login:
        false


  PAM Application  Avail Source Roles
  ---------------  ----- --------------------


Privileged commands:
  Name             Avail Command               Source Roles
  ---------------  ----- --------------------  --------------------
  DBA Oracle -     Yes   service oracle-xe     Mixed DBA/Global
  oracle-xe              start|stop|status|re
  service                start
  control/Global
  DBA Oracle -     Yes   su oracle             Mixed DBA/Global
  switch to
  oracle
  no-profile/Glob
  al
  DBA Oracle -     Yes   sqlplus *             Mixed DBA/Global
  sqlplus as
  oracle/Global
  DBA Oracle -     Yes   su - oracle           Mixed DBA/Global
  switch to
  oracle with
  profile/Global

To view the command definitions, use the dzdo –l command

$ dzdo -l
AD Password:
User thomasf may run the following commands on this host:
    (root) service oracle-xe start|stop|status|restart
    (oracle) sqlplus *
    (root) su oracle
    (root) su - oracle

To use your privileges via privilege elevation use dzdo

$ dzdo service oracle-xe restart
Shutting down Oracle Database 11g Express Edition instance.
Stopping Oracle Net Listener.

Starting Oracle Net Listener.
Starting Oracle Database 11g Express Edition instance.

Finally, and for the benefit of security operations, all privilege elevation continues to be written to syslog:
Dec 27 15:15:53 engcen6 dzdo:  thomasf : TTY=pts/3 ; PWD=/home/thomasf ; 
USER=root ; COMMAND=/sbin/service oracle-xe restart

Step 7: Verifying and the rights on the Windows system

In Windows, to view the role definition, you can open the Authorization Center in the System Tray, the role definitions tab shows the applications defined for the role, double clicking provides a deeper dive.
 
To use your privileges, in the GUI you can use the Run as role shell extension, pick the role and the application will be launched as defined. Finally, just like with UNIX, privileged elevation will be logged in the Windows Event Log.
 

Step 8: Session Capture and Replay with Audit Analyzer
Audit analyzer provides a very neat view of what's going on with your audited systems;   in the left pane you have queries and categories, on the right side you can see the sessions.  The columns include the AD user, the client and server systems, the status of the session, etc.


If you drill down into a session, you can see an index of the commands or events that happened during the session.


Looking at a replay, provides you with the event data +  a video of the terminal or Windows session.


Reconstructing what happened (especially on Windows platforms) is as simple as just watching and controlling like a DVR.


Finally, let's look at this scenario and do some testing:

This article is a repost of  a two-part series I wrote for the Centrify Community.

Sunday, December 28, 2014

Business Cases - Web-Mobile SSO Planning Session II: Apps

Planning for Applications

When we plan for Applications (Web or Mobile), we need to think about different strategies.  These types of questions arise:
  • How will the application be published?  
    Centrify provides the user portal, however, depending on your environment, you may have an intranet or content management platform that is used as a hub for applications.
  • What is the policy to access these applications?
    Apps can have different assurance requirements.  Maybe certain portions of the HR app are for intranet-only access with step-up (or two-factor) authentication.  Maybe your Netsuite-based ERP should only be available from inside of the United States.
  • Who should be entitled to access each app?
    Your security team may want to grant access based role or job function.  Centrify User Suite uses AD or Cloud Directory principals for app visibility.
  • What are the authentication capabilities of the app?
    Modern (especially cloud-based apps) provide federation technologies (like SAML, etc) but legacy apps don't have those capabilities or aren't available in the current version.  Also (and unfortunately) not all apps may be looking at the corporate directory (e.g. AD) as the identity repository (which can enable Kerberos or NTLM).  CUS offers the flexibility of password-vaulting and replaying.
  • How is the application provisioning model?
    This topic impacts the bottom-line of the business because the timely deprovisioning of cloud apps can impact the billing depending on how the application provider is metering the usage of the application.  In addition, some apps need to have entitlements provisioned as well for the purposes of role-based access.
  • What is the strategy for on-premise apps?
    Are these apps accessible via an existing VPN infrastructure (e.g. CheckPoint, Cisco, Microsoft's DirectAccess or others) or will you make use of the Centrify App Gateway (VPN-less access)?
These are high-level categories, there are advanced topics like timeouts, attribute-mapping, provisioning of certificates for federation trust, etc; but we will cover each scenario individually.

We will start by publishing these Web applications:
  • On-premises SharePoint (as a shortcut)
  • On-premises Apache or Java-based apps (leveraging NTLM, Kerberos & ADFS-less WS-Fed apps)
  • Google Apps
  • Salesforce
  • Office365.
Later we'll move on to Mobile apps on the Google Play and Apple App Store.

Monday, June 30, 2014

Troubleshooting: How to Spot Configuration Issues

Configuration issues can be hard to find.  The issue could be as simple as a missing item, as challenging as an issue introduced during the troubleshooting process or as complex as a configuration item that was set up and conflicts with the current objective.

Spotting Identity Issues with Identities and Role Definitions and Assignments


The most common identity configuration issues have to do with:
About Identity Overrides
Identity overrides can be used to assign an AD user more than one Unix Identity.  Overrides can happen at the Zone, Child Zone or Computer Levels.  Although identity overrides showcase the flexibility of the Centrify approach to UNIX identity management, they are generally a very bad idea.  Overrides promote identity fragmentation within the solution and in specific use cases (like filers) can be a challenge.  Ultimately Identity overrides promote what's known as a Centralized mess.  Administration of identities is centralized in AD but the UNIX namespace is not rationalized.

Nonetheless, overrides can be good for: migrations while rationalizing a namespace, legacy systems, mergers and acquisitions between different UNIX environments and even one-offs.

Classic zones traditionally had used the nss.passwd.override parameter, this troubleshooting purposely ignores this parameter since classic zones are not covered in this blog.

Determining Identity Overrides
The agent will use the PAMGetUnixName call to determine the user's UNIX login name, the key items to remember here are:

a) Is this change effective?
b) Is this a system local override (bad idea)?  If it is, has the centrifydc daemon been restarted?

The best way to make sure that system local overrides are effective is to restart the agent.  This is the only identity-related time that the agent has to be stopped and started.  The behavior varies in the latest versions of the agent, but I'd do a restart to be sure.

Spotting Authorization Issues


For RBAC to work, roles have to be effective, properly created, properly assigned and properly scoped.
The most common authorization issues have to do with:
  • Misconfigured Role
  • None or missing rights in Role
  • Improperly defined roles (another topic)
  • Unassigned Roles
  • Poor or Wrong scoping
Role configuration issues

1. Role is time-bound: this happens when the role has a time restriction and the user complains that they can't log in at certain times.

2. Role is not configured properly (System Rights):   this is very common. A role is created and properly assigned, but the role creator forgets to set the attributes for the role.  This pic illustrates the main issues:

3. Audit is being enforced (required):  the end user can log in to systems with standard edition, but not enterprise edition.

4. Roles that do not contain any rights:  this is very common.  A role is properly set up and properly assigned, but the creator forgets to add the proper PAM login or commands.  From UNIX, you can run an elevated dzinfo on the target user that is having the issue with the role.

$ dzdo dzinfo yash
...
  PAM Application  Avail Source Roles
  ---------------  ----- --------------------


Privileged commands:
  Name             Avail Command               Source Roles
  ---------------  ----- --------------------  --------------------
  (yash has no privileged command rights)

This excerpt of dzinfo indicates an empty role (no PAM or privileged commands); a role needs at least a PAM right to allow the asignee of the role to log in.  You can also verify this on Access Manager by clicking on the role in the left pane and looking at the detail in the right pane.

5. Unassigned Roles

The RBAC cadence in Access Manager is as follows:
  1. Create the PAM rights and Commands
  2. Create and configure the role
  3. Assign the rights to the role
  4. Assign the role to an AD principal (preferably a group) at the correct scope  (zone, child zone, computer role or computer (override))
  5. Populate the group and make sure the user's have UNIX identities in the zone.
Unfortunately a lot of end users think that by performing steps 1 to 3, the role is already assigned and to make matters worse, the design may make matters harder or easier to troubleshoot.  My recommendation is:
  • Identities are assigned at the highest levels with overrides used as a last resort.
  • Role assignments are performed at the computer role or child zone (with high-level roles assigned for a very small set of trusted administrators)
  • Very rarely use system overrides.
The tools available to perform high-level troubleshooting are:

a) The user's effective rights utility of Access Manager:
Do not attempt to troubleshoot at the system level if things don't look correctly here (it may be a time issue). 

b) The dzinfo command
c) The Centrify Report Center

6.  Role assigned, but expired

With Centrify, UNIX (or Windows) roles can be assigned during a specific window of time (break/fix, change control, etc).  An expired role can stop the user from logging in or performing admin duties.


Bottom-line, understanding why you're doing what you're doing is crucial, along with a configuration that makes sense.

Saturday, December 28, 2013

Basics: UNIX-Enabling Active Directory Users

Background

In a previous posting we discussed how UNIX systems identify users.
By default, UNIX/Linux systems using Centrify in Zone mode do not allow any user to log in to the systems unless they have:
  1. A UNIX Identity (login, UID/GID, Home, Shell and GECOS)
    This is what we call "UNIX-enabling" a user (hence the title of the posting)
  2. A role that allows the user to log-in.
UNIX-enabling simply means to provide a user (or a group) a UNIX identity in a Centrify Zone in Active Directory

Since we have established the Plan-Do-Check-Adjust model.  Here is the model for UNIX identities and Access

(Plan)ning UNIX Identities

  • Having a proper naming and identification strategy
    • What is the right login name?  Are there systems that don't like more than 8 characters?  (like HP-UX or AIX)
    • Does it have to be programmatically derived
    • What are the considerations for home directories?  Is there a central filer?
    • Is there an enterprise Shell?
    • Does anything need to be added to the GECOS field?
    • Are there different primary groups and secondary groups (other than private)?
  • What is the current state?
    • Is the namespace normalized(*)? Or does it need to be cleaned up?
      Are there users with different UIDs across systems?
      Are there different GID definitions for the same system?
      Are UNIX group memberships uniform?
    • Does the organization engage in Mergers and Acquisitions?
  • What will be the strategy if the company acquires another organization that has UNIX systems?
  • Are Samba or NFS in use?
(*) normalization is the process of rationalizing the names pase so everyone has a unique UNIX identity across the enterprise.  This is not a pre-requisite to deploy Centrify.

UNIX-enabling Users with Centrify (Do)

Users can get UNIX profiles using various methods:
  • Manually via Access Manager., Active Directory Users and Computers or ADSIEdit
  • Automatically via Centrify Zone Provisioning Agent
  • Automatically with any programming interface that can manipulate AD  (On Windows using vbscript, PowerShell, etc, and on UNIX/Linux using adedit).

Manual Method 1:  From Windows using Access Manager

  1. In Access Manager, expand the Zone, then UNIX Data, and right click Users.  
  2. Select Add Users to Zone
  3. In the Find box, type the name of the AD User account that is going to be enabled.  Select it and press OK
  4. Now, check all the boxes to pick the defaults OR, override each value to match your needs.

Manual Method 2:  From Windows using ADUC

Note: ADUC needs to have the Centrify Profile tab installed and activated
  1. In ADUC, right click the user object to UNIX-enable and select Properties
  2. Go to the Centrify Profile tab and select Add.  
  3. In the find window, press find and select the zone that the user will be added to.
  4. Follow the instructions from Step 3 above.

Manual Method 3:  From UNIX using adedit

Adedit is a TCL-based programming language included with the Centrify agent.
  1. On a Centrified UNIX system, type /usr/bin/adedit
  2. Bind to the domain with the proper credentials
    bind corp.contoso.com
  3. Select the zone to add the user to
    select_zone "cn=HQ,OU=Zones,OU=UNIX,dc=corp,dc=contoso,dc=com"
  4. Unix-enable the user
    new_zone_user jessie.matthews@corp.contoso.com
  5. Specify the UNIX identity
    set_zone_user_field uname jmatthews
    set_zone_user_field uid 0x8000000
    set_zone_user_field gid 0x8000000
    set_zone_user_field gecos "Jessie Matthews"
    set_zone_user_field home "%{home}/%{user}"
    set_zone_user_field shell "%{shell}"
    Note:  the 0x8000000 code after UID/GID specifies to use uniquely genereated code that is derive dfrom the AD object's SID.  Also, the variables under home and shell, allow this information to be picked based on the system's defaults.
  6. Verify the information
    show
    Bindings:
            corp.contoso.com: dc1.corp.contoso.com
    Current zone:
    CN=HQ,OU=Zones,OU=UNIX,DC=corp,DC=contoso,DC=com
    Current nss use:
    jessie.matthews@corp.contoso.com:jmatthews:1149240406:1149240406:Jessie Matthews:%{home}/%{user}:%{shell}:
  7. Save the Object
    save_zone_user

Manual Method 4:  From Windows using Centrify PowerShell

  1. On a Windows system with the Active Directory or Centrify PowerShell Modules
  2. Open PowerShell or PowerShell ISE as a user that has the rights to add and modify user profiles in the zone.
    Load these modules:
    Import-Module ActiveDirectory
    Import-Module Centrify.DirectControl.PowerShell
  3. Bind to the Centrify Zone in question
    $zone = Get-CdmZone -Name "HQ"
  4. Unix-enabling Jessie with defaults
    New-CdmUserProfile -Zone $zone –User jessie.matthews@corp.contoso.com -login jessie.matthews -UseAutoUid -AutoPrivateGroup –HomeDir "%{home}/%{user}" –Gecos "%{u:displayName}" –Shell "%{shell}"

Granting a UNIX Role

Once the user has an identity, the next step is to give him (or her) a role that grants them the ability to log in(*).  By this point a roles exercise has been conducted and the proper AD groups have been assigned UNIX roles.  This means that ADUC, Scripting/Programing, Identity Management Solutions and many other tools
(*) This is because users can be listed in a system, with no rights to log-in.

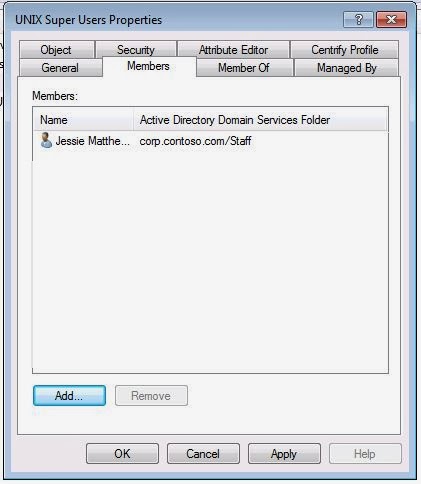
From Windows using ADUC
  1. Open ADUC and find the AD Group that has been assigned the role.
  2. Go to the Members tab and Click Add
  3. Find the newly UNIX-enabled user and Press OK Twice.

From UNIX Using adedit
  1. Log into UNIX/Linux with an account that can modify the group (or use kinit) and open adedit
  2. Bind to the domain
    >bind corp.contoso.com
  3. Add the ade_lib library
    >package require ade_lib
  4. Use the add_user_to_group function
    >add_user_to_group "jessie.matthews@corp.contoso.com" "UNIX Super Users@corp.contoso.com"
With PowerShell
Add-ADGroupMember "UNIX Super Users" -members "Jessie.Matthews"

At this point, when the cache refresh interval hits in the UNIX computer, the user will have the ability to log in with the corresponding role.


Verify the Access (Check)

There are multiple ways to check that the right identity and access have been provided:
  • In Windows:  via ADUC, Access Manager's User Effective Rights or Reporting
  • In UNIX with the adquery command and the dzinfo command.

To Verify the Identity in ADUC or Access Manager
  1. In ADUC, go to the user's properties, in the Centrify Profile tab, and double-click the entry.
  2. In Access manager, go to the Zone/UNIX Data/Users and double-click the user
  3. In any UNIX/Linux System in scope, run the adquery user <user name> command:
    $ adquery user jessie.matthews
    jessie.matthews:x:1149240406:1149240406:Jessie Matthews:/home/jessie.matthews:/bin/bash
To verify the level of access:
  1. In Access manager, go to the Zone/UNIX Data/Users and right-click the user and select "User Effective Rights"
  2. Select the system that you want to verify the level of access and review the settings.
Or
1. In Access Manager, go to the Reporting node.  Select the User's report or the UNIX User Effective Rights report, expand it, right click current and select Display Report

Review the systems that the user has access and what rights have been granted.
                                                                               Or 
In any System in scope, run the dzinfo <username> command.


(Adjust)ing the Identities or Roles assigned to a user

Due to various reasons there may be a need to adjust the user's identity or the role(s) that they may have in the systems.  Review the previous steps to perform any adjustments.  However, the most common operations are:
a) Identity Overrides:  This is when any of the default settings are modified.  E.g. they system admin does not want to change ownership of files and folders in multiple systems.  At this point he can change the UID/GID of the user to match their existing one.
b) Identity de-provisioning:  A user does not need access to UNIX systems anymore.  At this point their UNIX identity can be removed.
c) Access Changes:  A user may need to have access to more (or less systems) than required.  This may mean that they need to be added (or removed) from role assignments at the Computers Group level.
d) Temporary Access to a single or multiple systems:  These are normally exceptions. They can be dealt with temporary role assignments or computer level overrides.